

Setting up the ZED in Isaac™ Sim
Setting up the ZED in Isaac™ Sim
This tutorial guides you through setting up a ZED camera in NVIDIA® Isaac™ Sim and connecting it to the ZED SDK. If you’re not familiar with Isaac™ Sim, make sure to go through the official Isaac™ Sim documentation.
This tutorial assumes the ZED Camera extension is already installed and enabled. If not, follow the installation steps on the Get Started page first.
Add a camera to the scene
The camera is defined by two properties: a Camera Model (base model) and a Lens Type. The lens types are Wide, Narrow (the 4mm lens) and Fisheye.
Supported camera models
Mono cameras (ZED X One) can also be paired to create virtual stereo cameras.
The extension ships USD models for all the camera bodies in the exts/sl.sensor.camera/data/usd folder. The Narrow and Fisheye lenses are variants of their model’s USD: select the desired lens with the Lens dropdown on the camera prim in the Property panel (e.g. ZED_X_Nano offers only Wide; Fisheye is only available on ZED_XONE_S). The streamer node picks up that choice automatically.
Select the desired model USD and drag it into the Viewport or the Stage view.
You will notice that the prim has a base_link XForm; this is the reference frame of the mounting point on the bottom of the camera.
ZED Cameras panel
The ZED Cameras panel lists every ZED camera in the stage and lets you switch lenses without opening the Property panel. It is docked next to the Content browser and opens automatically when Isaac™ Sim starts. If you close it, reopen it from Stereolabs → ZED Cameras.
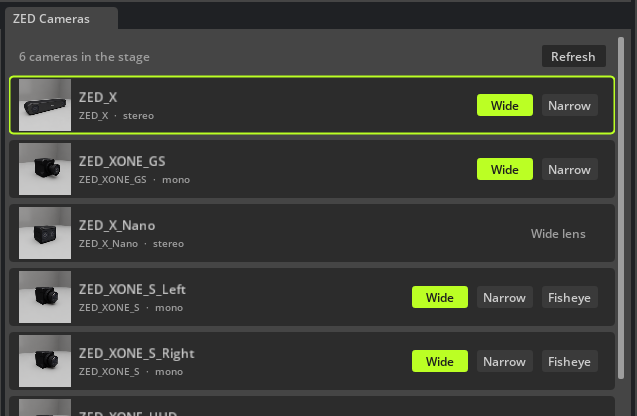
Each row shows a camera’s thumbnail, prim name, and model, tagged stereo or mono. To work with a camera:
- Switch its lens: click one of the Wide / Narrow / Fisheye buttons. Only the lenses the model supports are shown, and the current lens is highlighted. Fixed-lens models (ZED Mini, ZED X One UHD, ZED X Nano) display their single lens as a plain tag.
- Select it in the stage: click anywhere on its row. The selected camera’s row is outlined.
Switching the lens here edits the same Lens variant as the camera prim’s dropdown, so the viewport, the streamer node’s detected model, and the streamed calibration all stay in sync.
Build the Action Graph
The simulated camera takes advantage of the ZED SDK streaming input to stream its data into the ZED SDK.
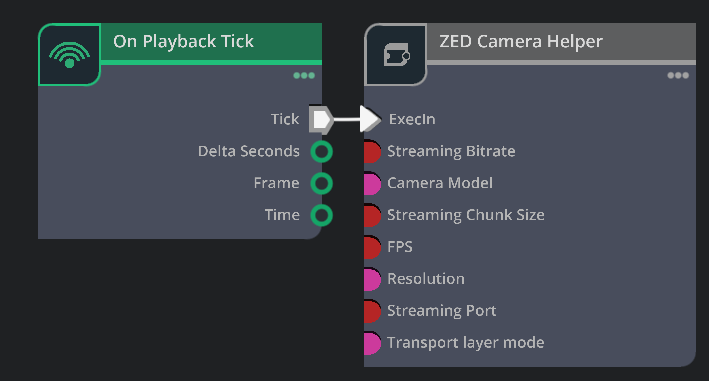
To initiate the simulated ZED camera streaming, we will use the ZED Camera Helper OmniGraph node. To stream data at each simulation tick, drag and drop this node into the graph (you can type zed in the search panel to quickly find it), set its ZED Camera prim target to the camera in the scene, and connect its ExecIn input to the Tick output of the On Playback Tick node.
The ZED Camera extension also includes a lower-level ZED Stream node. For most use cases, make sure to use the ZED Camera Helper node (or the ZED Camera One Helper node for monocular ZED X One cameras).
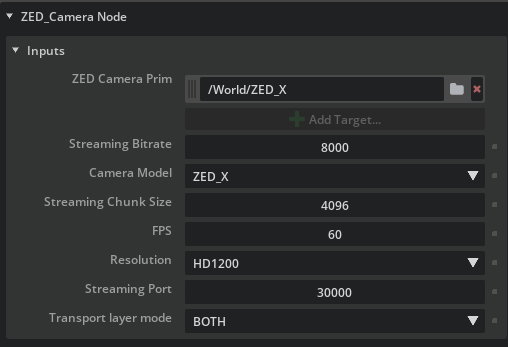
You can also configure the streamer from the Property panel on the right:
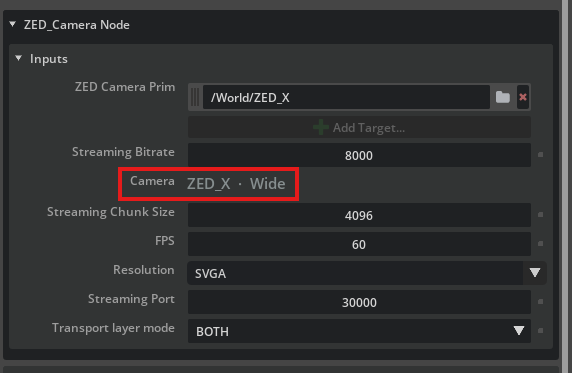
And that’s it — you can now start the simulation to stream your stage into the ZED SDK!

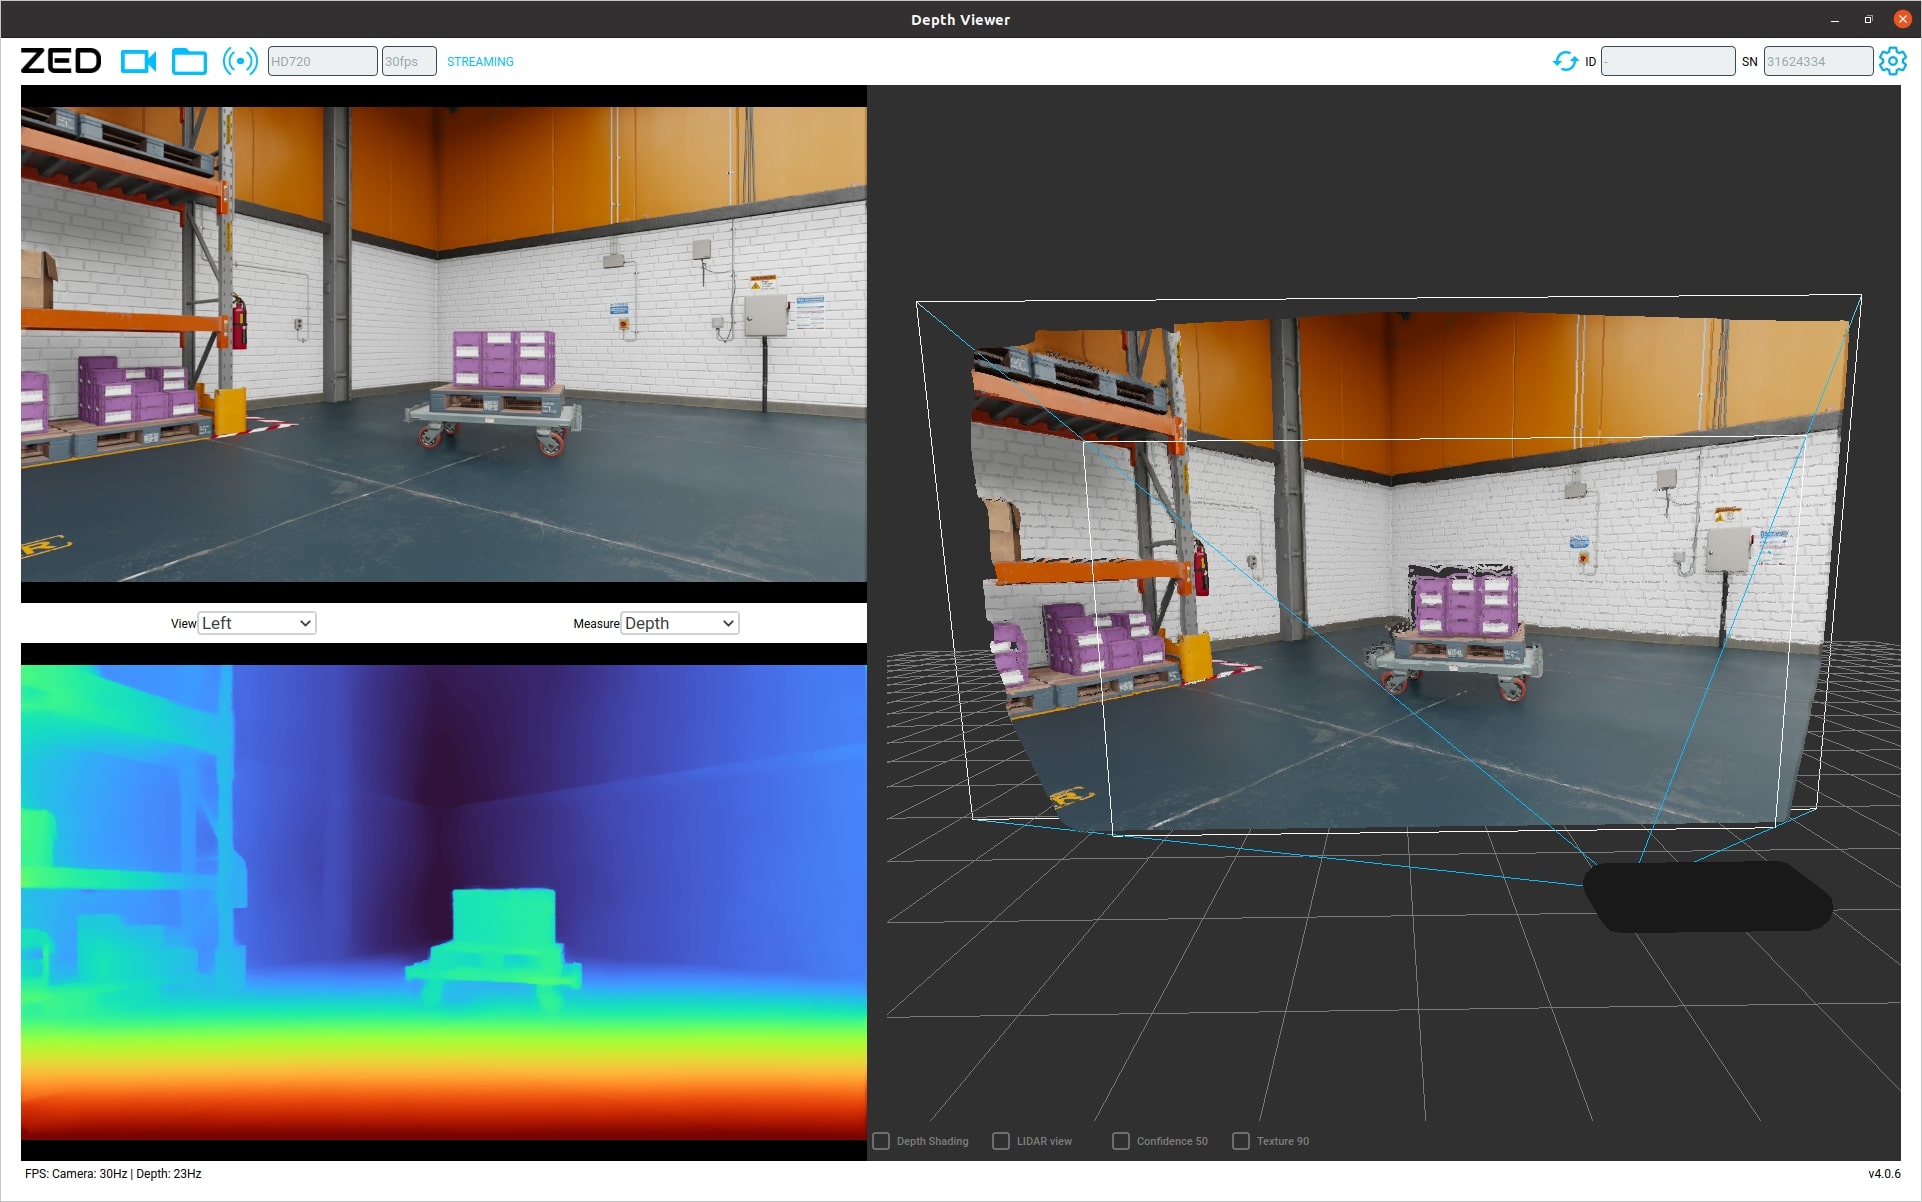
A simulated ZED streaming live from Isaac™ Sim into ZED Depth View, with the stereo pair and the ZED SDK’s point cloud.
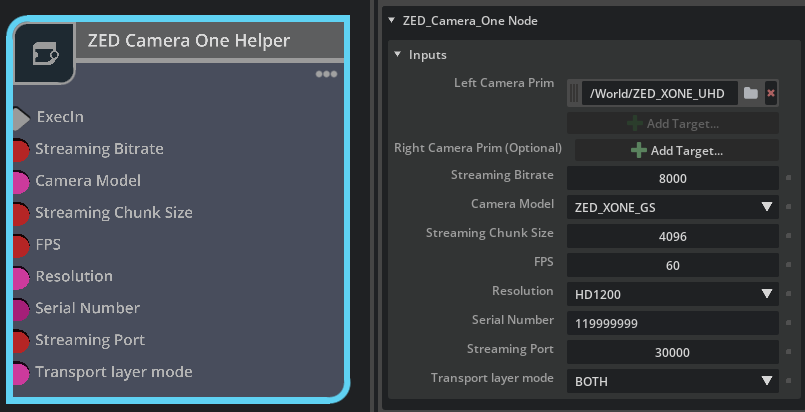
To stream a monocular camera (ZED X One), use the ZED Camera One Helper node instead.
The Serial Number input is only used for virtual stereo cameras.
Streaming depth
By default, the ZED Camera Helper streams the left + right stereo pair. You can instead stream the left image together with a depth map directly into the ZED SDK: enable the Stream Depth property on the node.
The depth is Isaac™ Sim’s ground-truth renderer depth, delivered to the ZED SDK through its ingestCustomDepth feature (requires ZED SDK ≥ 5.4.0). It is useful for feeding a known-good depth map into a ZED SDK pipeline for testing. The streamed depth is fixed at 896×512.
On the ZED Camera One Helper node, Stream Depth requires a virtual stereo pair (both camera prims set): a single mono camera cannot produce depth on real hardware, so the option is ignored.
ZED Sim2Real camera model (experimental)
This feature is experimental and under active development; its behavior and calibration may change.
By default the streamed image is a clean render. To narrow the sim-to-real gap when validating against the ZED SDK, open the ZED Sim2Real group on the ZED Camera Helper (or ZED Camera One Helper) node and turn on Apply. This runs a calibrated model of the real ZED X camera before the frame is encoded, reproducing:
- Lens blur, vignetting, and corner color shading
- Temporal auto-exposure and white balance
- Color correction and a ZED tone curve
- Sharpening and gain-coupled sensor noise
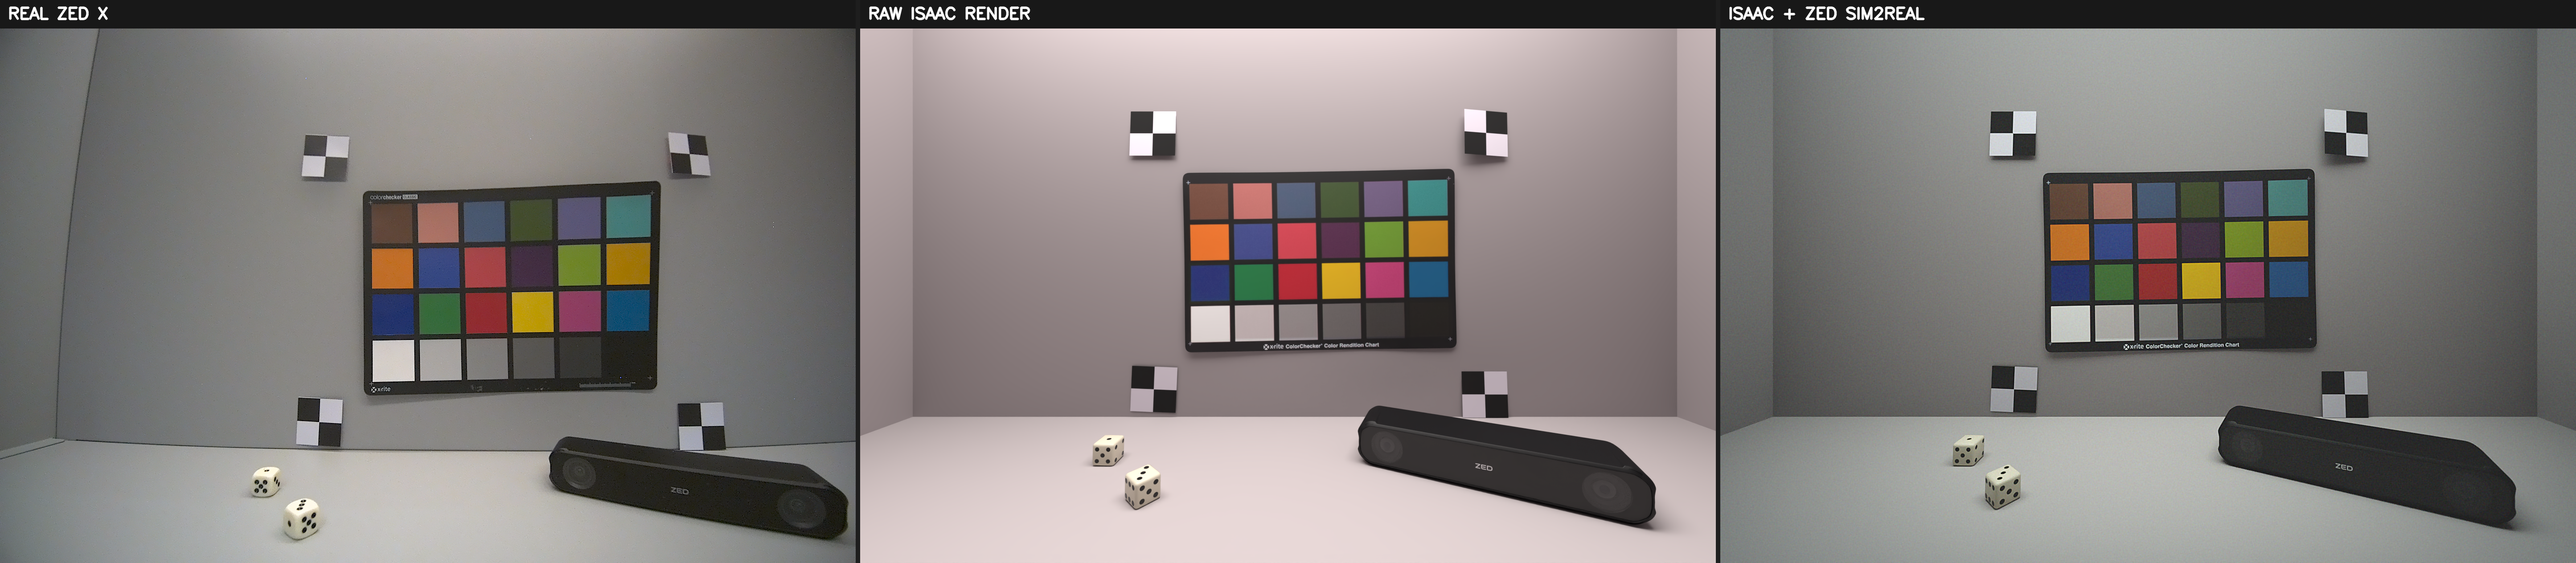
Left: real ZED X. Middle: raw Isaac™ Sim render. Right: the same render with the ZED Sim2Real model applied.
The Scene Lux property sets the assumed scene illuminance: leave it at 0 for a bright scene, or use a positive value to simulate a dimmer one (the lower the lux, the darker and noisier the image). Both Apply and Scene Lux can be changed live while the timeline is playing, so you can tune the look without stopping the simulation.
The model runs on the GPU through the sl_zed_sim2real library shipped with the extension. If that library is missing, the frame is streamed unmodified.
Using IPC
It is possible to stream images to the ZED SDK using IPC instead of NETWORK streaming for better performance. This is available when streaming to the same machine, on both Linux and Windows (since extension v5.2.0).
To use IPC, set the Transport layer mode property of the ZED Camera Helper node to IPC or BOTH.
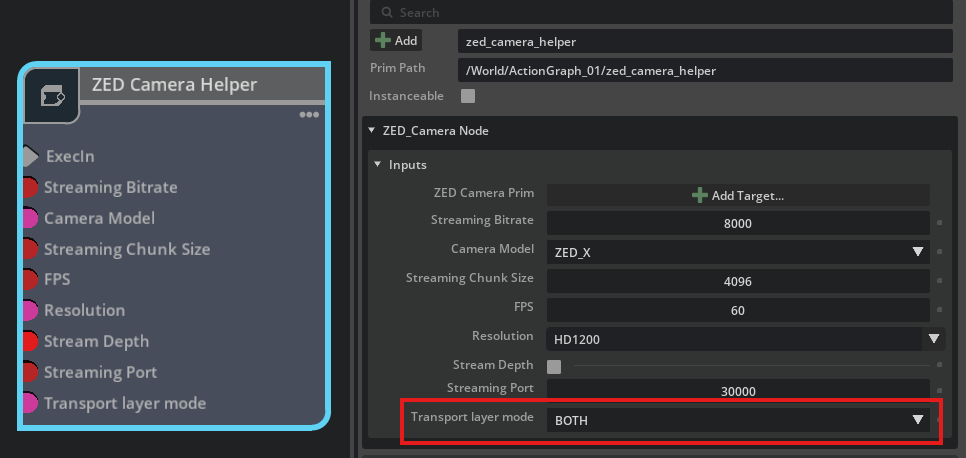
To receive a stream using IPC, the IP address must be set to 127.0.0.1 or localhost.
Multi-camera streaming
You can stream any number of simulated ZED cameras simultaneously: several cameras on a single robot (for example a front ZED X plus ZED X One side cameras), or several robots each carrying their own. Stereo and mono models can be mixed freely in the same scene.
- Add one ZED Camera Helper node per camera (ZED Camera One Helper for mono cameras); a single Action Graph can drive them all.
- Give each camera a unique even Streaming Port (
30000,30002,30004, …). Each camera arrives as an independent stream, so the ZED SDK or the ZED ROS 2 Wrapper sees them exactly like separate physical cameras. - In large scenes, lower the FPS or Resolution of individual cameras to reduce GPU cost.
If you use ZED Fusion, the fusion_calibration example generates the Fusion calibration file directly from the camera prim poses in your stage.
Create a Virtual stereo Camera
You can also create virtual stereo cameras by pairing two ZED X One cameras together, which requires a calibration step.
- First, open the Extensions window and enable the
ZED Calibration Exporterextension in the Third-Party tab. - In the top menu bar, click
Stereolabs->ZED Calibration Exporter. A new window will open. - Set the left and right cameras by selecting each prim in the Stage and clicking
Select. - Select the Camera model.
- Change the Serial Number if necessary.
- Click Generate. A calibration file (.conf) will be generated and saved on your machine.
- Then, in your Action Graph, add a
ZED Camera One Helperand set the left and right cameras. - You also need to set the serial number chosen during the calibration process.
Test it in ZED DepthViewer
Once streaming is started, you can test it by connecting the ZED DepthViewer to the simulated camera. Simply launch the tool, click on the streaming input button, set the IP Address (the streaming computer) and the port (set in Streaming port), and you should see the depth data coming from the virtual environment.
See also
- Using the ZED with ROS 2 in Isaac™ Sim — send the streamed ZED data to a ZED ROS 2 Wrapper node instead of the ZED SDK directly.
- Using the ZED in Isaac Lab: read stereo RGB and depth as in-process tensors, with no ZED SDK, for reinforcement learning and imitation learning.
- SDK-free depth capture: the extension also provides a ZED Depth OmniGraph node that captures RGB + renderer depth without the ZED SDK, plus standalone capture scripts.