ZED Studio
ZED Studio is an advanced tool that lets you verify that both software and hardware are working properly and that all ZED cameras connected to the host are recognized.
ZED Studio allows you to visualize multiple cameras’ video feeds, test camera controls, and check performance when multiple cameras are used simultaneously. You can use this tool with both Stereo and Monocular cameras.
ZED Studio also provides the easiest way to record and play back multiple camera streams in SVO format, which is the native video format of the ZED SDK. SVO files can be used to replay recorded data in your applications, allowing you to test and develop without needing a live camera feed.
Finally, ZED Studio can also become a ZED Local Streaming server for each of the connected cameras, allowing you to stream the camera video feeds over the local network to other devices or applications that support ZED streaming.
Run ZED Studio
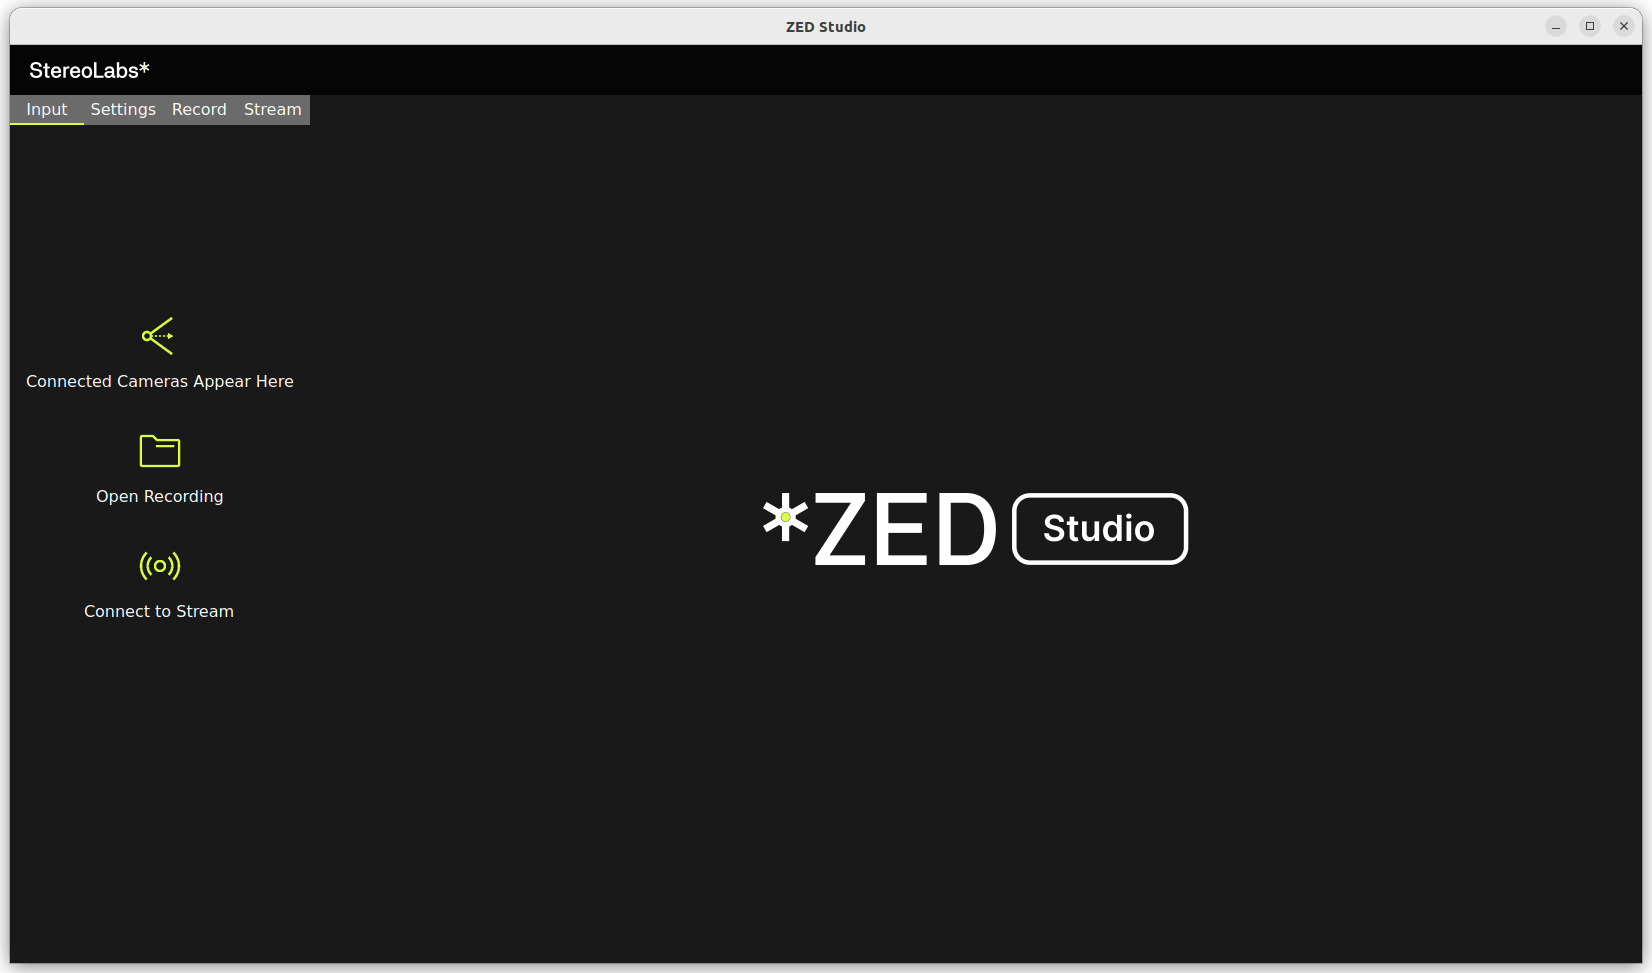
After connecting your cameras and installing the ZED SDK, you can run ZED Studio to visualize the camera feeds and test their features.
ZED Studio is an application for ZED live preview and recording. It lets you change video resolution, frame rate, and camera parameters.
On Windows, you can find ZED Studio in the Start menu under the ZED SDK folder. You can also run it from the command line by navigating to the ZED SDK installation directory: C:\Program Files (x86)\ZED SDK\tools\ZED Studio.exe.
On Ubuntu, you can run ZED Studio from the terminal by typing ZED_Studio or by navigating to the ZED SDK installation directory: /usr/local/zed/tools/ZED_Studio.
Live Camera Playback
When you launch ZED Studio, it automatically detects all connected ZED cameras and opens their live streams in a grid view.
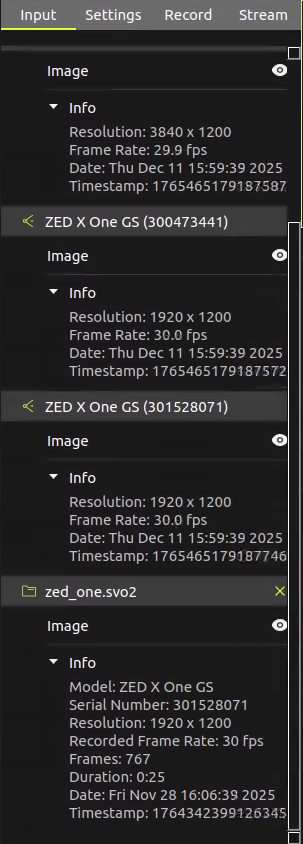
All the connected ZED cameras are listed in the left panel. You can select which cameras to visualize by opening or closing the eye icon below each camera serial number.

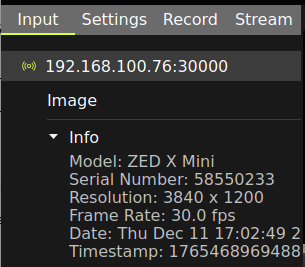
The Input tab in the left panel allows you to see all the connected cameras and their status, including:
- Camera Model and Serial Number
- Resolution
- Real Frame Rate
- Current Date and Time
- Timestamp of the last received frame
Change the Settings
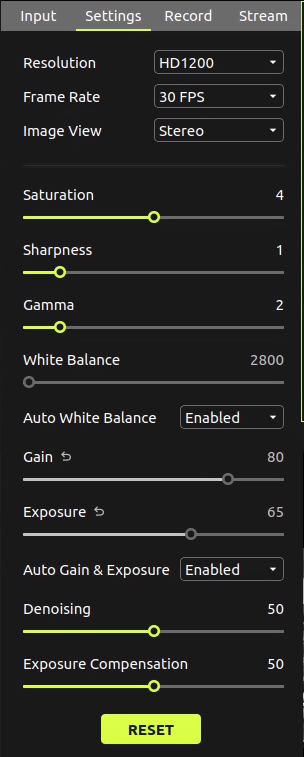
Select one of the live streams in the grid view on the right side of the GUI and click on the Settings tab to change the video resolution, frame rate, image view, and control the image settings.
General Settings
You can change the following general settings:
- Resolution: Select the desired video resolution from the dropdown menu.
- Frame Rate: Select the desired video frame rate from the dropdown menu.
- Image View: Choose between different image views, such as
Left,Right, orStereo. When visualizing a monocular camera, only theMonoview is available.
Camera Settings
You can control the image parameters, including:
- Brightness: Adjust the brightness of the video feed.
- Contrast: Adjust the contrast of the video feed.
- Saturation: Adjust the saturation of the video feed.
- Hue: Adjust the hue of the video feed.
- Gain: Adjust the gain of the video feed.
- White Balance: Adjust the white balance of the video feed.
- Exposure: Adjust the exposure of the video feed.
- Sharpness: Adjust the sharpness of the video feed.
- Gamma: Adjust the gamma of the video feed.
- Auto Gain & Exposure: Enable or disable automatic exposure adjustment.
- Auto White Balance: Enable or disable automatic white balance adjustment.
- Denoising: Adjust the denoising filter strength.
- Exposure Compensation: Adjust the exposure compensation for the video feed.
These settings allow you to fine-tune the camera parameters to achieve the desired video quality and performance. You can adjust these parameters in real-time while the camera is streaming live or receiving network streams.
Some of these parameters may not be available for all camera models or video modes. The available parameters depend on the camera model and its capabilities.
Click the RESET button to reset the camera parameters to their default values.
SVO Playback
You can open an SVO file for playback by clicking on the folder icon in the top icon bar.
![]()
You can open multiple SVO files simultaneously, each in its own stream window. You can select both Stereo and Monocular SVO files.
As with live streams, you can enable or disable the SVO stream visualization by clicking on the eye icon below each SVO file name in the left panel.
When you are in SVO playback mode, you can start, stop, or pause the playback using the playback controls at the bottom of the relative stream window. You can also navigate through the recorded frames using the slider.
![]()
The Input tab in the left panel allows you to see the features of the opened SVO files, including:
- Camera Model
- Camera Serial Number
- Resolution
- Recorded Frame Rate
- Frame Count
- Duration
- Frame Date and Time (at recording time)
- Timestamp of the last received frame (at recording time)
Local Network Stream Playback
You can connect to a ZED streaming server by clicking on the network icon in the top icon bar.
![]()
You can connect to a ZED Local Network Stream by entering the server IP address and port number in the dialog window.
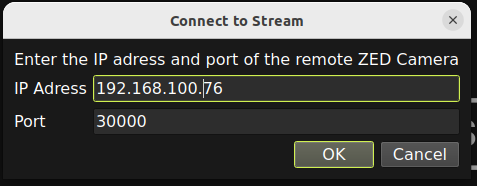
As with live streams, you can enable or disable the network stream visualization by clicking on the eye icon below each stream name in the left panel and visualize the stream information in the Input tab.
SVO Recording
When you are receiving live streams from multiple cameras (or network streams), you can record each of them in SVO2 format by clicking on the Record button in the Record tab after selecting the desired stream in the grid view.
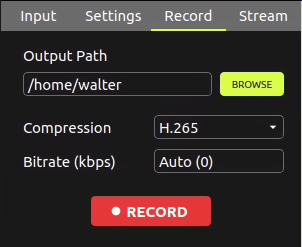
You can simultaneously record multiple streams from different cameras (or network streams). Each recording will be saved in a separate SVO file.
To select the stream to record, hold the Shift key and click all the desired streams in the grid view before clicking the RECORD button.
You can configure the following recording options:
- Output Path: The folder where the SVO file will be saved.
- Compression: The compression mode for SVO files.
- Lossless: No loss of quality, but larger file size.
- H.264: Good balance between quality and file size.
- H.264 Lossless: High quality with some compression.
- H.265: Better compression than H.264, resulting in smaller file sizes.
- H.265 Lossless: High quality with better compression than H.264 Lossless.
- Bitrate: The target bitrate for the video stream. Higher bitrates result in better quality but larger file sizes. You can leave this value at
Auto (0)to let the application choose the optimal bitrate based on the selected resolution and frame rate.
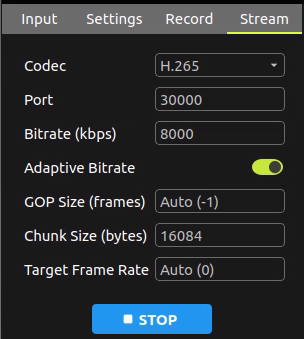
Local Network Streaming Server
You can start a Local Streaming Server for each of the connected cameras by clicking on the Stream tab after selecting the desired live stream in the grid view and clicking the STREAM button.
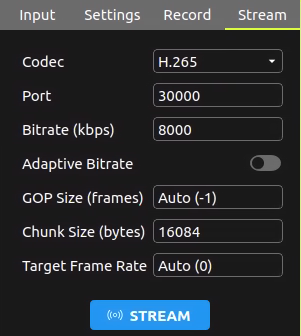
You can configure the following streaming options:
- Codec: The video codec used for streaming. You can choose between
H.264andH.265. - Port: The network port used for streaming. Make sure to use different ports for each camera stream.
- Bitrate (kbps): The target bitrate for the video stream. Higher bitrates result in better quality but require more network bandwidth.
- Adaptive Bitrate: Enable or disable adaptive bitrate streaming. When enabled, the application will automatically adjust the bitrate based on network conditions to ensure smooth streaming.
- GOP Size (frames): The Group of Pictures (GOP) size in frames. A larger GOP size can improve compression efficiency but may increase latency.
- Chunk Size (bytes): The size of each data chunk sent over the network. Larger chunk sizes can improve streaming performance but may increase latency.
- Target Frame Rate: The desired frame rate for the streamed video. You can set this to match the camera’s frame rate or choose a lower value to reduce bandwidth usage. Set to
Auto (0)to use the camera’s frame rate.
When the streaming server is running for a camera stream, you can find the information on the left side of the top bar of the image view window, showing the server IP address and port number:
![]()
You can stop the streaming server by clicking on the STOP button in the Stream tab.
Command Line Options
ZED Studio provides several command line options to customize its behavior at startup: