Environmental Mapping with Unity
In this tutorial, you will learn how to build a procedural mesh of your room and create applications with real world navigation and physics.
Introduction
Spatial Mapping captures a mesh of your environment, allowing physical interactions between the real and virtual world.
You can use Unity’s Runtime Navigation System to bake the mesh into a navigation mesh (or “NavMesh” for short). This structure describes the walkable surfaces in your space and tells characters where they can walk/move in the real world.
Spatial mapping also allows you to use Unity’s built-in physics engine, adding convincing physical behaviour to virtual objects. They can collide with the real world, bounce off of it and be affected by gravity and other forces present in the real world.
Create a new Project
- Select File > New Project and click Create project.
- Make sure the ZED SDK is installed, and import ZEDCamera.unitypackage.
- Select File > New Scene.
- In the Hierarchy panel, delete the Main Camera.
- Drag the ZED_Rig_Mono prefab into the Hierarchy.
Mapping an Area
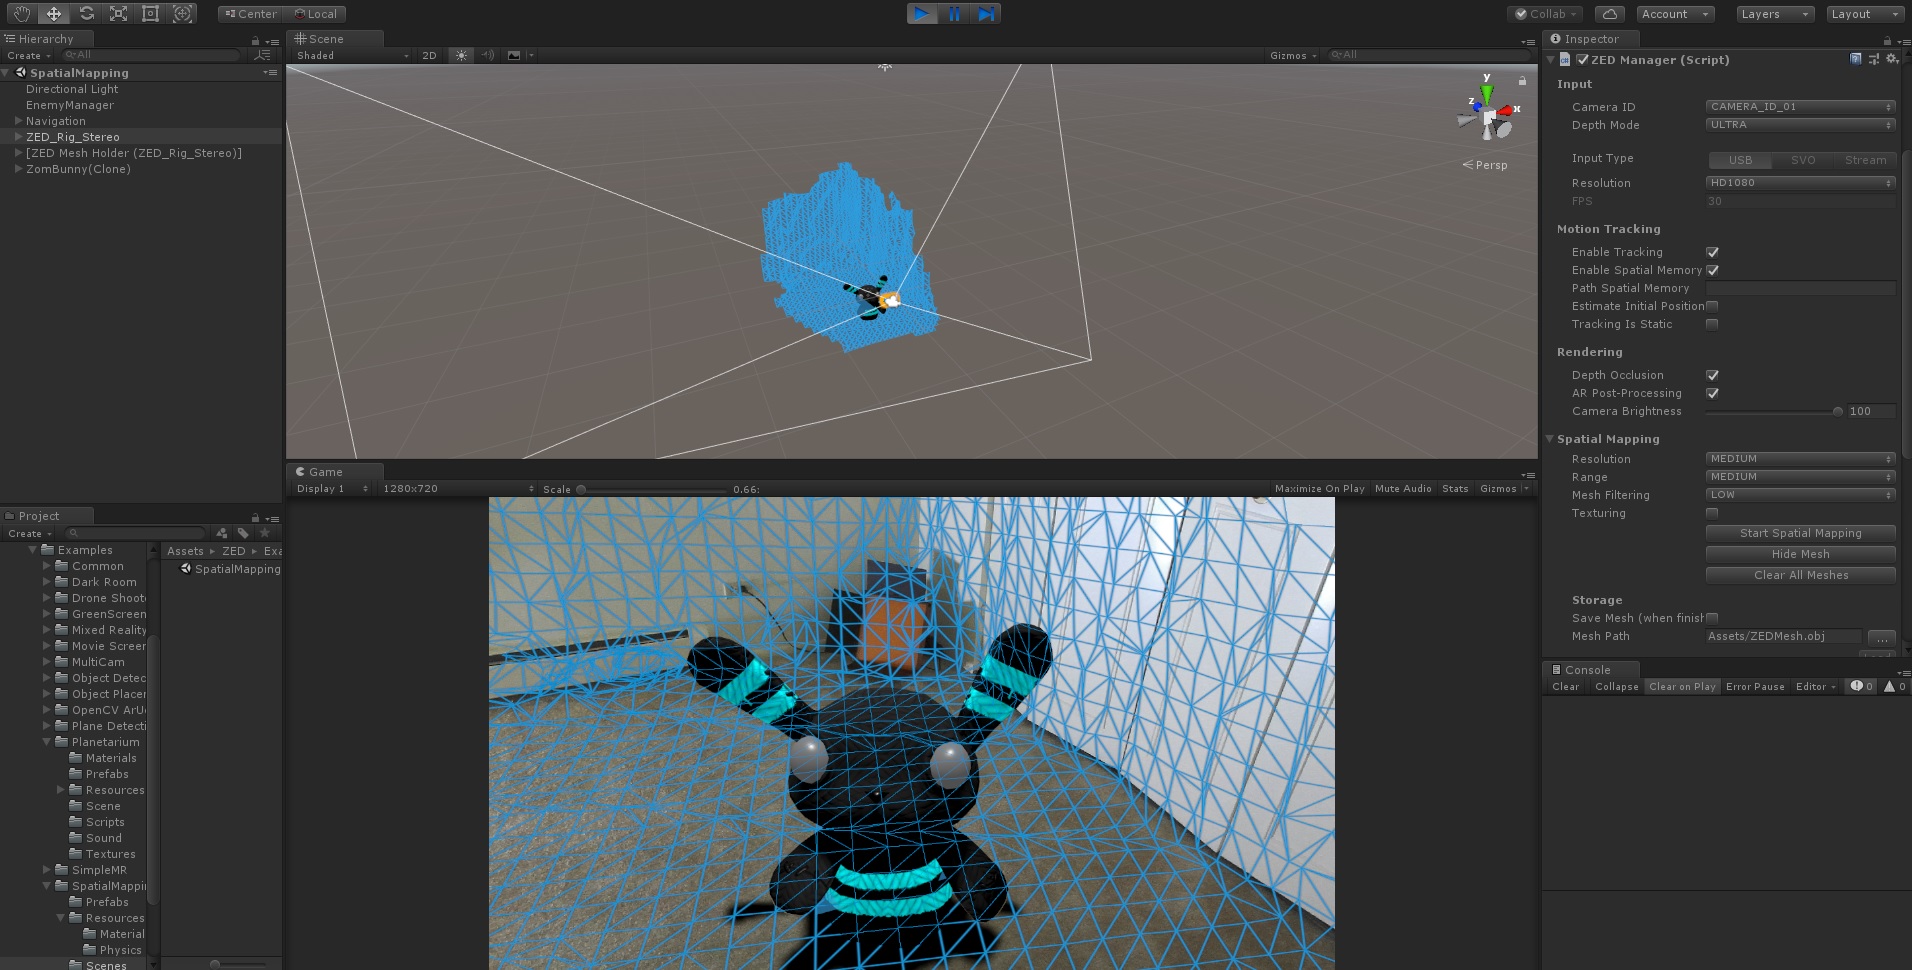
ZEDManager’s Inspector provides a UI for configuring, starting, and stopping spatial mapping. Once started, it will create a procedural mesh within Unity that can be used at runtime, or saved for later.
-
Select the ZED_Rig_Mono prefab you just dropped into the Hierarchy.
-
In the Inspector, Click the triangle next to Spatial Mapping to reveal the options.

For more details on Spatial Mapping parameters, read this section. We recommend using the following set of parameters:
- Resolution =
MEDIUM - Range =
MEDIUM - Filtering =
LOW
Now, let’s start mapping the area.
-
Launch the scene.
-
Press the Start Spatial Mapping button to launch the mapping. Move the ZED around to capture a mesh of your environment - a blue wireframe will indicate which areas you have scanned.
-
When finished, click on Stop Spatial Mapping to stop updating the mesh and start mesh filtering.
Mesh Holder
In the Hierarchy, you will now see a ZED Mesh Holder object storing the mesh of the real-world environment. If you didn’t select the Save Mesh option, the mesh will be temporarily stored in RAM and deleted at the end of the session.
Expand the mesh holder to see the different chunks (submeshes) that compose the global mesh. During procedural meshing, the surrounding area is split up into regions. Each region corresponds to a chunk. When spatial mapping is stopped, these chunks are merged to create larger submeshes. The submeshes have a maximum vertex count of 65535, which is the maximum number of vertices Unity can handle per mesh. The chunks are used to generate the NavMesh and handle complex collisions with the real world.
Using the Navigation Mesh
To add a character that navigates the real world, we will use Unity’s navigation system. Unity can create a Navigation Mesh which is a simplified plane that describes the walkable surfaces of a game. This allows a character to automatically find its path through obstacles.
As of version 5.6, Unity supports Runtime NavMesh building, which allows our plugin to automatically bake NavMesh at runtime using the environment geometry.
Building the NavMesh
The plugin includes a NavMeshSurface.cs script, which builds a NavMesh Surface at runtime.
A NavMesh Surface represents the walkable area for one Agent type. Multiple NavMesh surfaces can be present in a scene.
Once mapping is done, the NavMeshSurface component will collect all chunk sources and build a NavMesh for a given Agent Type.
-
Create a new empty GameObject in the Hierarchy and name it “Navigation”.
-
In the Inspector, click “Add Component” and add a Nav Mesh Surface component.
-
Drag and drop your ZED_Rig_Mono object from the Hierarchy to the NavMeshSurface’s ZED Rig field.
-
Select your Agent Type.
-
Start the scene, and launch Spatial Mapping and map the area.
-
Press Stop Spatial Mapping. The script you just added will generate a NavMesh from the procedural mesh.
-
Toggle between Display Mesh and Hide Mesh to show/hide the NavMesh.
It is not possible to bake a NavMesh at runtime using Window > Navigation > Bake as one would with imported 3D meshes. You need to bake the NavMesh using the scripts provided or Unity’s Components for navigation.
Adding Agents
Let’s place a Bunny character in the scene and make it move in random patterns on the walkable surface.
A NavMeshSurface is required for each type of agent, and an agent of one type cannot use surfaces of other types. This is because the navmesh defines the agent’s mobility around the scene, and different agents have different mobility: taller enemies can step over bigger objects, flying enemies can ignore terrain, etc. The NavMeshSurface component has a drop-down where you select which agent type to bake for.
- Select Humanoid Agent Type.
- Create an empty GameObject and attach the EnemyManager component. The script makes the Bunny move in random patterns on the walkable surface determined by the NavMesh.
- Drag the ZomBunny prefab (not the .fbx file) located in Examples > SpatialMapping > ZomShooter > Prefabs to the Enemy Prefab value in EnemyManager.
- Play the scene, start mapping a large area and when you press Stop Spatial Mapping, the NavMesh is generated and the Bunny character appears in the scene.
The ZomBunny prefab you dragged over is set up with Unity’s NavMeshAgent script. This allows a Unity GameObject to move around a NavMesh while constrained as expected - it can only walk on flat surfaces that are wide enough for it, can walk up ramps and stairs provided they are not too steep, etc.
However, the traditional way of using NavMeshes is to create them before you run a scene. Since we’re building the NavMesh at runtime, the EnemyManager script will disable the ZomBunny at the start and re-enable it once there’s a valid NavMesh present. The ZomBunny prefab also has a custom script called NavMeshAgentController which moves it to a random location on the NavMesh once activated.
Customizing Agents
You may notice that the NavMesh is smaller than expected. This is because the default “Humanoid” agent in Unity is built for a larger creature than our bunny. We can tweak that in Unity’s Navigation window.
- Click on Window -> AI -> Navigation
- In the new Navigation tab, click on Agents at the top.
- Change the Radius value from 0.5 to 0.25.
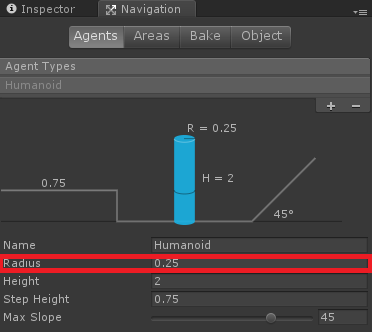
Depending on your environment, you may also wish to adjust the slope and maximum step height to allow the bunny to walk along more surfaces. Complete documentation on Unity agent parameters is available here.
Using Physics
At the end of spatial mapping, the mesh is automatically assigned a MeshCollider component to resolve collisions. We can now throw virtual balls in the real world and let Unity handle physics and collisions with the underlying mesh.
- Add the script BallLauncher located in Examples > SpatialMapping > Scripts to the Camera_Left GameObject.
- Select a ball type with the prefab located in Examples > SpatialMapping > Resources > Physics > Sphere.prefab
- Set Message Instruction to any GameObject in the scene - Camera_Left for example.
- Play the scene and press the space bar to throw bouncing balls into the real world environment!