
Body Tracking
In this tutorial, you will animate 3D avatars based on real-people movements using the ZED SDK AI module.
What is Body Tracking? #
The Body Tracking is very similar to the Object Detection module but is using another highly-optimized AI model to detect 3D people’s skeletons, expressed as keypoints. It can detect up to 70 keypoints on a single person. For more details about the Body Tracking feature, please take a look at the Body Tracking documentation page.
In Unity, we will use this 3D keypoints information (more precisely the orientation of each keypoint) to animate a 3D humanoid avatar based on a person’s movement in real-time.
![]()
Preparing your ZED Camera #
Optimize the AI models #
The Body Tracking module uses AI models that need to be optimized before their first use. The Unity plugin will launch the optimization if necessary but will freeze the Editor for the duration of the process. Thus, we advise you to optimize them externally using the ZED Diagnostic tool located in the ZED SDK installation folder (usually Program Files (x86)/ZED SDK/tools).
The process is described here: How can I optimize the ZED SDK AI models manually?
Ensure Floor Plane detection #
The Body Tracking module can use the floor plane position to make more assumptions. To do so, the floor plane should be visible in the image when starting the module as in this image:

Setting Up the Scene #
Basic Settings #
- Create a new scene and delete the Main Camera
- In the Project window, go to ZED -> Prefabs and drag ZED_Rig_Mono into the Hierarchy
- Select the new ZED_Rig_Mono in the Hierarchy.

- In the Positional Tracking section, make sure Set Floor As Origin is checked. This enables floor detection.
- In the Inspector, set the Resolution to 1080p. This is not required but increases object detection accuracy
- Set Depth Mode to ULTRA. Also not required.
- If your camera is fixed and will not move, enable Tracking Is Static to prevent incorrect drift throughout the scene.

Body Tracking Settings #
Scroll down to the Body Tracking section.

Choose the Body Tracking Model you want, depending on your accuracy/performance needs.
Three body formats are available, you can refer to the Body Tracking Documentation.
Multiple settings are available:
- Body Tracking Model: AI model for detection. You can choose between
HUMAN_BODY_FAST(fast, but less accurate),HUMAN_BODY_MEDIUM(less fast, but more accurate), andHUMAN_BODY_ACCURATE(most accurate, but slower) to track people’s poses. - Body Format: Body format to use with body tracking. Find more information on the Body Tracking page. Note that you will not be able to animate an avatar out-of-the-box using BODY_18, as our sample uses the fitting’s rotational data, computed for BODY_34 and above.
- Body Selection: Sets the keypoints that will be given by the ZED SDK. Full: all keypoints of the body format. Upper body: Only the keypoints from the hips up (arms, head, torso)
- Max Detection Range Defines an upper depth range for detections (in Meters).
- Allow Reduced Precision Inference Allows inference to run at a lower precision to improve runtime and memory usage.
- Enable Tracking: If enabled, the ZED SDK will track bodies between frames, providing more accurate data and giving access to more information, such as velocity.
- Prediction Timeout: Duration during which the SDK will predict the position of a lost body before its state is switched to
SEARCHING. - Minimum Visible Keypoints Sets the minimum number of keypoints needed for the ZED SDK to detect a person.
- Confidence Threshold: Sets the minimum confidence value for a detected person to be published. Ex: If set to 40, the ZED SDK needs to be at least 40% confident that a detected person exists.
- Skeleton Smoothing: Amount of smoothing applied at the body fitting phase in the Body Tracking module of the ZED SDK. Bigger values mean more latency and smoother movements, and lower values lead to a crispier animation with less interpolation, which is better for quick movements.
Last is the “Start Body Tracking” button. Normally, the Body Tracking module doesn’t start when the ZED does because it causes a long delay. This button is one of two ways to start the module. The other is via a script, which we’ll be doing here.
Adding Visuals #
- Create a new empty GameObject in the Hierarchy and rename it “BodyTracking Viewer”
- Add the ZEDBodyTrackingManager component to it
- In the Projects window, go to ZED -> Examples -> Body Tracking -> Prefabs
- Add the Virtual Canvas and the Virtual View Camera prefabs to your scene.
- Drag some objects into BodyTracking Viewer’s
ZEDBodyTrackingManagercomponent:- The ZED_Rig_Mono in the scene into the ZED Manager property
- The Frame under
ZED_Rig_Mono -> Camera_Leftinto the Camera Frame property - The Unity_Avatar prefab under
Assets/ZED/Examples/Body Tracking/Prefabs/Avatar/into the Avatar property. - The White material under
Assets/ZED/Examples/Body Tracking/Models/Materials/into the Skeleton Base Material property.
Note that “Start Body Tracking Automatically” is checked by default. This will call the function in ZEDManager to initialize the Body Tracking module as soon as the ZED itself is ready.

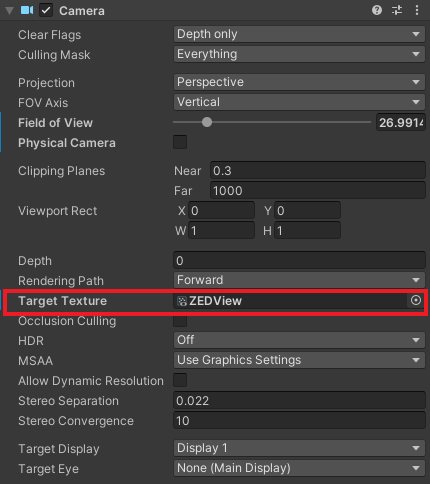
- In the ZED_Rig_Mono prefab, drag the ZEDView target texture to the Target Texture of the Camera_Left.
Import your own 3D avatar #
One 3D Avatar is already available in the Skeleton Tracking example Scene but you can also import your model. First, your 3D model needs to be rigged, otherwise, it won’t be possible to animate it.
Then :
- Import your model in Unity.
- In the Rig tab, set the Animation Type to Humanoid and Apply.

- Create a prefab of this model and add an Animator and a ZEDSkeletonAnimator components to it.
- Add an EmptyIKAnimatorController to the Animator in your prefab. This is an empty AnimatorController with the IK pass enabled. Even if you don’t plan to use the Foot IK features, this is necessary as the animation will be done in the IK pass phase.
- Set Raycast Detection Layers to
tagInvisibleToZEDin the IK SETTINGS of theZEDSkeletonAnimatorcomponent. This is used for both the Automatic Offset and the Foot IK.

- In the ZEDSkeletonTrackingViewer, put your prefab into the Avatar field in the inspector.
ZED Body Tracking Manager settings #
The ZED Body Tracking Manager provides a variety of settings to control the animation of the avatars from the Body Tracking data.
Game Control #

- Start Body Tracking Automatically: Launch the Body Tracking as soon as the ZED is initialized.
Visualization Mode #

- Use Avatar: To display or not the avatar animated with the joints’ rotations of the SDK.
- Maximum Number Of Detections: Maximum number of detected bodies whose data will be transmitted to the Unity plugin.
State Filters #

- SHOW ON/SEARCHING/OFF: Filters which detected bodies should be rendered in the scene, depending on their tracking_state.
- Delay Before Spawn: Delay before making an avatar appear. When a person is detected, a countdown of this much time will be started, and when it ends the
tracking_statewill be checked. If it passes the filters, the avatar is spawned. Use this setting along the minimum keypoints and confidence thresholds to reduce popups of avatars in some cases like partial occlusion and subjects at the edges of the ZED’s field of view.
If
SHOW OFFis enabled, some NaN values may be given by the body tracking module, so some errors may happen. In general, you will want to leave this off.
Avatar Control #

- Avatar: Prefab of Avatar to use.
- Skeleton Base Material: Material that will be applied to the SDK Skeleton render.
- Display SDK Skeleton: If the “stickman” representation of the body tracking data from the ZED SDK should be rendered or not.
- Offset SDK Skeleton: Offset to apply to the stickman representation.
- Mirror Mode: If the body tracking positions and rotations should be mirrored or not.
Height Offset #

- Manual Offset: Fixed offset to apply to all avatars. Ignored if Automatic Offset is enabled.
- Automatic Offset: If each avatar should be automatically adjusted to have its feet on the ground, and not under or above. This uses raycasting to reposition the root depending on the feet’s distance to the ground.
- Offset Step: How much the manual offset will be adjusted when using the corresponding keys.
Animation Smoothing #

- Enable Smoothing: Enable or not the animation smoothing. This does not impact the performance of the SDK, it just smoothes the avatar at Unity level.
- Smoothing Value: Value to smooth the avatar’s movements, making the animation update rate independent from the body tracking rate. 0 means no smoothing, so at body tracking FPS, and 1 means the maximum smoothing will be applied.
You might want to check out this setting if you avatar is very slow or not following your movements.
Experimental - IK Settings #
The plugin provides a basic implementation of Foot Inverse Kinematics. This allows sticking the feet on the virtual ground when they are near it, to compensate for eventual small errors in body or floor detection.
The Foot Inverse Kinematics implementation can show unexpected behavior sometimes (wrongly positioning or rotating the feet or knees). It should work well most of the time and should be tested in your project. However, you might want to compare it to just automatic height offset and choose what works best.
If the legs bend in an undesired way, you may want to adjust the IK Hints in the
ZEDSkeletonAnimator.csscript. The core issue lays in the rigging of the model. If the localForwardof the knee bone does not point forward the knee, the hint will be positioned wrongly.

- Enable Foot IK: Enable or not the Feet IK feature.
- Enable Foot Locking: If enabled, the script will try to prevent small horizontal movements of the feet when they are on the ground.
- Foot Locking Smoothing Value: Smoothing value to apply to the transitions of the feet when the foot locking is enabled.
Keyboard mapping #

- These are toggles for the Body Tracking features and key mappings to increase and decrease the manual height offset.
Avatar settings #
The ZEDSkeletonAnimator component on the Avatar manages the animation using the Animator component, the Foot IK, and the application of the HeightOffsetter component, with which it comes.
Height Offsetter #
This component applies an offset on the avatar to make it stand on the virtual ground instead of the height given by the SDK’s root joint.
The Unity avatars are positioned so that their hip joint overlaps the hip keypoint given by the ZED Body Tracking module. However, the avatars do not natively scale to the size of the person tracked by the SDK. Thus, an offset can appear between the feet data from the SDK and those of the Unity avatar, making it float in the air or inside the virtual ground.
The Heigh Offsetter aims to compensate for this difference in feet position by readjusting the height of the avatar’s root. A global manual offset can be set in the ZEDBodyTrackingManager component, or an automatic offset can be calculated for each avatar.
Automatic Offset #
The automatic offset is determined by the shortest distance between each foot and the ground so that both feet are above the ground. This offset is recalculated if both feet are not on the ground for a set amount of time.

- Current Auto Height Offset: Used to check and access the current automatic offset value.
- Find Floor Distance: Maximum distance from the foot to detect the floor, either above or under it.
- Threshold Dist Close To Floor: Acceptable distance to the ground to deem the automatic offset correct. Above this value, the automatic offset will be deemed incorrect, but under the timer for updating the automatic offset is reset.
- Threshold Duration Offset Error: Amount of time after which the automatic offset will be updated, if it’s deemed wrong (both feet not on the ground) continuously.
Animator Controller #
An empty animator controller with the IK pass enabled must be given to the animator component for the animation to work. One is available at ZED/Examples/Body Tracking/Prefabs/Avatar/EmptyIKAnimatorController.controller.

ZED Skeleton Animator #
The data gathered from the Body Tracking module are passed by the ZEDBodyTrackingManager component to each ZEDSkeletonAnimator that will apply it to its avatar 3D model.

IK Settings #
The more the feet get close to the virtual ground, the more the feet IK feature will be applied if it is enabled.
- Threshold Enter Grounded State: Distance between the sole and the virtual floor under which the IK will be fully applied.
- Threshold Leave Grounded State: Distance between the sole and the virtual floor under which the IK will begin to apply progressively. Above it, the IK is not applied at all.
- Threshold Foot Lock: Horizontal radius under which the foot is deemed not moving on the floor. Use this to reduce the jitter and possible foot-sliding effect.
- Raycast Detection Layers: Layers detected as ground when rays are shot to find the virtual floor.
- IK Application Ratio: Overrides for the maximum application values of the IK under Threshold Enter Grounded State.
Rig Settings #
- Ankle Height Offset: The rays used to find the automatic height are shot from the “Feet” joints, which are actually the ankles. In order to correctly adjust the avatar’s position, the height difference between the ankle and the sole of the foot must be provided in this property.
Keyboard controls #
- Reset Automatic Offset: Set the automatic height offset value to 0.
Run the Scene #
After a short initialization period, the app will pause for 10-20 seconds as the object detection module loads.
Once it does, step into the ZED’s view. You should see an Avatar imitating your movements in real-time.