Key Concepts & Scripts
Key Concepts & Scripts
This section serves as an introduction and handbook to the ZED Plugin for Unity’s main features and key scripts. It details the plugin’s basic concepts, which you will find useful in most projects.
Cameras
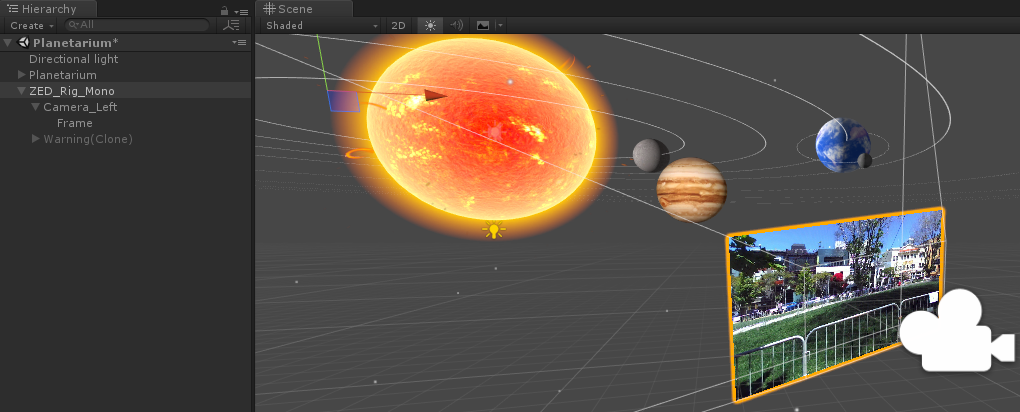
When you create a new project and import ZEDCamera.package, you will find a Mono and Stereo camera rig in the Prefabs folder: ZED_Rig_Mono and ZED_Rig_Stereo. These prefabs are custom AR cameras that replace the regular Unity Camera in a scene. They mix the virtual 3D elements rendered by the Unity camera with the real-world video captured by the ZED.
Attached to the ZED Rig Mono is Camera_Left which contains a Frame holding the video source of the left camera. The ZED Rig Stereo prefab contains both the left and right video sources for passthrough AR. When adding the ZED Rig to your hierarchy, it will appear at (0,0,0) with -Z representing the forward direction facing the camera.
When adding ZED Rig to your project, delete the Main Camera from the Hierarchy to avoid interfering with the embedded camera of the prefab. If your use case requires multiple camera outputs in your scene, you may need multiple display windows visible in the editor.
Depth-aware AR
The ZED and ZED Mini cameras capture depth and normal maps of the surrounding environment in real-time. To create a believable and interactive AR/MR experience, the depth and normal buffers captured by the cameras are integrated into the Unity rendering pipeline. This allows you to add several key AR features:
- Object placement: Virtual objects can be placed anywhere in the real world without having to scan the environment first. See Object Placement to learn more.
- Interactive collisions: Virtual elements can collide with real people and objects moving in the camera field of view.
- Realistic shadows and lighting: Unity’s lights can cast shadows and project light onto the real world. See Lighting and Shadows to learn how to enable interactive AR lighting.
- Depth occlusions: Virtual objects are naturally occluded by the surrounding environment. Occlusions are automatically enabled by the plugin.
The features above are accessible through the ZED Manager or support functions located in the Scripts folder of the package. Explore the different samples to learn how to use these support functions.
Understanding ZED_Rig_Mono and ZED_Rig_Stereo
The ZED Rig prefabs replace the regular Camera in a Unity scene and handle everything the user sees, both real and virtual. They capture the virtual world while also projecting the real world in 3D, so that the final output is a combination of the two with proper occlusion and shadows. When using the ZED or ZED Mini in a scene, you will almost always want one of these two prefabs in it.
The two rigs differ slightly in hierarchy but have three main parts:
- Root object: Holds the ZEDManager component, allowing you to change numerous camera settings (listed in the next section) via the Inspector. When not in AR pass-through mode, this object is the one that moves when Tracking is enabled.
- Camera object(s): Holds a Unity Camera, and the ZEDRenderingPlane component, which handles how the Camera renders. It also sets up the Frame object with the proper transform, materials, and material settings. In AR pass-through mode, this is what moves around.
- Frame object(s): Quad(s) positioned in front of the camera, textured with video from the real-life ZED. Rendered with a material that offsets the depth of each pixel based on its depth as calculated by the ZED SDK, allowing real-time occlusion and lighting effects.
Which prefab to use depends on whether you are doing AR pass-through. If so, choose ZED_Rig_Stereo. If not, choose ZED_Rig_Mono. (ZED_Rig_Stereo will work as well but its second, unused Unity camera will cost performance.) Always delete the default Unity camera in a scene before dropping in one of the ZED rig prefabs.
ZED_Rig_Mono
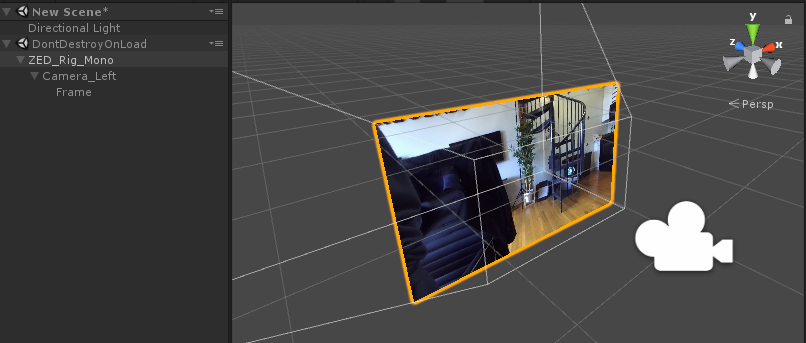
The mono rig is perfect for third-person mixed reality, or any kind of augmented reality where a headset isn’t used. It has a single Unity camera that outputs the final video stream to the main display like any other. The “real” part of the video feed comes from the ZED’s left camera.
ZED_Rig_Stereo
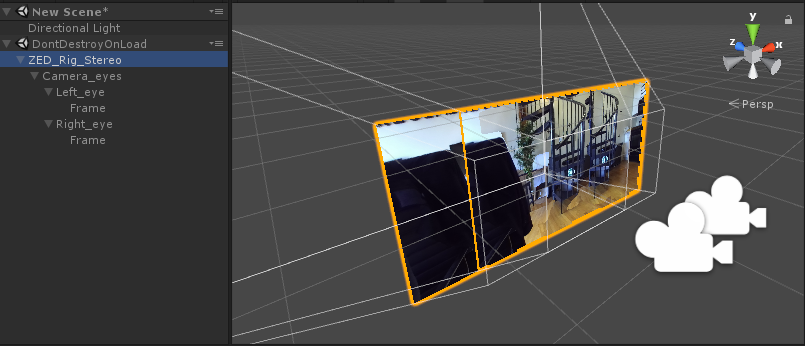
The stereo rig is necessary for AR pass-through but behaves the same as the mono rig if no headset is being used. It has two Unity cameras and two Frame objects - one for each eye. The two cameras are children of an empty “Camera_eyes” object that represents the center of the user’s head.
With VR enabled in the Player settings, you can simply drag the camera into the scene and run it. When a headset is detected, the prefab will position Camera_eyes using Unity’s built-in VR/XR functions. As such, you do not need any other plugins to use pass-through AR unless you want to add controller support.
Key scripts
ZEDManager.cs
After adding a ZED_Rig_Mono or ZED_Rig_Stereo to the Hierarchy view, click on it to access the parameters of the ZED Manager script in the Inspector window.
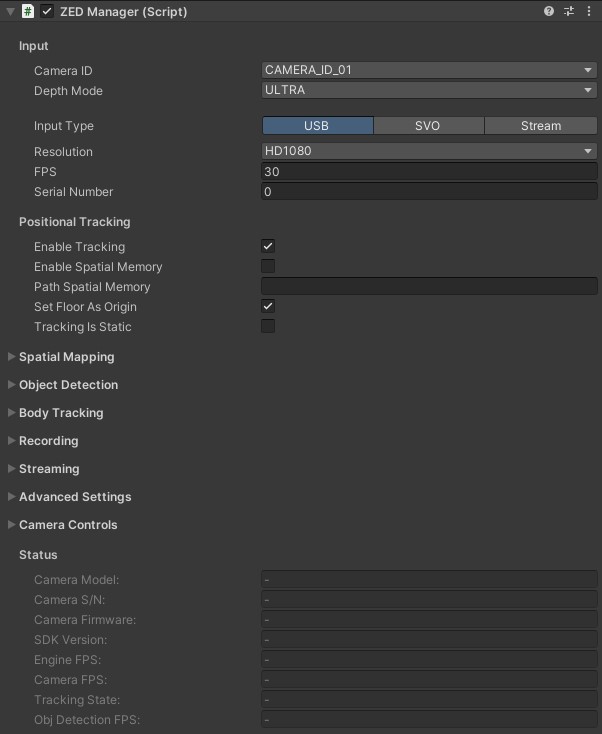
ZEDManager is the central script of the plugin and the primary way a user like yourself interacts with the ZED within Unity. It sets up and closes the connection to the ZED, adjusts parameters based on user settings, enables/disables/handles features like tracking, and holds numerous properties, methods, and callbacks a developer can find useful. ZEDManager is attached to the root object of both ZED rig prefabs.
Input:
- Camera ID: You can connect up to four ZED or ZED Mini cameras to a single PC at once. This value decides which camera you’ll connect to. Note that the order of cameras is defined by the order in which Windows recognizes the devices.
- Depth Mode: The accuracy of depth calculations. Higher settings mean more accurate occlusion and lighting but cost performance. Note there’s a significant jump in performance cost between
QUALITYandULTRAmodes. - Input Type: The ZED SDK can take input from one of three methods:
- USB: Input from a live camera attached to your ZED. You can specify the resolution and FPS of that camera. 720p at 60FPS is the best balance for AR pass-through. You can specify the Serial Number of the camera you want to open if you have several ZED cameras connected to your computer, or leave 0 to open the first camera found.
- SVO: Load a recorded SVO file taken during a previous session with a live ZED. This file acts as if a live ZED were attached. Specify the path to the SVO file, whether to loop it once finished, and whether to play each frame based on its time stamps or sequentially.
- Stream: Input from a ZED on a remote device that’s actively streaming its camera input. Set the IP and Port to connect to. See the Streaming section of ZEDManager to broadcast a stream.
Positional Tracking:
- Enable Tracking: When enabled, the ZED will move/rotate itself using its own inside-out tracking, regardless of whether an HMD is attached. In AR pass-through mode, it will combine its tracking with the HMDs and allow our timewarp feature for latency compensation.
- Enable Spatial Memory: When this and Tracking are enabled, the ZED will remember points in the scene to relocalize itself when there is tracking drift. Tracking is more accurate but may “jump” when it relocalizes.
- Path Spatial Memory: If using Spatial Memory, you can specify a path to an existing .area file to start with some memory already loaded. .area files are created when using Spatial Mapping (see ZEDSpatialMapping.cs).
- Set Floor As Origin: If ticked, the origin of the reference system used for the ZED SDK’s data will be the point on the floor under the camera when it opens. If not ticked, the origin will be the camera’s position at startup. Leave this false when using a VR HMD.
- Tracking Is Static: If true, tracking is enabled but doesn’t move after initializing. Useful to eliminate any jitter or drift when the camera should not move.
Spatial Mapping
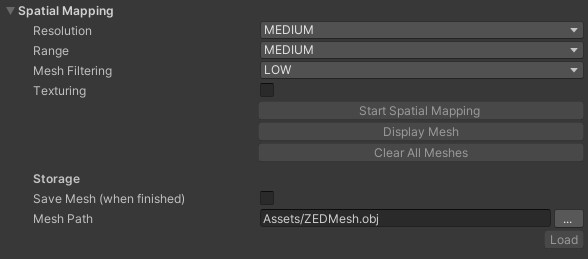
Lets you scan your environment into a mesh. Useful for collisions where geometry must be persistent, for building navmeshes that AI can use to navigate, and for saving the meshes for later. It is also how you create a .area file used by the Spatial Memory feature of ZEDManager.
During runtime, click Start Spatial Mapping to start the scan. Once you’ve scanned enough, hit “Stop Spatial Mapping” to finish the mesh (and save it if needed).
- Resolution governs the detail of the mesh. Medium is recommended not only for performance, but because it tends to average out minor depth errors.
- Range governs how far a surface can be and still get scanned. Medium is recommended not only for performance, but to ensure accuracy.
- Mesh Filtering governs how much the mesh is smoothed when finished. Low is usually best, but increasing it can sometimes help with some tough-to-scan surfaces.
- Texturing saves the surface texture in addition to the geometry.
This will add significantly to the time it takes to finalize the mesh.
- Save Mesh causes the mesh to be saved as an .obj, .bin, or .ply file to the finalized path. It also saves the .area file used for spatial memory if both Enable Tracking and Spatial Memory are enabled on the ZEDManager.
Read more here, or try the included Spatial Mapping sample scene.
Object Detection:
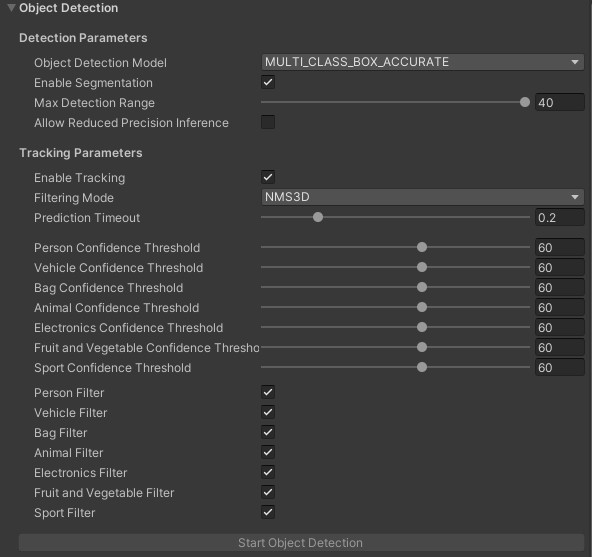
- Object Detection Model: AI model for detection. You can choose between
MULTI_CLASS_BOX(fast, but less accurate),MULTI_CLASS_BOX_MEDIUM(less fast, but more accurate), andMULTI_CLASS_BOX_ACCURATE(most accurate, but slower) to track all kinds of objects, orPERSON_HEAD_BOXorPERSON_HEAD_ACCURATEto track people’s heads. - Enable Segmentation: Enabling this allows scripts to access a 2D image that shows exactly which pixels in an object’s 2D bounding box belong to the object. Since we’re using the 3D bounding boxes only in this tutorial, leave this unchecked to save performance.
- Max Detection Range: Defines an upper depth range for detections (in meters).
- Allow Reduced Precision Inference: Allows inference to run at a lower precision to improve runtime and memory usage.
- Enable Tracking: If enabled, the ZED SDK will track objects between frames, providing more accurate data and giving access to more information, such as velocity.
- Filtering Mode: Defines the bounding box preprocessor used. More info here.
- Prediction Timeout: Duration during which the SDK will predict the position of a lost object before its state is switched to
SEARCHING.
The ZED SDK is able to detect multiple types of objects.
- Confidence Threshold: Sets the minimum confidence value for a detected object to be published. Ex: If set to 40, the ZED SDK needs to be at least 40% confident that a detected object exists. Available for each class.
- Class Filter: If enabled, the ZED SDK will detect this class. Available for each class.
- Start Object Detection button: Normally, the Object Detection module doesn’t start when the ZED does because it causes a long delay. This button is one of two ways to start the module. The other is via script.
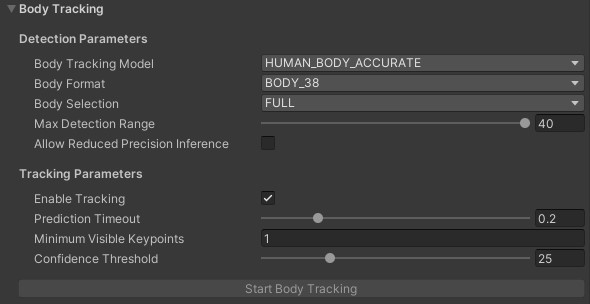
Body Tracking:
-
Body Tracking Model: AI model for detection. You can choose between
HUMAN_BODY_FAST(fast, but less accurate),HUMAN_BODY_MEDIUM(less fast, but more accurate), andHUMAN_BODY_ACCURATE(most accurate, but slower) to track people poses. -
Body Format: Body format to use with body tracking. Find more information on the Body Tracking page. Note that you will not be able to animate an avatar out-of-the-box using BODY_18, as our sample uses the fitting’s rotational data, computed for BODY_34 and above.
-
Body Selection: Sets the keypoints that will be given by the ZED SDK. Full: all keypoints of the body format. Upper body: only the keypoints from the hips up (arms, head, torso).
-
Max Detection Range: Defines an upper depth range for detections (in meters).
-
Allow Reduced Precision Inference: Allows inference to run at a lower precision to improve runtime and memory usage.
-
Enable Tracking: If enabled, the ZED SDK will track bodies between frames, providing more accurate data and giving access to more information, such as velocity.
-
Prediction Timeout: Duration during which the SDK will predict the position of a lost body before its state is switched to
SEARCHING. -
Minimum Visible Keypoints: Sets the minimum number of keypoints needed for the ZED SDK to detect a person.
-
Confidence Threshold: Sets the minimum confidence value for a detected person to be published. Ex: If set to 40, the ZED SDK needs to be at least 40% confident that a detected person exists.
-
Start Body Tracking button: Normally, the Body Tracking module doesn’t start when the ZED does because it causes a long delay. This button is one of two ways to start the module. The other is via script.
Recording:
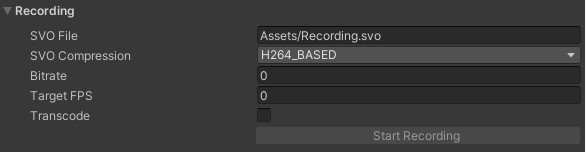
At runtime, you can record an .SVO video file of the ZED’s input, to be played back later and used as if it were input from a live ZED.
- SVO File: Where the recorded file will be saved. Specify a filename that ends in .svo.
- SVO Compression: Which method of compression to be used. AVCHD_BASED achieves small file size and is generally recommended.
- Bitrate & Target FPS: Parameters for SVO recording. Leave at 0 for default values.
- Transcode: If input is streaming, avoids decoding + re-encoding for SVO recording. Leave at false in any other case.
- Start/Stop Recording: Press this at runtime to start recording to the specified file.
Streaming:
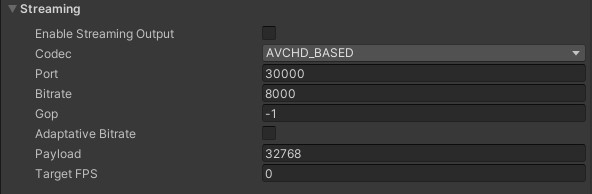
You can broadcast your ZED’s video so that other devices can use it as input.
- Enable Streaming Output: Check this to enable streaming. It will automatically start when you run the app.
- Codec: The compression used to encode the output video.
- Port: The port on which to broadcast the stream.
- Bitrate: How much information to send at once. Lower settings result in lower video quality but are easier on the network.
- GOP: Maximum GOP size for the codec. Setting this to -1 removes the limit.
- Adaptive Bitrate: Enable to automatically increase and decrease the bitrate based on performance.
- Payload: Chunk size for packet streaming.
- Target FPS: Target FPS for streaming output.
Advanced Settings:
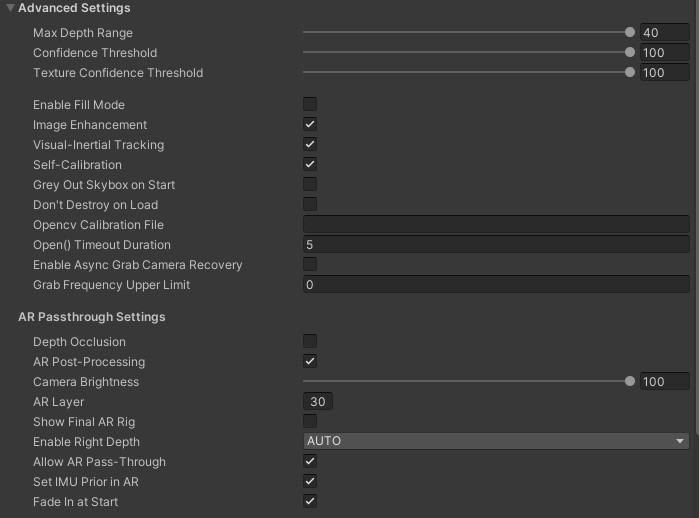
- Max Depth Range: Maximum depth displayed by the camera. Pixels further than this will be ignored.
- Confidence Threshold: How tolerant the SDK is to low-confidence values. A lower value means more filtering. See the API documentation for more information.
- Texture Confidence Threshold: How tolerant the SDK is to homogenous blocks. A lower value means more filtering. See the API documentation for more information.
- Enable Fill Mode: Defines if the depth map should be completed or not. Enabling this will override the confidence values confidence_threshold and texture_confidence_threshold as well as remove_saturated_areas.
- Image Enhancement: Enable SDK color/gamma curve to remove slight red bias and expose more details in darker areas.
- Visual-Inertial Tracking: Improve tracking using IMU data from the camera (not compatible with ZED 1).
- Self-Calibration: The SDK will adjust the calibration at runtime to account for heat and other factors. This should rarely be disabled.
- Grey Out Skybox on Start: Removes color and color emissions from the skybox, which can cause unrealistic lighting effects in an AR scene. Leave this checked when the real environment is more prominent than the virtual environment, such as pass-through AR. Turn it off when virtual elements are predominant, such as greenscreen VR capture.
- Don’t Destroy On Load: Enable setting the ZED rig’s DontDestroyOnLoad value, which will prevent its destruction when you change scenes.
- Opencv Calibration File: Optional path to OpenCV-computed calibration file. See the API documentation for more information.
- Open() Timeout Duration: Define a timeout in seconds after which an error is reported if opening the camera fails. If set to -1, the SDK will try to open the camera endlessly without returning an error in case of failure. If set to 0, an error will be returned if the first attempt fails. The default value is 5s. It does not impact SVO or STREAM input mode.
- Enable Async Grab Camera Recovery: If enabled, if there is an issue with the communication with the camera, the
grab()function in the SDK will exit after a short period and return theERROR_CODE::CAMERA_REBOOTINGwarning. The recovery will run in the background until the correct communication is restored. If disabled, thegrab()function will return only once the camera communication is restored or the timeout is reached. - Grab Frequency Upper Limit: Define an upper limit to the
grabfrequency. Effectively, this will reduce the FPS of the camera. This can be useful to get a known constant fixed rate or limit the computation load while keeping a short exposure time by setting a high camera capture framerate. It has no effect when reading an SVO file. This parameter is ignored when set to 0 or lower.
AR Passthrough Settings:
- Depth Occlusion: When enabled, virtual pixels can be covered up by real pixels, allowing a virtual cube to be behind your real table, for example. Turn off to make virtual objects always appear over the real world.
- AR Post-Processing: Whether to apply additional post-processing effects to make the pass-through experience feel more realistic. Requires extra performance but is usually worth it.
- Camera Brightness: Lower to make the real world darker. Note that this doesn’t change the actual input from the camera, but the final material, meaning that re-lighting the real world will make it brighter realistically (see the Dark Room sample).
- AR Layer: The second AR rig needs to see nothing but the canvases in front of it. To accomplish this while making it simple to understand for users, we assign the quad objects in the AR rig to the layer specified here, and it’s the only layer that the cameras in that rig can see. Assign this to an unused layer, and make sure not to put other objects in it.
- Show Final AR Rig: In pass-through AR mode, the plugin uses a second, hidden AR rig to make final adjustments to the image before it’s sent to the headset. It’s hidden by default because it can be quite confusing to see, but this setting lets advanced users observe and modify this rig. See ZEDMixedRealityPlugin below for more details.
- Enable Right Depth: Enable depth measurement from right camera. Required for HMD AR pass-through, but requires performance even if not used. AUTO value enables it only if a plane rendering the right eye is detected as child of the ZEDManager’s prefab.
- Allow AR Pass-Through: Set to false to fully disable pass-through mode. Else, pass-through mode will be enabled if a setup using it (ZED_Rig_Stereo for example) and an HMD are detected.
- Set IMU Prior in AR: In AR pass-through mode, whether to compare the ZED’s IMU data against the reported position of the VR headset. This helps compensate for drift and should usually be left on. However, in some setups, like when using a custom mount, this can cause tracking errors.
- Fade In At Start: Disable to remove the fade-in effect you see when the ZED is first connected.
Camera Controls
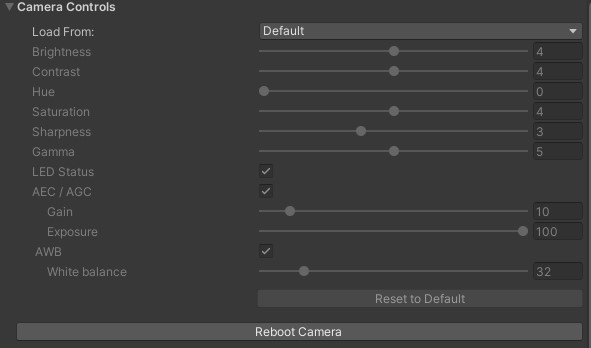
See the SDK Documentation.
Useful public members of ZEDManager.cs include:
public event OnZEDManagerReady OnZEDReady: A callback that fires after the ZED is finished initializing. Useful for having a script wait until the user can see the world before doing something.public static ZEDManager GetInstance(sl.ZED_CAMERA_ID): Returns the ZEDManager instance in the scene that’s connected to the specified camera ID (1 - 4).public static List<ZEDManager> GetInstances(): Returns all active ZEDManager instances in the scene.public Transform GetLeftCamera(): Returns the left camera component in the rig. There is also a right-camera counterpart, but it’s best to use this method as both ZED rig prefabs (ZED_Rig_Mono and ZED_Rig_Stereo) use the left camera.
ZEDRenderingPlane.cs

ZEDRenderingPlane configures and updates the Frame objects in the camera rig that display the real world, and is responsible for actually mixing the real and virtual images. You usually don’t need to interact with it, but as it’s central to the plugin’s functionality, it can be useful to know its role. The specifics of what it does are lengthy and complex, but some of its responsibilities include:
- Scaling and positioning the Frame/Canvas objects properly
- Creating materials assigned to the Frames from images/depth from the ZED camera and properties from ZEDManager
- Applying post-processing
- Updating the images, depth and light information in real time
ZEDCamera.cs
ZEDCamera is the main interface between Unity and the ZED SDK and primarily consists of extern calls to our native Unity wrapper. It’s based on the Camera.cpp class in our C++ SDK. It’s not a MonoBehaviour and can’t be attached to a GameObject. It is mostly handled by ZEDManager and a developer usually doesn’t need to interact with it. However, it has some functions that can be useful to advanced users:
public int ImageWidth/ImageHeight: Use to get the resolution of the ZED image.public Matrix4x4 Projection: Projection matrix that represents the real camera’s own projection matrix. ZEDRenderingPlane applies it to Unity cameras to make them match the ZED’s input, and you can do the same to make additional mirrored cameras.public Vector3 GetGravityEstimate(): If using a ZED Mini, uses its IMU to estimate which way is down.public sl.ERROR_CODE RetrieveImage((sl.ZEDMat mat, sl.VIEW view, sl.ZEDMat.MEM mem, sl.Resolution resolution): Advanced. Creates a ZEDMat instance with an “image” version of the specified view, intended to be user-viewable. Passing VIEW.DEPTH, for example, will return a grayscale depth map that lacks precision but is easily viewable. You will need to use the ZEDMat’s IntPtr and some conversion to get a Unity-friendly Texture2D from this.public sl.ERROR_CODE RetrieveMeasure(sl.ZEDMat mat, sl.MEASURE measure, sl.ZEDMat.MEM mem, sl.Resolution resolution): Advanced. Similar to RetrieveImage, but with measured values instead of an imprecise, user-viewable version. For example, passing VIEW.DEPTH will return an array of floats for the depth to each pixel in view. Note that it’s often simpler to use the static functions in ZEDSupportFunctions.cs to retrieve individual depth values.
ZEDMixedRealityPlugin.cs
ZEDMixedRealityPlugin.cs is used when in AR pass-through mode. It creates and updates a second camera rig (hidden by default) that adds our video timewarp latency compensation to the final image the camera sees. ZEDManager creates it automatically and there’s rarely a reason to change it, but you may occasionally want to access it to understand the final output or add custom effects.
Like the ZED rig, it consists of two cameras and two quads. The quads hold the output of the cameras in the rig. But unlike in the rig, the quads aren’t children of the cameras. When you turn your head, instead of the quads being “locked” to the camera’s rotation, the script has them trail behind according to the ZED’s latency. The end result is that the position of objects you see in the real world stay synchronized with reality, despite the latency. This reduces discomfort significantly.
To view this rig at runtime, enable Show Final AR Rig in ZEDManager’s Advanced Settings.
Other Useful Scripts
ZEDLight.cs
![]()
Add this component to any Point, Spot or Directional light to cause it to illuminate the real world. For directional lights, it will also add shadows on the real world if enabled in the light. Note that in Forward rendering (the default and recommended setting) you can only have 8 such lights at a time. In deferred rendering, you do not need to attach the ZEDLight component for lights to work, and there is no limit to how many you have.
Read more here.
ZEDGreenScreenManager.cs

Removes green pixels (or pixels of another specified color) from the real world, to make the background visible regardless of depth. Useful for filming a VR user from third-person.
ZEDGreenScreenManager must be added to the same object as the cameras within the ZED rig. However, a few other changes to the rig are required to make it work, so it’s recommended to use the rig prefab in ZED -> Examples -> GreenScreen -> Prefabs instead of modifying ZED_Rig_Mono.
- View lets you see different steps of the rendering stage, which can be helpful for tweaking the other settings.
- Color defines the color that’s subtracted.
- Range governs how similar a pixel must be to the chosen color to get removed.
- Smoothness causes pixels on the edge of the range to the color to fade out, instead of all pixels being 100% or 0% visible.
- Clip White causes pixels with alpha values above its setting to be set to 100% alpha, useful for reducing noise from your smoothness setting.
- Clip Black is the opposite of Clip White, causing pixels with alphas below its value to be completely invisible.
- Erosion carves off pixels from the edges between the foreground and background.
- Despill subtracts the color value from the foreground image, making it appear “less green” for instance. Useful because bright lighting can cause the color of a greenscreen to spill onto your actual subject.
- Enable Garbage Matte opens up a new window that lets you define a border outside which no real pixels are displayed. Useful if your greenscreen isn’t big enough to fill the whole screen.
- Save Config lets you save and load the settings in the inspector, to load in a different project or switch between different studio setups. Note that a relative path (like the default) may work in the Editor but not a build.
Find more documentation here and a detailed guide on greenscreen capture with the ZED here. Also see the included GreenScreen sample scene.
ZEDPlaneDetectionManager
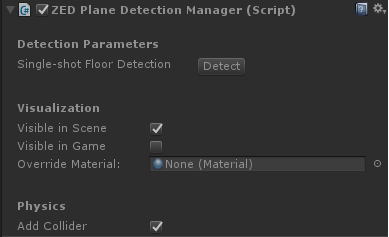
Lets you click on the screen or specify screen-space coordinates to detect a flat surface in the real world. If it finds one, it’ll instantly turn the whole visible surface into a plane, complete with physics.
Unlike Spatial Mapping, Plane Detection works in real-time, so it’s often better for placing objects in the real world, or collisions.
To use, create an empty GameObject and add the ZEDPlaneDetectionManager component to it. At runtime, click on the window to check for a plane there. You can also click Detect to check for a plane in the scene that represents the floor.
- Visible in Scene governs whether you see planes in the Scene window.
- Visible in Game governs whether you see planes in the Game view. Disabling can be useful if you just want planes for collisions.
- Override Material will replace the default wireframe material on created planes with the material you specify.
- Add Collider causes the manager to add a Mesh Collider to planes once spawned, enabling collisions.
See the two included Plane Detection samples to explore further.
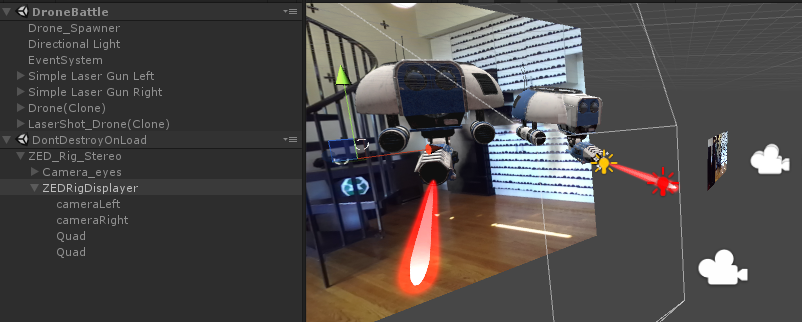
ZEDControllerTracker
![]()
![]()
If you have the Oculus Integration or SteamVR Plugin installed, ZEDControllerTracker will move the GameObject on which it’s attached to the controller, headset or Vive Tracker specified after a small, adjustable delay. This delay is meant to correspond with the ZED image’s latency. Adding this component fixes an effect where you see a virtual controller object move ahead of your real hands since the Oculus/Vive tracking systems have less latency than the ZED.
- Load Data searches for and loads information about the Oculus or SteamVR plugins you’ve imported. This allows it to be agnostic to the two.
- Device To Track specifies which tracked object you want it to connect to, without requiring a reference to an actual GameObject.
- Latency Compensation governs the length of the added latency.
- SN Holder lets you specify the exact serial number of an object you want to track. This is filled automatically but you can use it to override the detected settings.
See the laser guns on the DroneBattle sample, or the ZED rig holder object in the GreenScreen sample for examples.
ZEDSupportFunctions.cs
A static class holding many static functions that simplify a number of interactions with the ZED. The functions are diverse and worth exploring in detail. Some notable examples include:
public static bool GetNormalAtPixel(Vector2 pixel, sl.REFERENCE_FRAME reference_frame, Camera cam, out Vector3 normal)returns the normal (direction) of the real world given a screen-space point specified.public static bool GetForwardDistanceAtWorldLocation(Vector3 position, Camera cam, out float depth)lets you check the depth of a single 3D point in the real world.public static bool HitTestAtPoint(Camera camera, Vector3 point, bool countinvalidascollision, float realworldthickness)checks if a virtual point is “collding” with a real point. By default this means that the point is behind the real world, but by specifying realworldthickness, you can ignore collisions that are behind the real world by a certain amount. Useful for checking virtual projectiles against the real world.public static bool HitTestOnRay(Camera camera, Vector3 startpos, Quaternion rot, float maxdistance, float distbetweendots, out Vector3 collisionpoint)emulates Unity’s raycast feature by calling HitTestOnPoint() along a line at specified intervals. Useful for object placement and fast-moving projectiles.public static bool SaveImage(RenderTexture rt, string path)saves the specified RenderTexture to a .png file. Speficy the RenderTexture in ZEDRenderingPlane or on the Frame objects to snap a picture of the real world.
ZEDToOpenCVRetriever

If using the OpenCV for Unity package, putting this component in your scene greatly simplifies interfacing the ZED with OpenCV.
It will automatically create an OpenCV matrix for the ZED’s rectified camera parameters, which is required for most spatial OpenCV functions. Then, you can subscribe to a variety of events, named OnImageUpdated_<imagetype>, where <imagetype> is an image format the ZED can provide, such as LeftRGBA or LeftGrayscale. Then, whenever a new ZED image arrives, this component will deploy any events with listeners with the ZED’s left camera reference, the Camera matrix, and an OpenCV matrix of that image.
You can see examples of ZEDToOpenCVRetriever being used in the ArUco sample scenes, where ZEDArUcoDetectionManager subscribes to them in order to move GameObjects to visible ArUco markers.