Environmental Mapping with UE5
In this tutorial, you will learn how to build a procedural mesh of your room and add physical interactions between virtual objects and the real world using Spatial Mapping.
Introduction
Spatial mapping captures a mesh of your environment, letting virtual elements interact with it in much the same way they would with the floors, walls, and other objects in a video game.
It allows you to use Unreal’s built-in physics engine, adding convincing physical behavior to virtual objects. This way, they can collide with the real world, bounce off of it in appropriate directions, accelerate correctly and be affected by gravity and other forces in the real world.
Prepare your project
Either:
- Open the level L_SpatialMapping in
Content/ZED/Levelsand explore its setup along this page - Or follow the steps in Creating a project if you don’t know how to create and set up a new project, then follow the next steps.
Mapping an Area
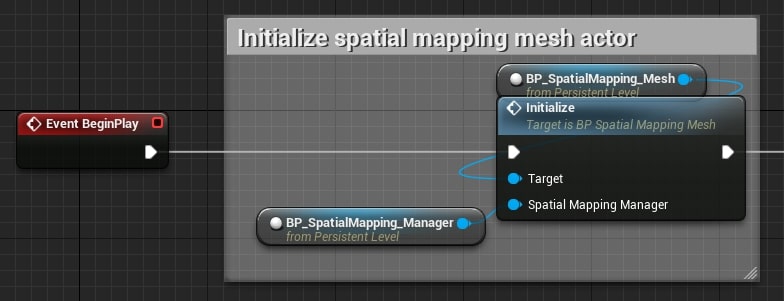
To use spatial mapping you will need two actors: the BP_SpatialMapping_Manager to scan and retrieve the mesh and a procedural mesh to create and display the mesh in the virtual world. The plugin provides an example blueprint, BP_SpatialMapping_Mesh, to let you see how to use the procedural mesh.
- Go to ZED/Blueprints/SpatialMapping and add BP_SpatialMapping_Manager and BP_SpatialMapping_Mesh to the scene.
- Now we need to initialize the scanning mesh actor. Open the level blueprint and initialize the mesh.
-
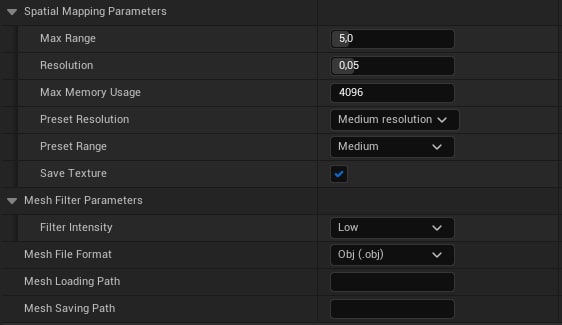
Click on the BP_SpatialMapping_Manager actor in the world outliner to see the settings. We recommend using the following set of parameters for mapping:
- Resolution =
Medium(Small variations in the geometry will disappear, useful for big objects) - Range =
Medium(Medium depth range.LONGwill take into account objects that are far, useful for outdoor purposes.) - Filtering =
Low(Clean the mesh by closing small holes and removing isolated faces.)
- Resolution =
For more details on Spatial Mapping parameters, see this section.
Now, let’s start mapping the area.
- Play the level.
- Click on the BP_SpatialMapping_Manager in the world outliner. You should see the spatial mapping controls.
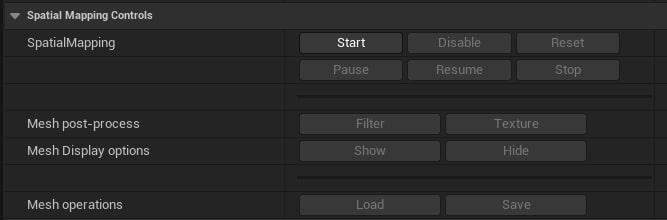
- Click on Start to initialize the spatial mapping and start mapping the area.
- Move your camera around. The mesh should become visible.
- Once you’ve mapped enough of the room, click on Stop.
- Click Filter to filter (clean up) the mesh. This process may take some time depending on your settings.
- If you want to save your mesh, click Save.
- When finished, click on Disable to disable spatial mapping.
Using Physics
During mapping, use the blueprint BP_SpatialMapping_Mesh to automatically generate a mesh of the area and enable collisions between virtual objects and the real scene.