Body Tracking with UE5
In this tutorial, you will learn how to animate 3D avatars with your own movements using Body Tracking.
ZED Blueprints
Main StereoLabs blueprints used to make the body tracking work (click to unwrap)
BP_ZED_Initializer
Put the BP_ZED_Initializer in your scene to configure all the features of the ZED camera. This actor is a direct reference to the C++ code of ZEDInitializer.cpp.
Pay special attention to some parameters:
- Input Type: will the SDK compute data from a ZED camera, an SVO file, or a stream input.
- Resolution, FPS, Depth Mode: Main parameters of the ZED camera. See the API Reference for more details. Default values HD 1080p, 30 fps, and Depth Mode Ultra will work the best in most cases.
- Loop and Real Time: If you’re using an SVO file, you will want to tick these two to true in most cases. It enables SVO looping and syncing the SDK processing time with the SVO timestamps.
- Depth Occlusion: If enabled, the virtual objects will be hidden by the render of the real scene, using the depth of each pixel of the camera.
- Show Zed Image: If enabled, the ZED Camera/SVO video stream will be rendered in fullscreen in the level viewport at runtime. You may want to leave it on in some cases (MR applications mostly) but in this tutorial, we want the virtual scene to occupy the screen.
BP_BodyTracking_Visualizer
This blueprint manages the whole avataring process, from enabling body tracking to sending the skeleton data to the animation blueprint.
-
Enabling the Body Tracking:
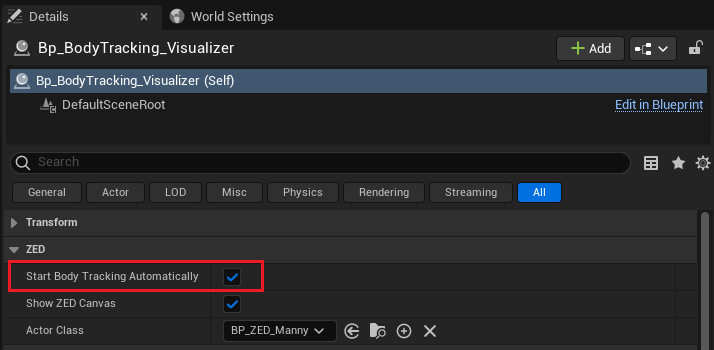
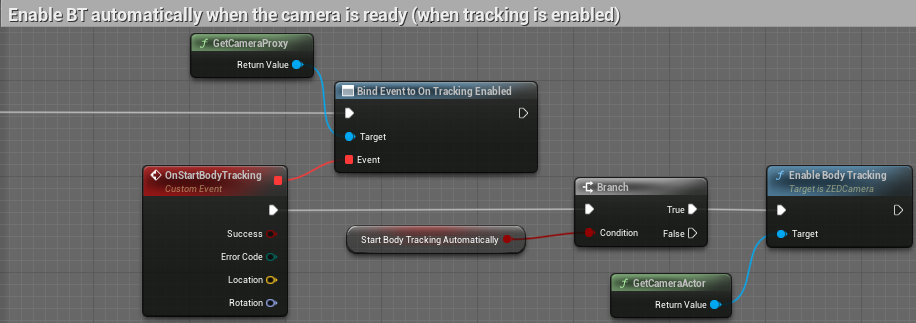
-
Automatically: If the “Start Body Tracking Automatically” option is ticked, the body detection will start as soon as the ZED camera is ready.
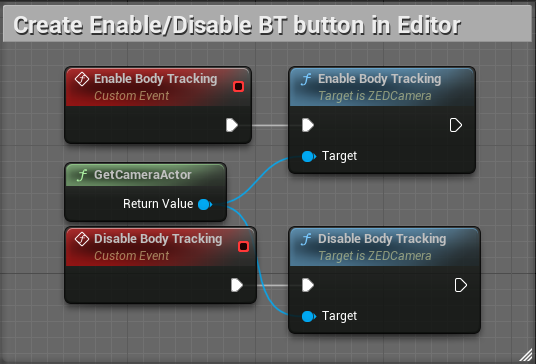
-
Manually: If it is not ticked, it can be started in the details panel manually.
-
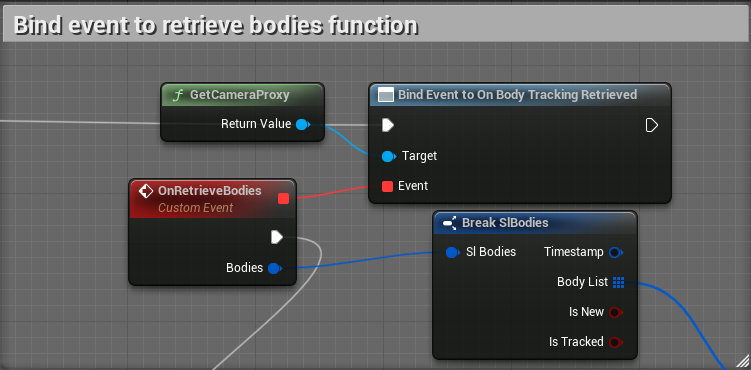
Watch for the retrieve bodies callback
-
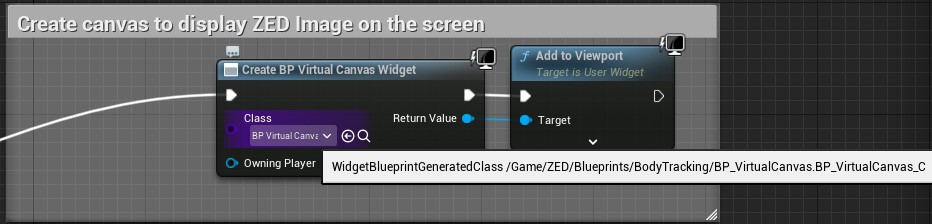
Put a small viewport with the image from the ZED Camera / SVO file in the main viewport.
-
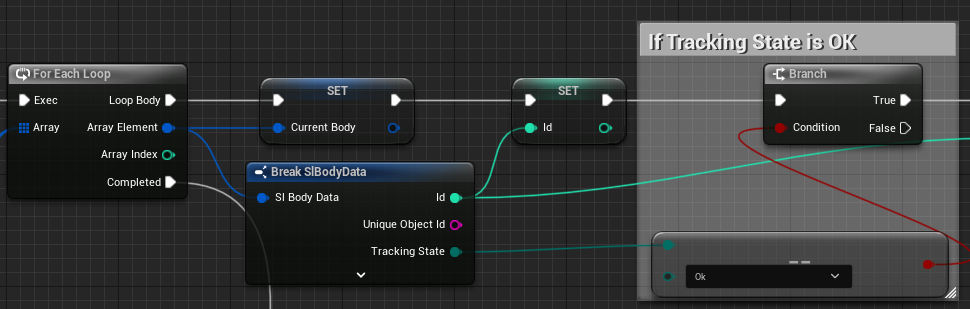
Loop on each retrieved body and check its tracking state.
-
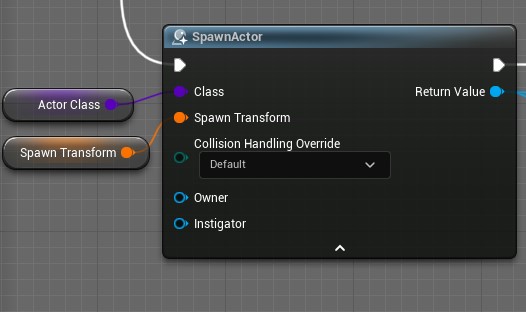
If it is a new detection, spawn an avatar.
-
If it is an already tracked skeleton, find the avatar in question in the
Avatarsactor map.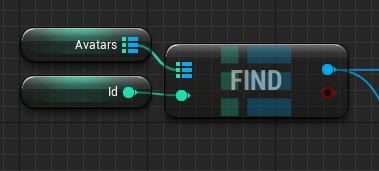
-
Set Animation Blueprint’s
Body DataandSkeletal Meshvariables (see AnimNode_ZEDPose.cpp below.)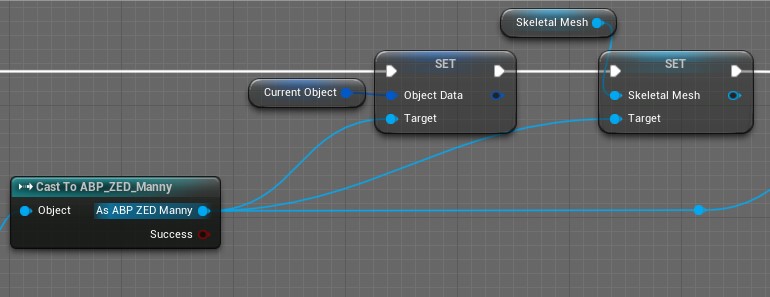
BP_ZED_Manny & ABP_ZED_Manny
The BP_ZED_Manny Actor Blueprint includes a skeletal mesh using a specific animation blueprint, the ABP_ZED_Manny. The procedure to create your own is detailed below in this article.
For now, the skeleton used must be in T-Pose to achieve the most accurate correspondence of the movements possible.
The ABP_ZED_Manny is fed a SlBodyData structure containing all the data about the skeleton, mainly keypoints positions, bones orientations, and location of the skeleton. A Control Rig node might be activated afterward, sticking the feet to the ground when nearing it.
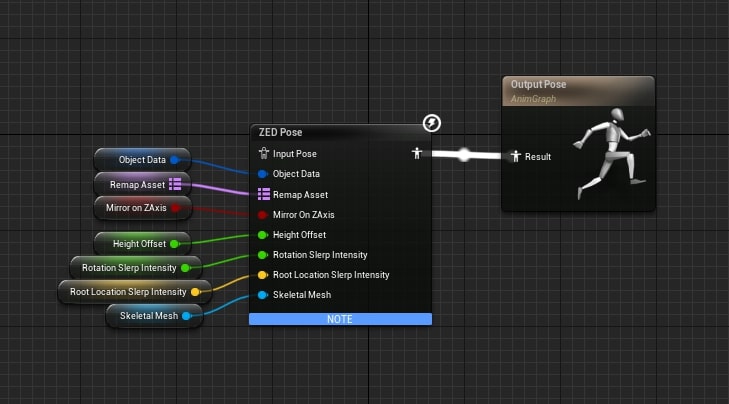
ZED Pose - Animation Blueprint node
This node is generated by the AnimNode_ZEDPose.cpp file, do not hesitate to take a peek at it. This is the core of the avataring, it applies the rotations of the bones of the SDK skeleton to the Unreal avatar bones (using the remap asset).

- Body Data: SlBodyData structure used to retrieve the location and orientations of key points and bones from the SDK. It must be set externally (e.g. from the
BP_BodyTracking_Visualizer). ExploreStereoLabsBaseTypes.hfor more details on this structure. - Remap Asset: This map of names is used to make the correspondence between the bones’ names in the SDK and the ones of the avatar.
- Mirror on Z Axis: Enable mirror-mode for the avatar. If you raise your right hand, it will raise its left.
- Height Offset: Can be used to apply an external offset to the character Z location (height).
- Rotation Slerp Intensity: Intensity of the smoothing applied to the avatar movements. You can adjust it to adjust latency on movements and jittering.
- Root Location Lerp Intensity: Intensity of the smoothing on the location of the root of the skeleton. Used to avoid sudden displacement which can happen in case of unstable data from the camera.
- Skeletal Mesh: Used to give the skeletal mesh to the C++ script, which then manipulates its Pose.
What is Body Tracking?
Body Tracking is very similar to the Object Detection module but uses another highly optimized AI model to detect people’s 3D skeletons, expressed as keypoints. It can detect up to 70 keypoints on a single person. For more details about the Body Tracking feature, please take a look at the Body Tracking documentation page.
In Unreal, we will use this 3D keypoint information (more precisely, the orientation of each keypoint) to animate a 3D humanoid avatar based on a person’s movement in real time.
Preparing your ZED Camera
Optimize the AI models
The Body Tracking module uses AI models that need to be optimized before their first use. The UE5 plugin does not do this by itself, so we advise you to optimize them externally using the ZED Diagnostic tool located in the ZED SDK installation folder (usually Program Files (x86)/ZED SDK/tools).
The process is described here: How can I optimize the ZED SDK AI models manually?
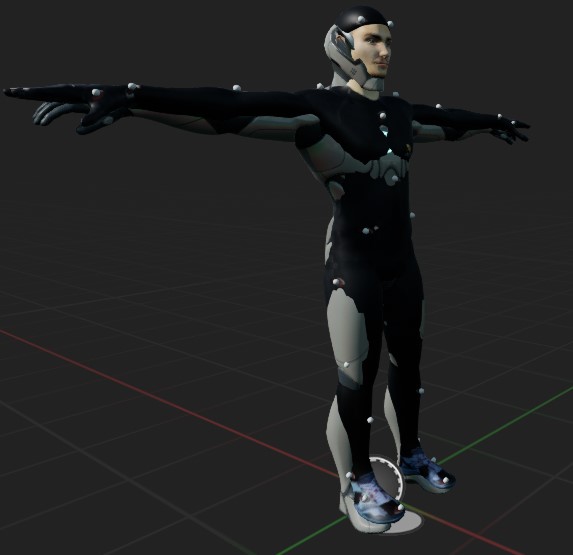
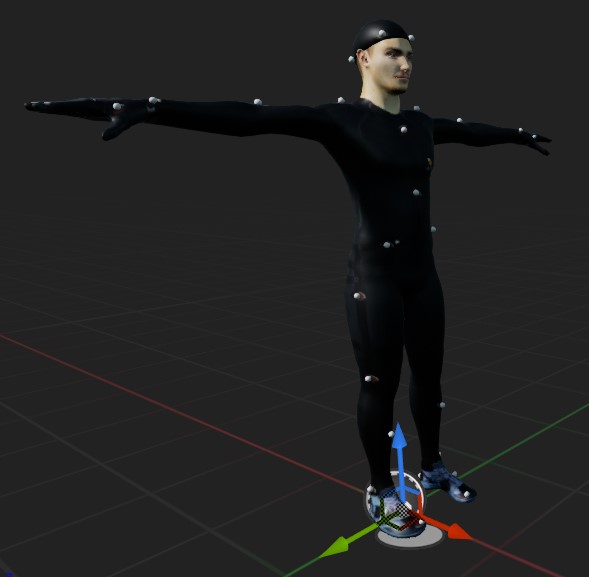
Ensure Floor Plane detection
The ZED SDK’s Body Tracking module uses the floor plane position to know the camera’s position in the world. To do so, the floor plane must be visible in the image when starting the module as in this image:
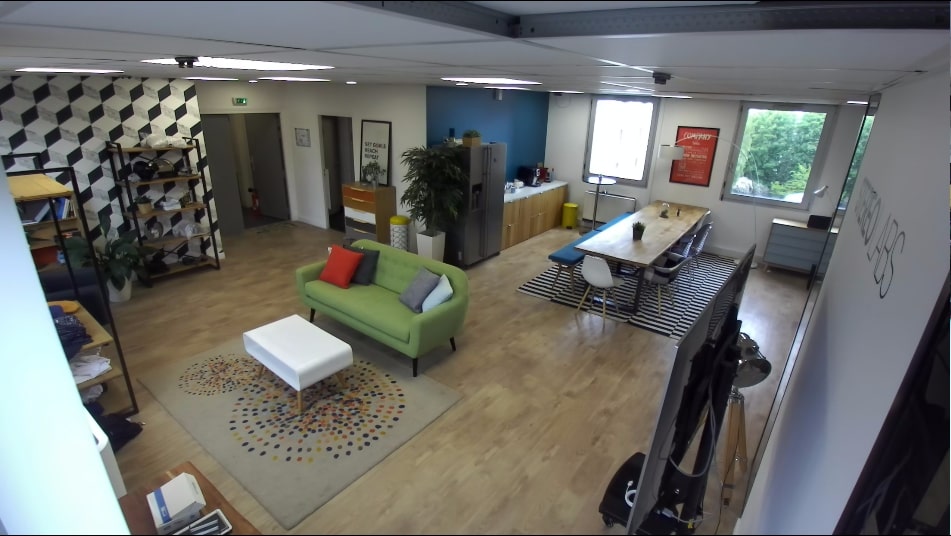
If the avatar appears inside the floor, make sure the floor is visible in the image and restart the level.
Setting Up the Scene
Basic Settings
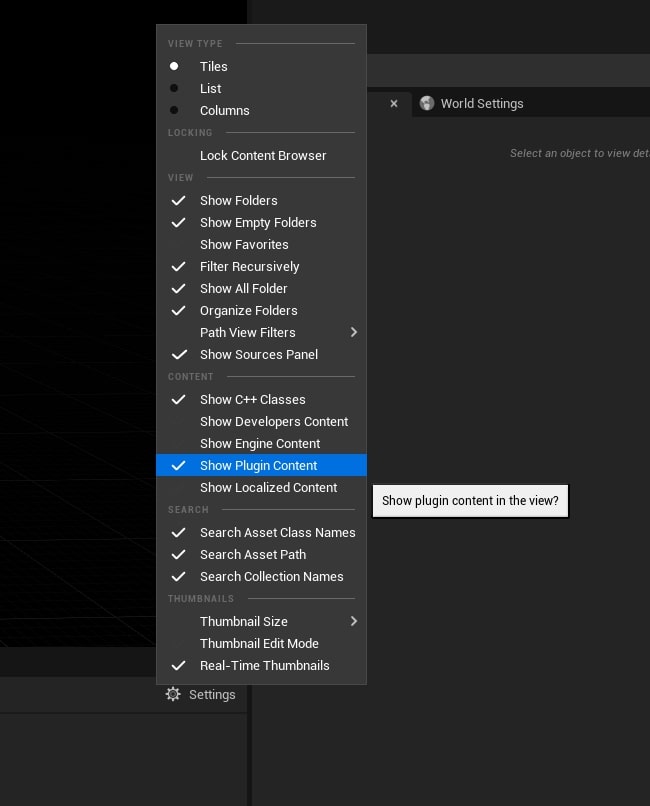
Now we’ve got to add a Blueprint from the ZED plugin. But by default, Content from plugins is hidden. To fix this, click on View Options at the bottom right of the Content Browser and enable Show Plugin Content.
Now click on the folder icon beside Content and click on StereoLabs Content to switch to the plugin’s content folder.
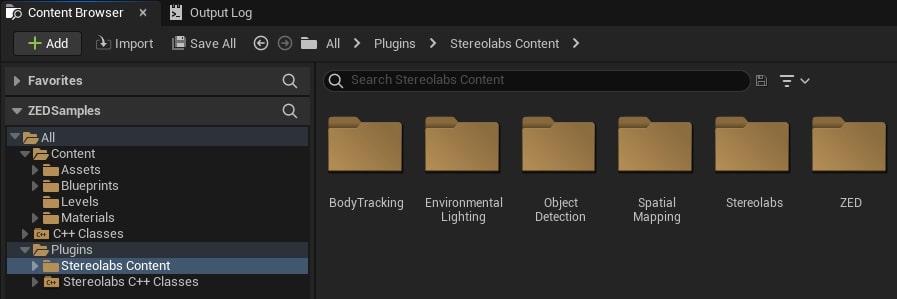
In the Content Browser, go to Plugins -> StereoLabs Content -> ZED -> Blueprints and drag a BP_ZED_Initializer into the scene. This is the object that sets up your camera and handles communication with your app.
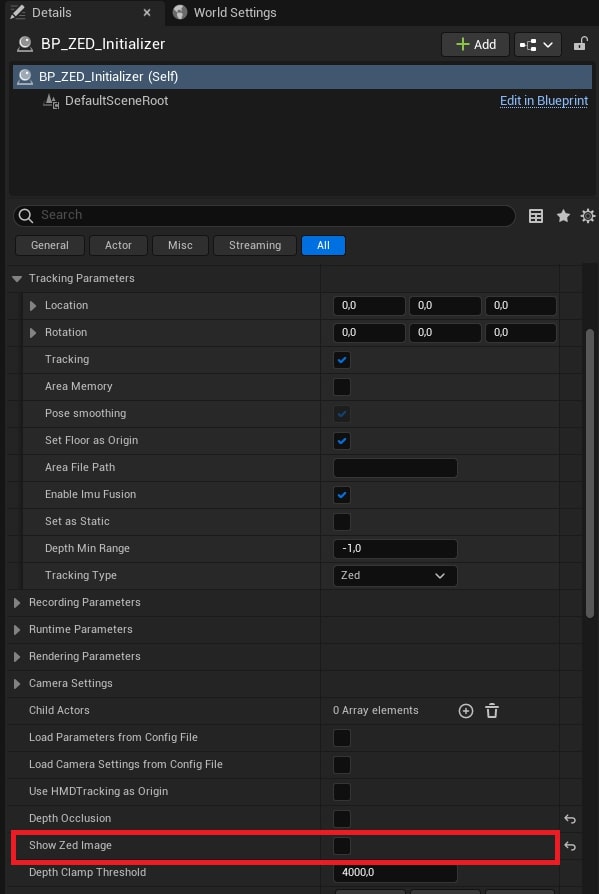
- Select the BP_ZED_Initializer blueprint, and in the ZED section, uncheck the Show Zed Image parameter. This parameter has to be disabled so we can see the 3D scene and not the ZED’s image in fullscreen.
- In the Init Parameters section, set the Resolution to 1080p. This is not required but increases body tracking accuracy
- Set Depth Mode to ULTRA. Also not required but can improve body tracking accuracy.
- If your camera is fixed and will not move, enable Set as Static in the Tracking Parameters section to prevent incorrect drift throughout the scene.
Body Tracking Settings
Open the ZED / Body Tracking section of the BP_ZED_Initializer.
Choose the Body Tracking Model you want, depending on your accuracy/performance needs.
Three body formats are available, you can refer to the Body Tracking Documentation.
Multiple settings are available:
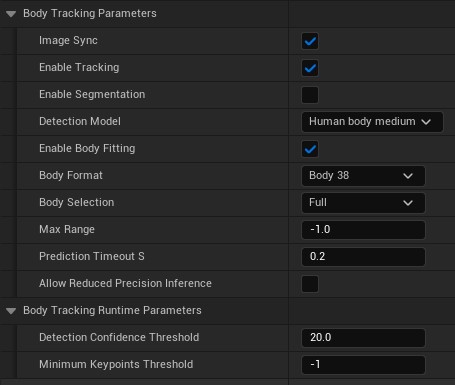
- Image Sync: Synchronize the body detection to the image grab.
- Enable Tracking: If enabled, the ZED SDK will track bodies between frames, providing more accurate data and giving access to more information, such as velocity.
- Enable Body Fitting: The fitting process takes the history of each tracked person to deduce all missing keypoints thanks to the human kinematic constraints used by the body tracking module. It is also able to extract local rotation between a pair of neighbor bones by solving the inverse kinematic problem.
- Body Selection: Sets the keypoints that will be given by the ZED SDK. Full: all keypoints of the body format. Upper body: Only the keypoints from the hips up (arms, head, torso)
- Max Range: Defines an upper depth range for detections (in centimeters).
- Prediction Timeout: Duration during which the SDK will predict the position of a lost body before its state is switched to
SEARCHING. - Allow Reduced Precision Inference: Allows inference to run at a lower precision to improve runtime and memory usage.
- Person Confidence Threshold: Sets the minimum confidence value for a detected person to be published. Ex: If set to 40, the ZED SDK needs to be at least 40% confident that a detected person exists.
- Minimum Keypoint Threshold: Minimum number of detected keypoints required to consider a person detected. Can be useful to remove partially occluded detection.
- Skeleton Smoothing: Amount of smoothing applied at the body fitting phase in the Body Tracking module of the ZED SDK. Bigger values mean more latency and smoother movements, and lower values lead to a crisper animation with less interpolation, which is better for quick movements.
Go to Content -> ZED -> Blueprints -> BodyTracking and add BP_BodyTracking_Visualizer into the scene as well. This object will manage the avataring of the 3D models in the scene.
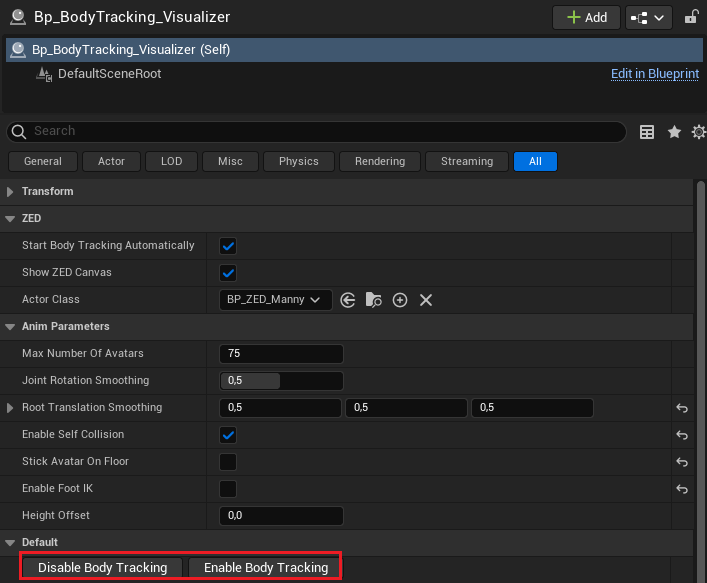
Body Tracking Visualizer Settings
![]()
Use Retargeter
Check this if you’re using a retargeted avatar. It prevents the base avatar from becoming visible during the animation.
Max Number of Avatars
This setting allows you to choose the maximum number of avatars that will be spawned in the scene.
Movement Smoothing
These are interpolation values used to smooth the rotations of the limbs. The default values allow filtering the occasional jittering that can occur in the SVO data when the target is standing still.
Enable Self-Collision
This setting allows the virtual limbs to collide with the virtual body. This prevents the arms/legs from passing through the chest or each other. This feature uses the colliders provided by the Physics Assets corresponding to the skeleton.
Stick Avatar On Floor
If this is enabled, a dynamic height offset will be applied to the avatar to stick the lower foot on top of the ground in the virtual scene.
Enable Foot IK
This setting allows the Control Rig in the ABP_ZED_Manny to take effect and compensate for small gaps between the feet and the floor when the feet are near the floor, effectively sticking them in place.
In the current version, if Stick Avatar On Floor is enabled, the Foot IK will not be applied. Using both together leads to undesired behavior like the avatar crouching more and more over time. If you want to experiment with this or just enable both, you can modify the check in the animation blueprint
ABP_ZED_Manny.
Height Offset
This value is applied as a flat height offset to the skeletons managed by the AnimZEDPose node.
Unexpected behavior can occur if “Stick Avatar On Floor” is ticked, as “Height Offset” is a manual solution to fix a floor detection issue, when “Stick Avatar On Floor” is the automatic counterpart.
Changing the Camera point of view
By default in the scene, the virtual camera will follow the ZED camera’s position and orientation. However, in some cases, you may want to see the scene from a different point of view.
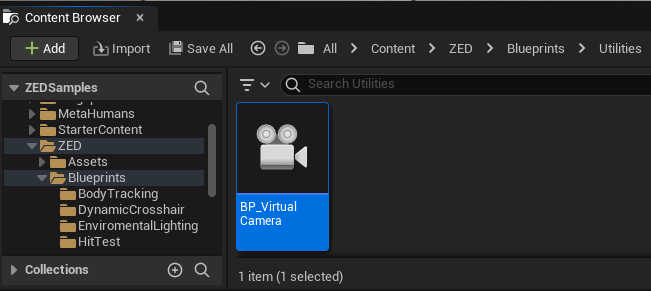
For that, add a BP_VirtualCamera actor in the scene. This camera will automatically be set as the main camera at the start.
Using your own avatar with the Retargeting system of UE5
Though this documentation aims to provide a step-by-step detailed process, please read the official UE5 documentation about Retargeting for more details.
Import your rigged mesh into Unreal Engine
Importing procedure with Blender (click to unwrap)
Step 1: In Blender
- Prepare your model’s mesh and rig
If you’re using Mixamo to make your skeleton, ensure your scale is applied before exporting your FBX/OBJ to Mixamo.
- Make it face +X in Blender
- Ensure the scale is “normal” in Blender
- Apply scale
- Scale everything to 100
- Apply scale again
- Scale everything to 0.01, and do NOT apply the scale.
- Export to FBX
Settings to change:
- Set Transform -> Forward: X Forward
- Uncheck “Add Leaf Bones”
- Export the file.
Step 2: In Unreal Engine
- Import the FBX file
Settings to change:
- If importing a mesh only to an existing skeleton, make sure to select said skeleton in the drop-down menu in the import window
- In Misc, select “Convert Scene” and no other (neither force front X Axis nor convert scene unit)
- Follow the next steps, and check that everything works as intended.
If you get an error about the bone hierarchy: check in Blender that no “root” object was added above the hips bone in the hierarchy. If there is one: Ctrl-A -> Apply scale -> Select parent object that should not be there -> Delete it -> Select hips (armature & mesh) -> Scale to 100 -> Apply scale -> Scale to 0.01 -> Export.*
The first step is to import your rigged mesh into Unreal. If you can, import a character in T-Pose, facing X, or tick “Force Front X Axis” in the import options. The full process to import a mesh is described above.
Having the avatar face X and be in T-Pose is not mandatory, as the pose will be adjusted later in the retargeting process anyway. However, it does make the setup process easier.
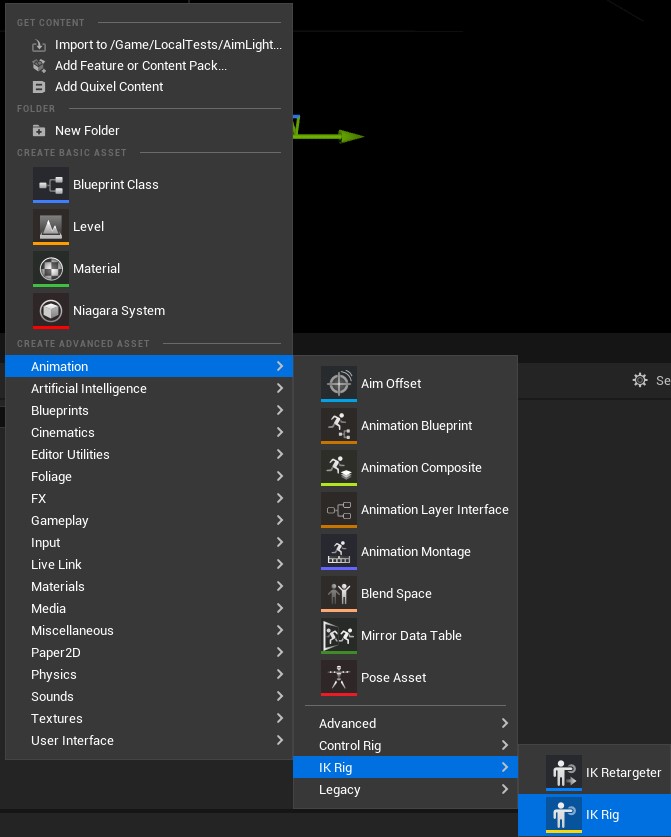
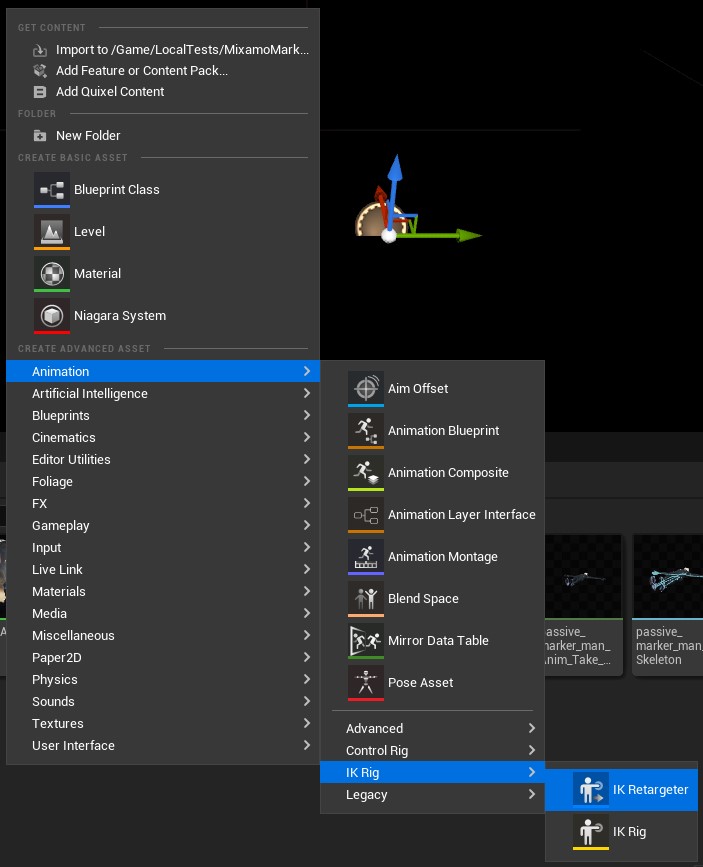
Create an IK Rig
Once the new avatar is imported, create an IK Rig targeting its skeletal mesh.
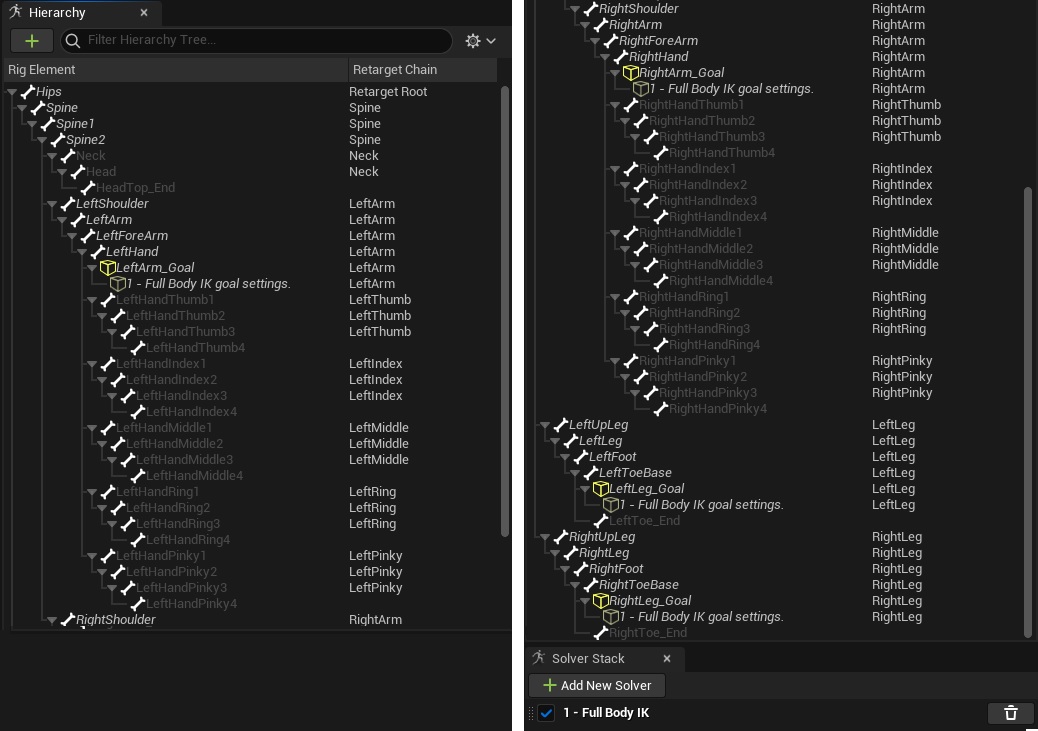
The ZED avatar uses the Mixamo rig. The Retarget Chains of the new avatar should match the ZED’s ones as closely as possible:
- Spine: from the pelvis to the upper torso. Do not include the Retarget Root bone.
- Neck: from the neck to the head bone (not the top of the head)
- LeftArm/RightArm: from the clavicle to the wrist
- LeftLeg/RightLeg: from the hip to the bottom of the foot
- Left/RightThumb, Index, Middle, Ring, Pinky: from the base of the finger to the last phalange. Do not include the tip of the finger or the metacarpal.
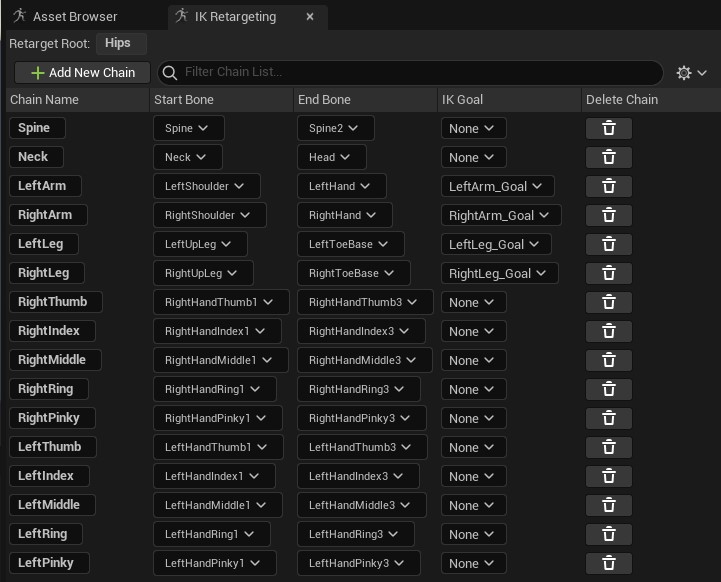
Setup of the retargeter
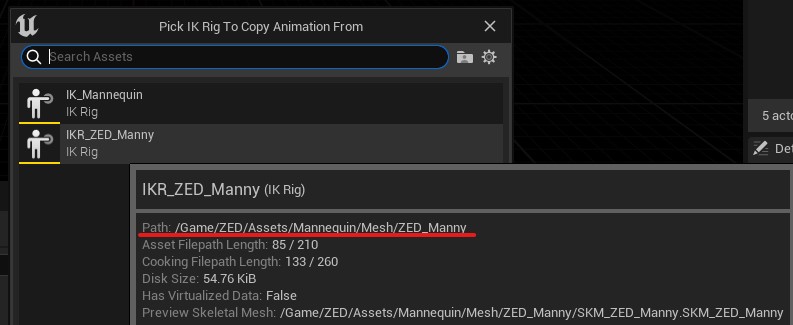
Create an IK Retargeter from the ZED avatar.
Choose IKR_ZED_Manny as the source IK Rig. If it does not exist in your project, create it first from the SKM_ZED_Manny skeletal mesh located in ZED/Assets/Mannequin/Mesh/ZED_Manny, following the same procedure as for your custom mesh.
Correct the pose of the new avatar to match the one of the ZED Avatar.
You can test the accuracy of the retargeting and adjust the retargeter settings by playing any Mixamo animation.
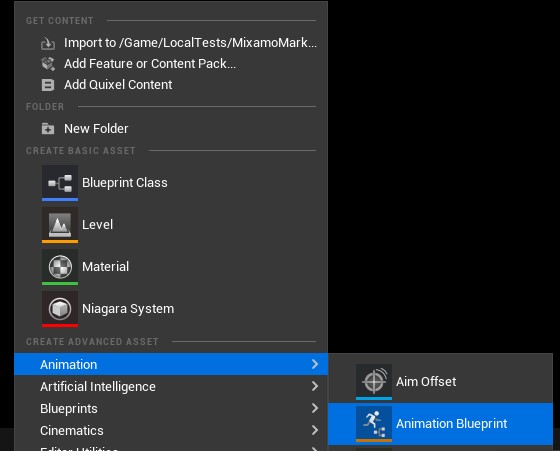
Create an animation blueprint
The creation of the animation blueprint to make the new avatar move should be fairly simple. First, create an animation blueprint targeting the skeleton of the new avatar.
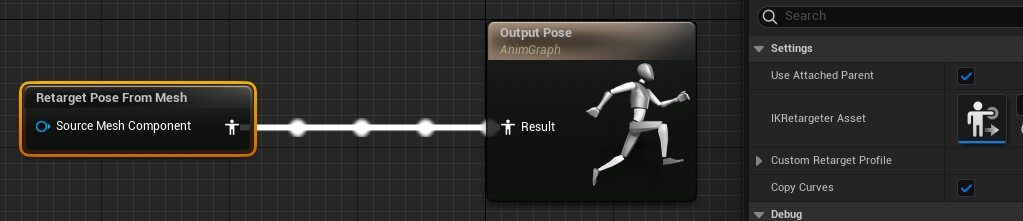
Add a Retarget Pose From Mesh node, referencing the just-made parameter. The “Source Mesh Component” can be left empty, as the new avatar’s mesh will be a child of the ZED avatar’s mesh. However, ensure that the “Use Attached Parent” option is ticked in the node Details.
Create an actor
Create a child actor to BP_ZED_Manny, the ZED avatar. Add a child “Skeletal Mesh Component” to its Skeletal Mesh Component.
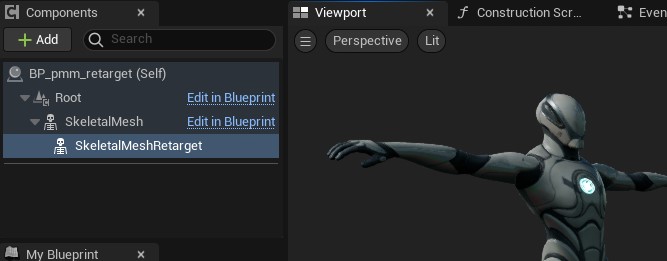
Set the mesh of this child to the mesh of the new avatar, and the Anim Class to the one just created. Check that the meshes overlap correctly, then set the “Visible” setting of the parent mesh to false and ensure that Visibility Based Anim Tick Option is set to “Always Tick Pose and Refresh Bones” on the parent mesh.
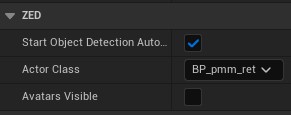
Use the actor with the visualizer
Replace the BP_ZED_Manny actor with your new one in the BP_BodyTracking_Visualizer. Uncheck the “Avatars visible” option in the details panel, and click play. You should see your avatar walking in the scene.
Using your own avatar [Deprecated version]
We now recommend using the UE5 Retargeter to use your avatars with the body tracking feature. The old way of importing the avatar might cause issues and we can’t guarantee it will continue to work in further versions. However, this explains how the “first-hand” ZED_Manny avatar is animated and may prove useful in understanding the whole animation pipeline.
More information about retargeting can be found in the official Unreal Engine documentation.
Deprecated version (click to unwrap)
Importing and using your own 3D avatar and rig as base [Deprecated]
One 3D Avatar is already available in the Example project but you can also import your own model. First, your 3D model needs to be rigged; otherwise, it won’t be possible to animate it.
For now, our plugin allows you to animate correctly an avatar if it is imported in the right format. We need the avatar to respect two conditions:
-
The first condition is on the avatar’s reference pose. The reference pose is the default pose of the avatar you can see when you open the skeleton asset window. We need this reference pose to be in T-Pose, which corresponds to the pose where the avatar is standing up with its arms held horizontally.
-
The second condition is on the avatar’s global orientation when imported. We want to start from a known orientation, so we need the avatar to be facing the +X direction in its reference pose.
To respect the first condition, you might need to change your avatar’s reference pose if it isn’t already a T-Pose. You can change its reference pose using Blender, for instance.
Moreover, in order to meet the second condition, you’ll have to tick the checkbox Force Front X-Axis to force the avatar to look in the +X direction. This way we make sure the avatar starts with a known orientation.
Importing procedure with Blender
- Import the mesh into Blender.
- Make sure the mesh is oriented following Blender default parameters: Facing -Y, Z up.
- Rig the mesh.
- If you’re using Mixamo to make your skeleton, ensure your scale is applied before exporting your FBX/OBJ file to Mixamo.
- Pose the mesh in T-Pose.
- When exporting from Blender, ensure your scale & transform are applied beforehand, and use the default FBX export settings.
- You can leave “Add leaf bones” checked or not, depending on your needs.
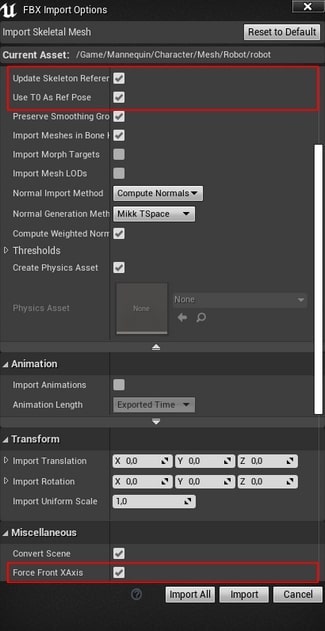
- Import to Unreal, checking the following settings :
- Skeletal Mesh
- Convert Scene
- Force Front XAxis
- If you’re using a T-Pose which is not the rest pose of your rig (e.g. from Mixamo):
- Update Skeleton Reference Pose
- Use T0 As Ref Pose
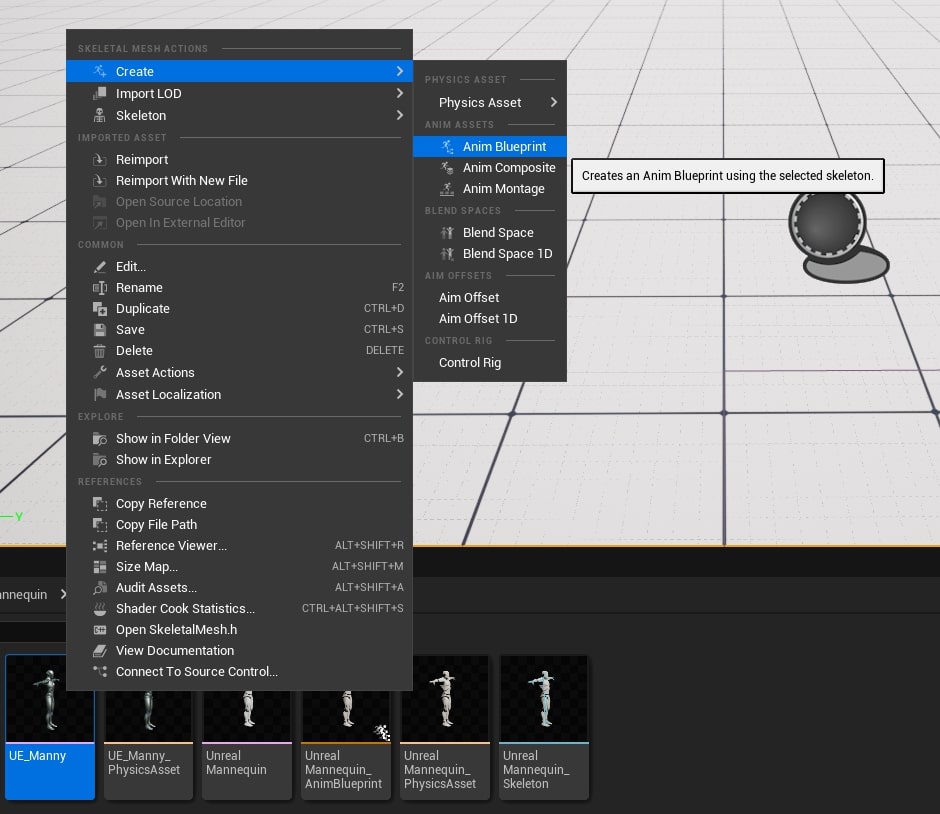
Creating an Animation Blueprint
Once you imported the avatar, the next thing to do is to create an Animation Blueprint. For that, Right click on the Skeletal Mesh you just imported, and select Create -> Anim Blueprint.
Now, you need to configure this Anim Blueprint to receive the skeleton data from the ZED SDK and to apply it correctly onto the avatar.
- Open the Anim blueprint and add a ZED Pose component.
- Create a variable for each input of this component and link it to the Output Pose node.
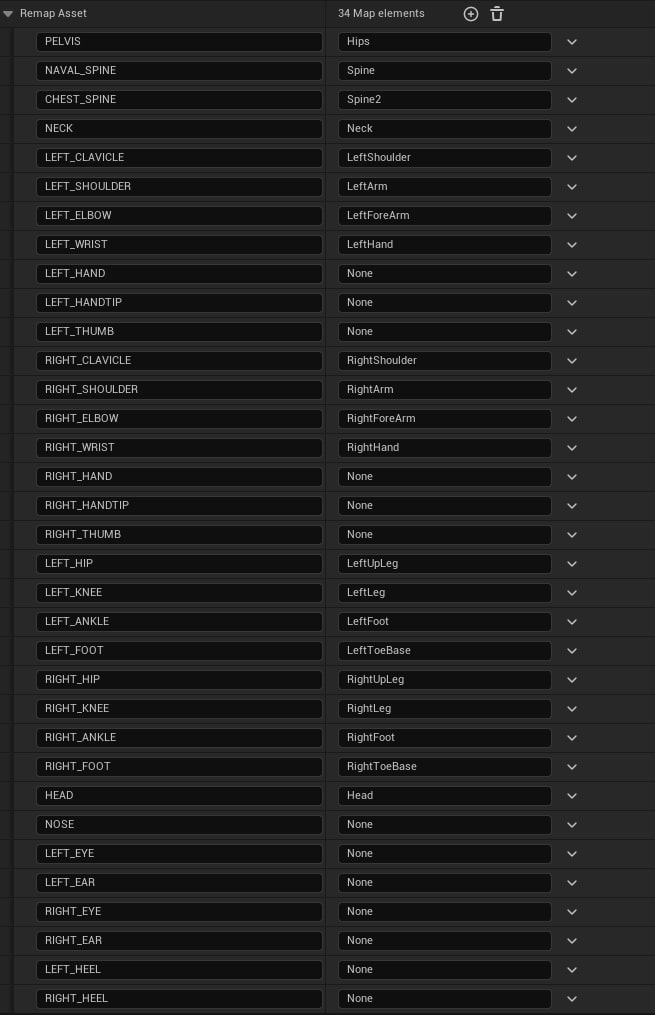
Setting up the Remap Asset
Your avatar’s joints probably don’t have the same names as the ones given by our plugin. The Remap Asset variable is used to match the joints from the ZED SDK with the joints of your avatar, exactly as the Livelink Remap asset.
- Select the Remap Asset variable and, for each of the joints from the ZED SDK, add its matching name from your avatar.
For example, “LEFT_SHOULDER” is mapped to “LeftForeArm”, or “LEFT_KNEE” to “LeftLeg”.
Creating an Actor Blueprint
Now, we have all the pieces to create a Blueprint that can be instantiated in the scene and animated using the ZED SDK skeleton data.
- Create an Actor Blueprint and add a Skeletal Mesh component.
- Set the Skeletal Mesh and the Anim class fields with the skeletal mesh you just imported and the Anim Blueprint previously created.
Your Actor is now ready to be automatically instantiated in the scene.
Setting up the Body Tracking Manager
Now, you need to configure the Body Tracking Manager so it will create a new instance of your Actor blueprint for each new detection in the scene and share the keypoint data with its anim blueprint.
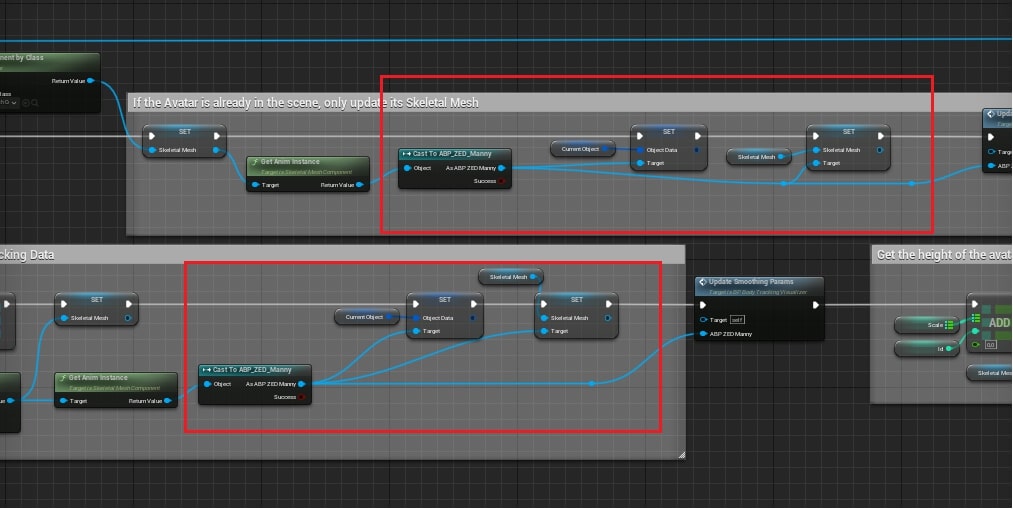
- Click on Edit BP_BodyTracking_Visualizer in the world hierarchy
- In the Event Graph, modify the parts of the blueprint highlighted in the following screenshot with your own Instance of AnimBlueprint.
- It will share the skeleton data from the ZED SDK to the ZED Pose node of the Anim blueprint for preprocessing.
- Then, the preprocessed data will be used to animate your Avatar in real time.
Run the Scene
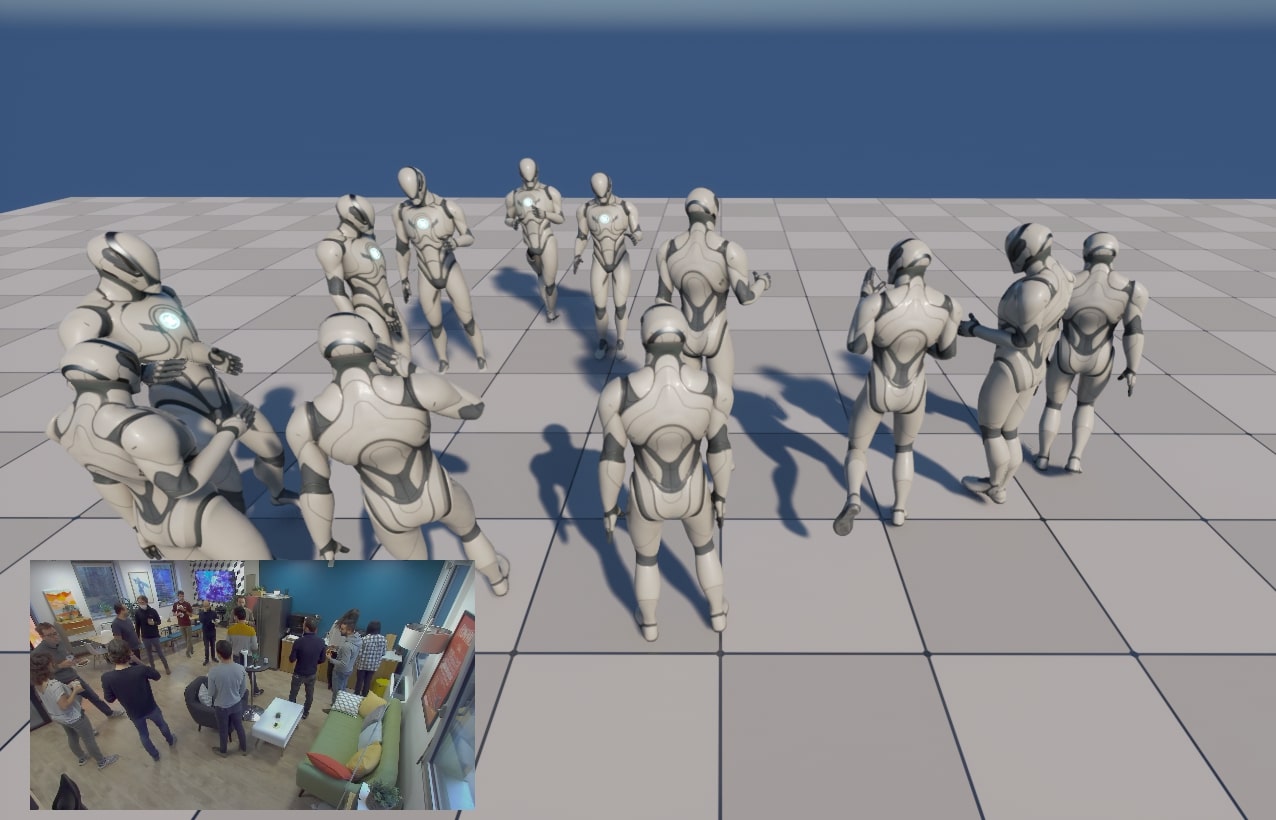
After a short initialization period, the app will pause for a few seconds as the body tracking module loads.
Once it does, you should see an Avatar imitating your movements in real time.
To see a similar scene already built, check out the L_BodyTracking level. There are also plenty of other scenes for getting started that will show you the basics of camera tracking, spatial mapping and more.