Magnetometer Overview
The magnetometer measures the intensity of the magnetic field around the camera in microteslas (μT). The magnetometer determines the orientation of the Earth’s magnetic field, which gives the absolute orientation of the camera relative to the magnetic North Pole.
Only the ZED 2 (out of production) and the ZED 2i cameras are equipped with a magnetometer.
Output Data
The following information is accessible from the camera sensor stack:
Using the API
The magnetometer measures the intensity of the magnetic fields around the camera. By measuring the Earth’s magnetic field, the sensor can estimate the camera’s absolute orientation relative to the magnetic North Pole.
Magnetometer values are stored in the SensorData::MagnetometerData which can be accessed with:
The values in magnetic_field_calibrated are different from the values in magnetic_field_uncalibrated only if the magnetometer sensor has been calibrated following the procedure illustrated below.
Code Example
For a code example, check out the Getting Sensor Data tutorial.
Magnetometer Calibration
Differently, from all the other sensors the magnetometer cannot be factory calibrated. The Earth’s magnetic field is very weak, about 35-65 µT, so the measures of the magnetometer sensor are highly affected by the environment where the camera is placed. Metal cases, power cables, robot motors, speakers, and all the ferromagnetic objects, are very strong sources of magnetic disturbance that strongly influence what the magnetometer measures.
For this reason, if you plan to use this useful sensor, you must calibrate it once the camera is fixed in the final location where it will be used. An accurate calibration procedure requires the camera to be rotated in space to acquire magnetic field information from all possible directions.
Once the magnetometer sensor is calibrated it can be used as a (3D) compass to determine the direction of the magnetic North (heading or yaw).
There are two kinds of calibration to be performed:
- Hard iron calibration
- Soft iron calibration
The hard iron calibration procedure generates the offset parameters used to compensate for the effects of all the active magnetic materials placed near the sensors. The soft iron calibration procedure generates the rescaling factor parameters used to compensate for the effects of metal objects placed near the sensor, which do not necessarily generate a magnetic field themselves. It ensures that the magnetic field along the three main axes is uniform, which is normally almost the case.
Calibrating the sensor once does not guarantee a permanent good calibration. The procedure must be replicated in time to compensate for the variations of the local magnetic fields.
To perform a tri-axis magnetometer calibration you can use the ZED Sensor Viewer application. Select the Magnetometer sensor and click on Calibrate Magnetometer.
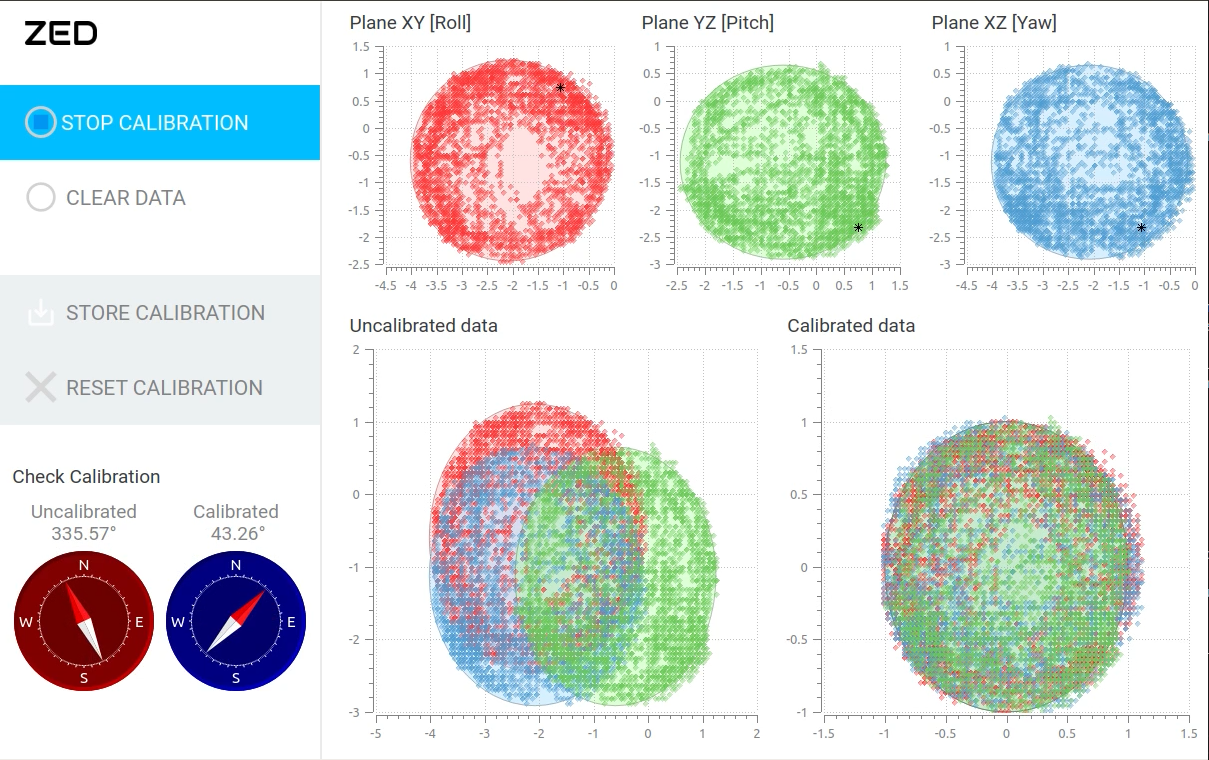
Calibration process
Start the calibration by pressing the button START CALIBRATION.
you can clear all the acquired data and restart the calibration process at any moment by pressing the CLEAR DATA button.
1. Initialize the plane XY
Perform a series of roll rotations. The scope of this phase is to “draw” a complete red circumference fitting the red ellipsoid in the background:
2. Initialize the plane YZ
Perform a series of pitch rotations. The scope of this phase is to “draw” a complete green circumference fitting the green ellipsoid in the background:
3. Initialize the plane XZ
Perform a series of yaw rotations. The scope of this phase is to “draw” a complete blue circumference fitting the blue ellipsoid in the background:
4. Perform a full calibration
Perform a series of mixed rotations trying to orient the camera in all the possible roll, pitch, and yaw combinations. The scope of this phase is to fill as much area inside the three ellipsoids as possible for the three planes XY, YZ and XZ:
5. Stop the calibration and verify the result
When the three ellipsoids are filled, the calibration process can be stopped by pressing the button STOP CALIBRATION.
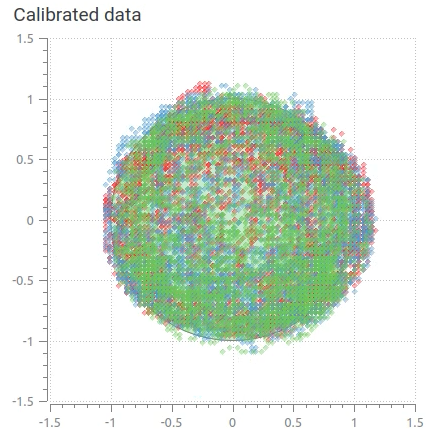
You can check the reliability of the calibration by verifying that the calibrated values for the three planes are perfectly overlapped in the Calibrated data chart, and that they fit (with some outliers) the unitary ellipsoid displayed in the background:
On the left side of the interface, you can find two compasses. The red compass shows the heading of the camera calculated using the uncalibrated magnetic field values, the blue compass shows the heading of the camera calculated using the calibrated magnetic field values. Place the camera horizontally and rotate it around the vertical axis. If the calibration is done well, the blue compass should display the correct camera orientation with respect to the North Magnetic Pole. You can use a “real” compass to compare the values.
The North Magnetic Pole does not correspond to the geographical magnetic pole and its location changes according to the latitude of the camera. Do not use a digital compass to compare the results if its readings are corrected using GPS coordinates (e.g. smartphone compass applications compensate for the North Magnetic Pole using GPS and can show different values).
6. Save the calibration parameters
Store the calibration parameters in the non-volatile memory of the camera by pressing the button STORE CALIBRATION.
You can reset the magnetometer calibration to the default values at any moment by pressing the RESET CALIBRATION button.
the reset process is not reversible and it will erase the current calibration.
7. Close the dialog
You can now close the calibration dialog to go back to the main Sensor Viewer. Select again the Magnetometer sensor and verify that on top of the plot you can read Magnetometer [Calibrated].