Custom Object Detection and Tracking with ROS 2
This guide explains how to use a custom YOLO-like model for object detection with the ZED ROS 2 Wrapper. This is useful if you have trained your own model and want to integrate it with the ZED SDK.
The custom model must:
- Be in ONNX format
- Be compatible with the ZED SDK
- Be exported correctly for integration
To enable your custom model:
- Generate the ONNX file from your trained model.
- Set the
object_detection.custom_onnx_fileparameter in your configuration.
Export the YOLO-like ONNX Model
You can perform object detection inference using a custom YOLO-like ONNX model.
Refer to the YOLO ONNX model export documentation for detailed instructions.
Here’s a quick example using Ultralytics YOLOv8:
Setup the Custom Model usage
To use your model:
- Set the following in your
common_stereo.yaml:
When enable_tracking is true, the ZED SDK’s advanced algorithms can track the detected objects over time, even if they are temporarily occluded or move out of the camera’s field of view.
The field tracking_state in the zed_interfaces/ObjectsStamped message will indicate the tracking state of each detected object. The possible values are:
0-> OFF: object is no longer valid1-> OK: object is valid and tracked2-> SEARCHING: occlusion occurred, trajectory is estimated3-> TERMINATE: the track will be deleted in the next frame
- Create a custom ONNX configuration file using the
custom_object_detection.yamltemplate.
Create a Custom Object Detection Model Configuration File
The header of your YAML config should look like this:
- Set the
custom_onnx_fileparameter to the path of your ONNX file. - Set the
custom_onnx_input_sizeparameter to the input resolution used during training (e.g., 512). - Set the
custom_class_countparameter to the number of classes your model was trained on (e.g., 80 for COCO dataset).
Class-Specific Configuration
For each class, add a class_XXX block (where XXX is the class index, from 0 to custom_class_count - 1):
- Set the
labelparameter to the label of the object in your custom ONNX file. - Set the
model_class_idparameter to the class ID of the object in your custom ONNX file. It is required that this value matches the ID of the class used during the training of the model. - Set the
enabledparameter totrueto enable the detection of this class of objects. This is a dynamic parameter, so it can be changed at runtime. - Set the
confidence_thresholdparameter to the minimum value of the detection confidence of an object. The value must be in the range [0,99] and it can be changed at runtime. - Set the
is_groundedparameter to provide hypothesis about the object movements (degrees of freedom or DoF) to improve the object tracking. This is a dynamic parameter, so it can be changed at runtime. - Set the
is_staticparameter to provide hypothesis about the object staticity to improve the object tracking. This is a dynamic parameter, so it can be changed at runtime. - Set the
tracking_timeoutparameter to the maximum tracking time threshold (in seconds) before dropping the tracked object when unseen for this amount of time. The value must be in the range [0,500] and it can be changed at runtime. Use -1.0 to disable the timeout. - Set the
tracking_max_distparameter to the maximum tracking distance threshold (in meters) before dropping the tracked object when unseen for this amount of meters. The value must be in the range [0,500] and it can be changed at runtime. Use -1.0 to disable the distance threshold. - Set the
max_box_width_normalizedparameter to the maximum allowed width normalized to the image size. The value must be in the range [0,1] and it can be changed at runtime. Use -1.0 to disable the width threshold. - Set the
min_box_width_normalizedparameter to the minimum allowed width normalized to the image size. The value must be in the range [0,1] and it can be changed at runtime. Use -1.0 to disable the width threshold. - Set the
max_box_height_normalizedparameter to the maximum allowed height normalized to the image size. The value must be in the range [0,1] and it can be changed at runtime. Use -1.0 to disable the height threshold. - Set the
min_box_height_normalizedparameter to the minimum allowed height normalized to the image size. The value must be in the range [0,1] and it can be changed at runtime. Use -1.0 to disable the height threshold. - Set the
max_box_width_metersparameter to the maximum allowed 3D width. The value must be in the range [0,500] and it can be changed at runtime. Use -1.0 to disable the width threshold. - Set the
min_box_width_metersparameter to the minimum allowed 3D width. The value must be in the range [0,500] and it can be changed at runtime. Use -1.0 to disable the width threshold. - Set the
max_box_height_metersparameter to the maximum allowed 3D height. The value must be in the range [0,500] and it can be changed at runtime. Use -1.0 to disable the height threshold. - Set the
min_box_height_metersparameter to the minimum allowed 3D height. The value must be in the range [0,500] and it can be changed at runtime. Use -1.0 to disable the height threshold. - Set the
object_acceleration_presetparameter to the object acceleration preset. The possible values are:DEFAULT,LOW,MEDIUM,HIGH. - Set the
max_allowed_accelerationparameter to the maximum acceleration of the object. The value must be in the range [0,10000] and it can be changed at runtime. When the value is different from the default [100000.0], this value takes precedence over the selectedobject_acceleration_preset, allowing for a custom maximum acceleration. The unit is m/s^2. Note: Using a good value for this parameter is important to avoid false positives in the object tracking process.
Template File
Use the provided custom_object_detection.yaml template as a reference example. It is preconfigured for models trained on the 80 classes COCO dataset.
Launch the ZED Node with Custom Object Detection and Tracking configuration
To launch the ZED node with the custom object detection configuration, use the launch command and set the value of the custom_object_detection_config_path launch setting:
Replace <camera_model> with the desired camera model (e.g., zedx, zedxm, zed2i, zed2, zedm, zed, or virtual) and <path_to_custom_object_detection.yaml> with the path to your custom object detection configuration file created in the previous step.
The custom_object_detection_config_path launch parameter is optional. If not provided, the ZED node will use the default configuration file custom_object_detection.yaml located in the config folder of the ZED ROS 2 Wrapper package.
Enable the Object Detection processing
You can automatically start the object detection module by setting the object_detection.od_enabled parameter to true in the common_stereo.yaml file. This will enable the object detection when the ZED node starts.
You can also start the object detection manually by calling the service ~/enable_obj_det with the parameter True.
In both cases, you can stop the object detection by calling the service ~/enable_obj_det with the parameter False.
See the services documentation for more info.
The first time you run the ZED node with the custom object detection configuration, the SDK will optimize the model for the GPU used on the host device.
This process may take a long time, depending on the model size and the power of the GPU used. The optimized model will be saved in the /usr/local/zed/resources folder and reused in subsequent runs, which will no longer require the optimization process.
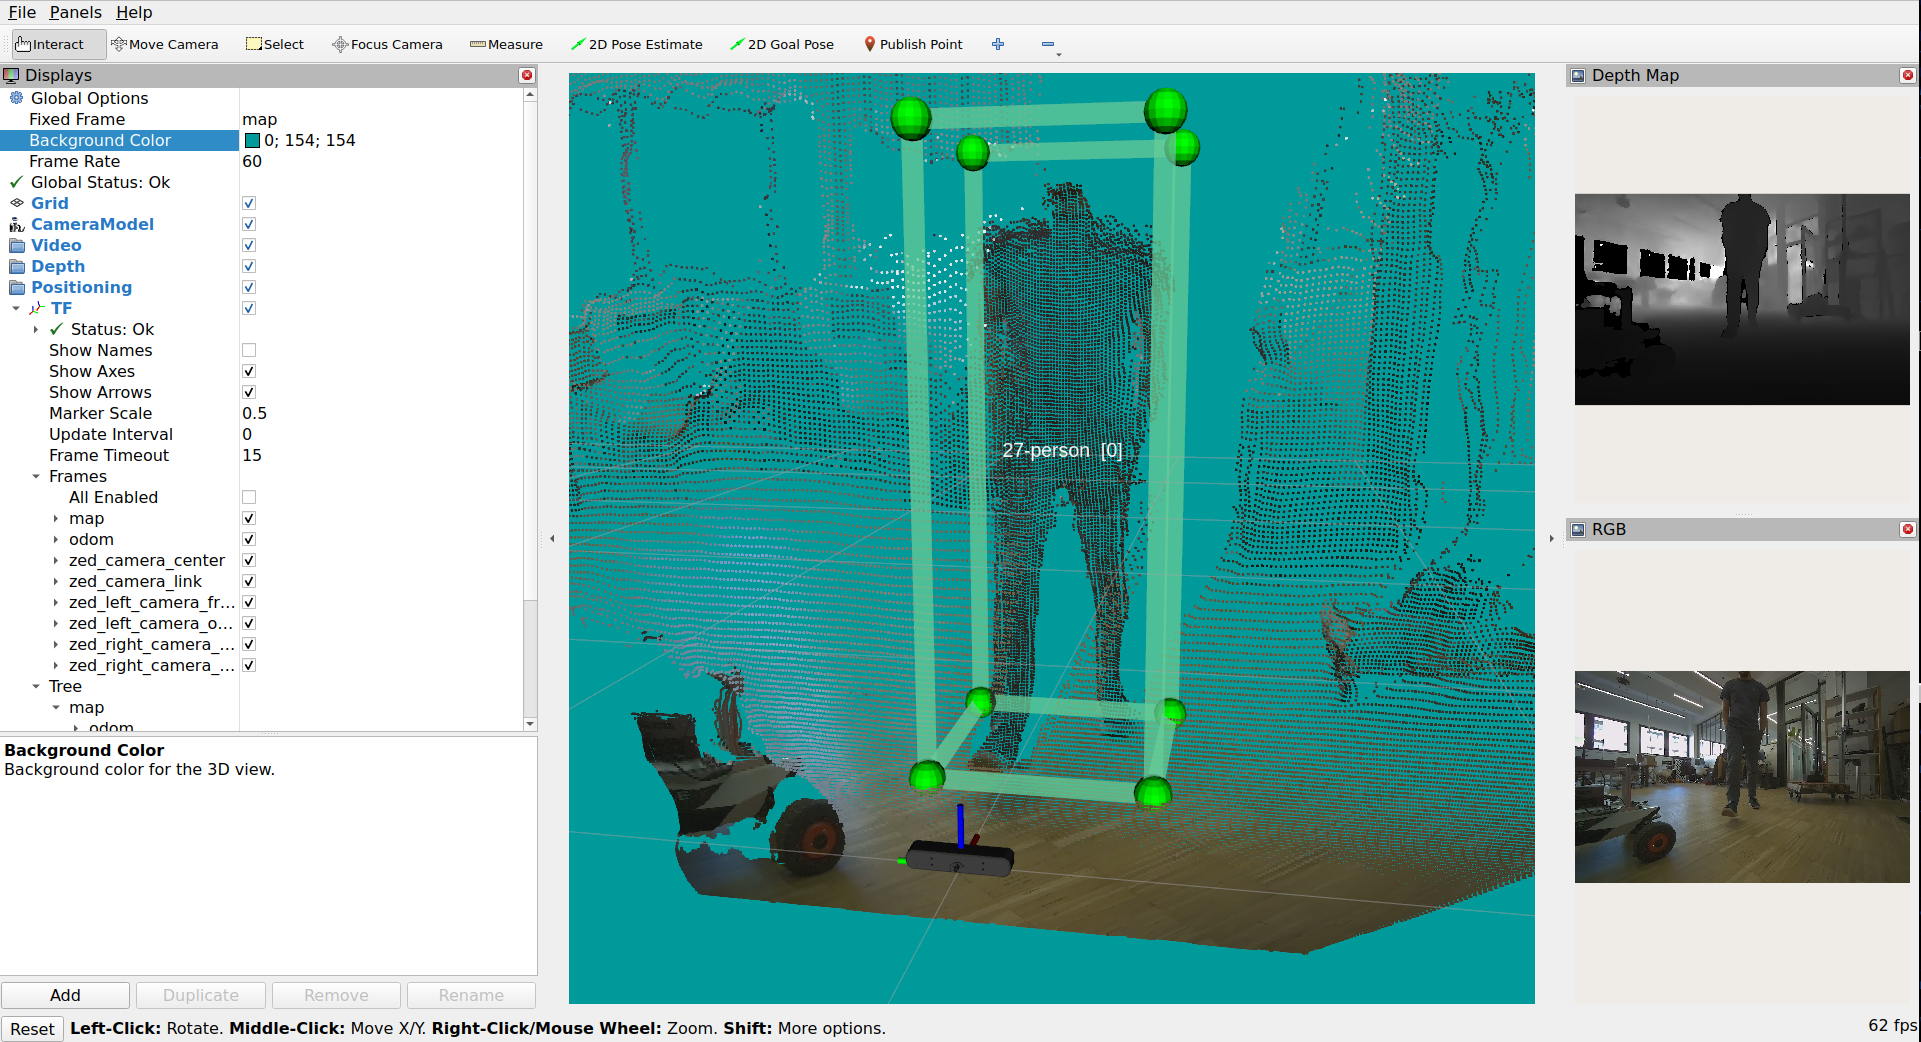
Object Detection and Tracking results
The results of the Object Detection and Tracking processing are published using a custom message of type zed_interfaces/ObjectsStamped defined in the package zed_interfaces.
To visualize the results of the Object Detection processing in RViz 2, the ZedOdDisplay plugin is required. The plugin is available in the zed-ros2-examples GitHub repository and can be installed following the online instructions.
The source code of the plugin is a valid example of how to process the data of the topics of type zed_interfaces/ObjectsStamped.
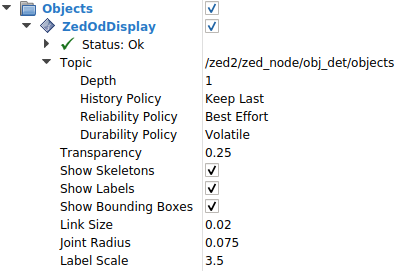
Parameters:
Topic: Selects the object detection topic to visualize from the list of available images in the combo box.Depth: The depth of the incoming message queue.History policy: Set the QoS history policy.Keep Lastis suggested for performance and compatibility.Reliability Policy: Set the QoS reliability policy.Best Effortis suggested for performance and compatibility.Durability Policy: Set the QoS durability policy.Volatileis suggested for compatibility.Transparency: the transparency level of the structures composing the detected objects.Show skeleton: Not used.Show Labels: enable/disable the visualization of the object label.Show Bounding Boxes: enable/disable the visualization of the bounding boxes of the detected objects.Link Size: the size of the bounding boxes’ corner lines.Joint Radius: the radius of the spheres placed on the corners of the bounding boxes.Label Scale: the scale of the label of the object.
The format of the label of the detected objects is:
Where:
tracking_idis the tracking ID of the detected object, associated by the ZED SDK to the detected object. The tracking ID is unique for each detected object and it is used to identify the object in the tracking process.labelis the label of the detected object, corresponding to the value of the parameterlabelin the configuration file.label_idis the ID of the label of the detected object, corresponding to the value of the parametermodel_class_idin the configuration file.