
Using the Object Detection API with a Custom Detector
Object detection is the ability to identify objects present in an image. Thanks to depth sensing and 3D information, the ZED camera can provide the 2D and 3D positions of the objects in the scene. Now even with any 2D bounding box detector.
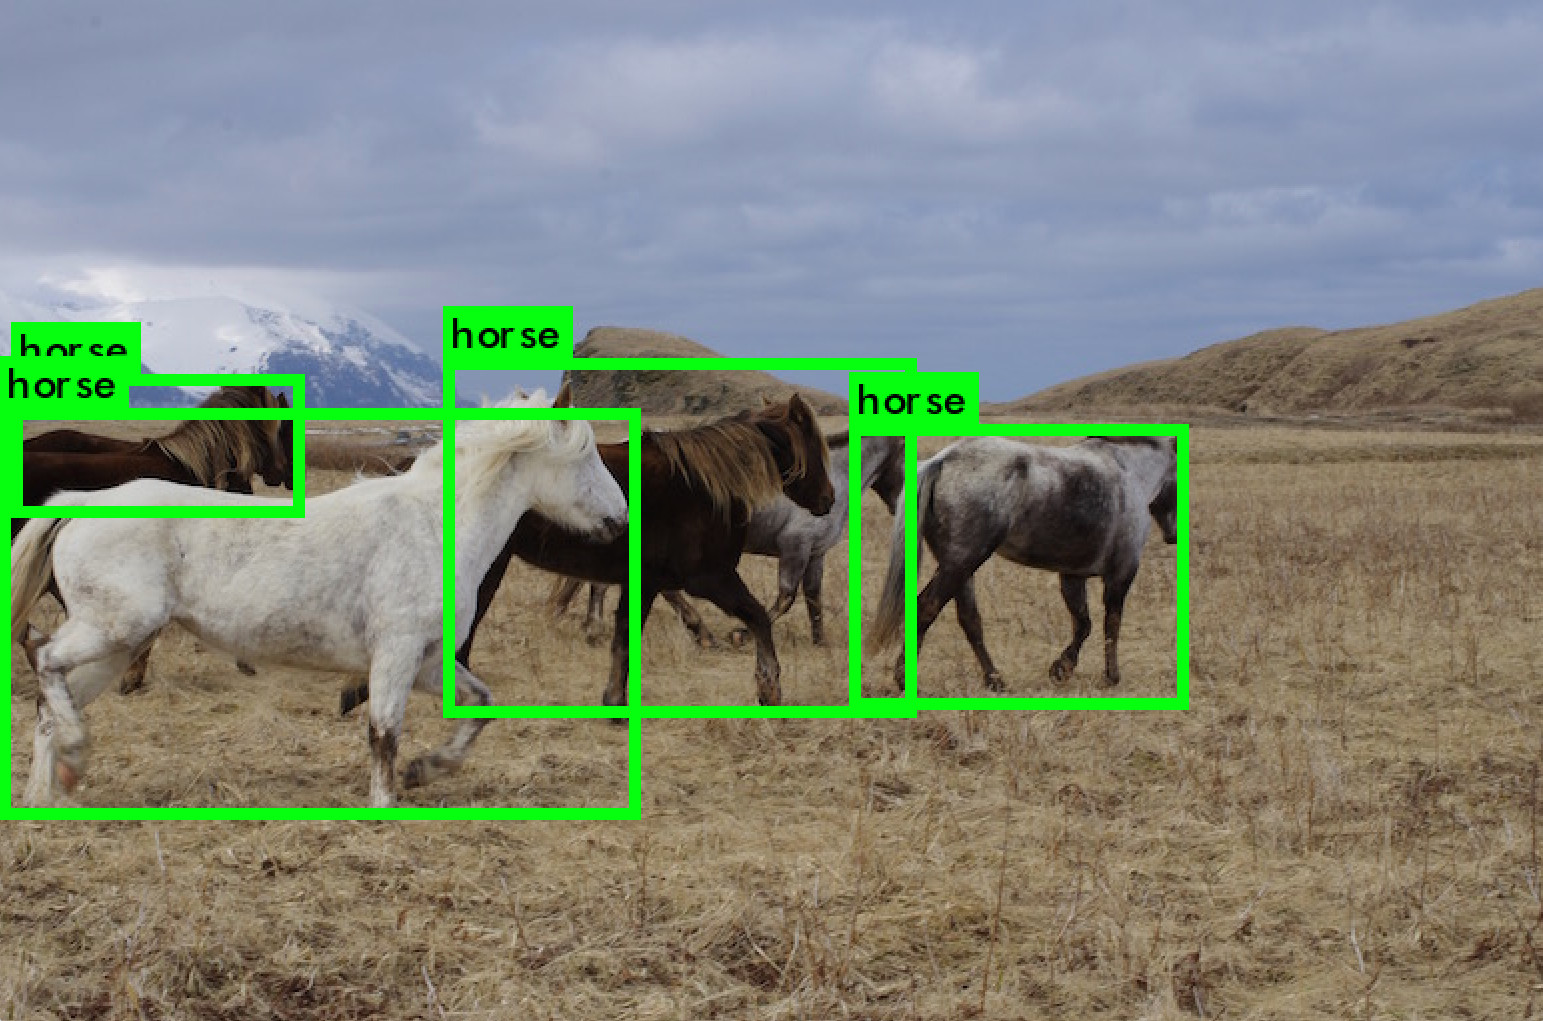
Since ZED SDK 3.6, a custom detector can be used with the API. The 2D detections are ingested and the 3D information such as position, 3D bounding box, and more are computed.
How It Works #
You can use your own bounding box detector, tailored for each custom need. The detections can then be fed into the ZED SDK that computes the 3D position of each object, as well as their 3D bounding box, using data from the depth module. The objects can also be tracked within the environment over time, even if the camera is in motion, thanks to data from the positional tracking module.
3D Object Detection and Tracking #
Using the 2D bounding boxes given by your own detection algorithm, the ZED SDK identifies the objects and computes their 3D position and velocity. Similar to the Object Detection module, the distance of the object from the camera is expressed in metric units (ex. meters) and calculated from the back of the left eye of the camera to the scene object.
The ZED SDK also computes a 2D mask that indicates which pixels of the left image belong to the object. From there, the ZED can output the 2D bounding boxes of the objects and accurately compute the 3D bounding boxes with the help of the depth map.
If the positional tracking module is activated, the ZED SDK can track the objects within the environment. This means that the detected object will keep the same ID through the sequence, as depicted below:
![]()
For more information on Object Detection, see the Using the API page.
Object Detection steps #
Training #
Several state-of-the-art object detection algorithms can be used to identify and localize objects. They can be trained on any dataset with annotated information, known as ground truth to teach the detector what to look for.
You can refer to this tutorial to train a custom model based on Yolov5 for instance. Several model variants can be chosen to improve accuracy or inference speed.
Ideally, the inference requirements such as available memory or compute constraints should be considered from the training step to select the most pertinent model architecture.
Inference #
We provide optimized inference samples that use any Yolov5 model using the TensorRT library. We also provide a sample that can run Yolov4 (and more!) with the OpenCV DNN module, which can be trained using darknet.
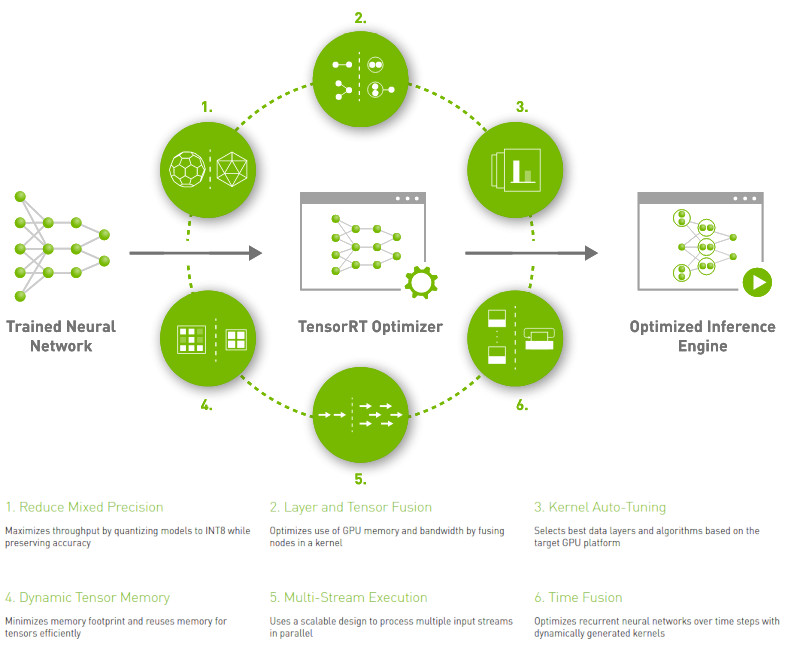
TensorRT library is installed when installing the ZED SDK AI module. For more samples on different network architectures, you can refer to this repository. This library is not mandatory but is advised to get the best possible performance, especially on smaller devices such as NVIDIA® Jetson™, where the built-in quantification to fp16/int8 provides optimum run times.
Typically when using PyTorch to train the network, the model can also be exported in ONNX format. This file contains both the network architecture and weights and can easily be used with TensorRT using for instance this light wrapper. Optional post-processing steps may need to be implemented depending on the models.
📌 Note: The inference can also directly be done in Python using a training framework such as PyTorch for instance.
Workflow #
After each grab call, the image can be retrieved and sent to your detector, and the bounding box detections result can be ingested into the ZED SDK for processing. Then using retrieveObjects the tracked 3D objects can be retrieved.
The detections are relative to the left (rectified) image at native resolution and should be rescaled accordingly if the inference was done at a lower resolution.
Object Detection Configuration #
To configure the Object Detection module, use ObjectDetectionParameters at initialization. ObjectDetectionRuntimeParameters will be ignored for the Custom Model, no filtering will be applied (score thresholds, NMS, etc) to the input 2D boxes.
The detection model parameter detection_parameters.detection_model must be set to CUSTOM_BOX_OBJECTS:
// Set the other initialization parameters
ObjectDetectionParameters detection_parameters;
detection_parameters.detection_model = OBJECT_DETECTION_MODEL::CUSTOM_BOX_OBJECTS; // Mandatory for this mode
detection_parameters.enable_tracking = true; // Objects will keep the same ID between frames
detection_parameters.enable_mask_output = true; // Outputs 2D masks over detected objects
# Set the other initialization parameters
detection_parameters = sl.ObjectDetectionParameters()
detection_parameters.detection_model = sl.OBJECT_DETECTION_MODEL.CUSTOM_BOX_OBJECTS # Mandatory for this mode
detection_parameters.enable_tracking = True # Objects will keep the same ID between frames
detection_parameters.enable_mask_output = True # Outputs 2D masks over detected objects
// Set the other initialization parameters
ObjectDetectionParameters detection_parameters = new ObjectDetectionParameters();
detection_parameters.detectionModel = sl.OBJECT_DETECTION_MODEL.CUSTOM_BOX_OBJECTS; // Mandatory for this mode
detection_parameters.enableObjectTracking = true; // Objects will keep the same ID between frames
detection_parameters.enable2DMask = true; // Outputs 2D masks over detected objects
If you want to track objects’ motion within their environment, you will first need to activate the positional tracking module. Then, set detection_parameters.enable_tracking to true.
if (detection_parameters.enable_tracking) {
    // Set positional tracking parameters
    PositionalTrackingParameters positional_tracking_parameters;
    // Enable positional tracking
    zed.enablePositionalTracking(positional_tracking_parameters);
}
if detection_parameters.enable_tracking:
    # Set positional tracking parameters
    positional_tracking_parameters = sl.PositionalTrackingParameters()
    # Enable positional tracking
    zed.enable_positional_tracking(positional_tracking_parameters)
if (detection_parameters.enableObjectTracking ) {
  // Set positional tracking parameters
  PositionalTrackingParameters trackingParams = new PositionalTrackingParameters();
  // Enable positional tracking
  zed.EnablePositionalTracking(ref trackingParams);
}
With these parameters configured, you can enable the object detection module:
// Enable object detection with initialization parameters
zed_error = zed.enableObjectDetection(detection_parameters);
if (zed_error != ERROR_CODE::SUCCESS) {
    cout << "enableObjectDetection: " << zed_error << "\nExit program.";
    zed.close();
    exit(-1);
}
# Enable object detection with initialization parameters
zed_error = zed.enable_object_detection(detection_parameters)
if zed_error != sl.ERROR_CODE.SUCCESS :
    print("enable_object_detection", zed_error, "\nExit program.")
    zed.close()
    exit(-1)
// Enable object detection with initialization parameters
zed_error = zedCamera.EnableObjectDetection(ref detection_parameters);
if (zed_error != ERROR_CODE.SUCCESS) {
    Console.WriteLine("enableObjectDetection: " + zed_error + "\nExit program.");
    zed.Close();
    Environment.Exit(-1);
}
📌 Note: Object Detection has been optimized for ZED 2/ZED 2i/ZED Mini and uses the camera motion sensors for improved reliability. Therefore the Object Detection module requires a ZED 2/ZED 2i or ZED Mini, and sensors cannot be disabled when using the module.
Ingesting Custom Bounding Boxes detections #
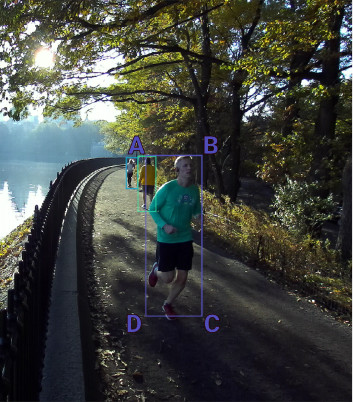
A 2D bounding box is represented as four 2D points starting from the top left corner of the object, as follows:
The detector output must be ingested into the ZED SDK using the CustomBoxObjectData structure. It contains the following fields:
unique_object_id: used to track the object through the SDK if other parallel processes occur for instance.probability: detector score, this score can be used to improve the tracking and the localization in case of ambiguities.label: this is the object class, outputted by the detector. It’s also used by tracking to improve re-identification.bounding_box_2d: 2D bounding box using unsigned integer size, the reference size is the native camera image size.
std::vector<sl::CustomBoxObjectData> objects_in;
// The "detections" variable contains your custom 2D detections
for (auto &it : detections) {
    sl::CustomBoxObjectData tmp;
    // Fill the detections into the correct SDK format
    tmp.unique_object_id = sl::generate_unique_id();
    tmp.probability = it.conf;
    tmp.label = (int) it.class_id;
    tmp.bounding_box_2d = it.bounding_box;
    tmp.is_grounded = true; // objects are moving on the floor plane and tracked in 2D only
    objects_in.push_back(tmp);
}
zed.ingestCustomBoxObjects(objects_in);
objects_in = []
# The "detections" variable contains your custom 2D detections
for it in detections:
    tmp = sl.CustomBoxObjectData()
    # Fill the detections into the correct SDK format
    tmp.unique_object_id = sl.generate_unique_id()
    tmp.probability = it.conf
    tmp.label = (int) it.class_id
    tmp.bounding_box_2d = it.bounding_box
    tmp.is_grounded = True # objects are moving on the floor plane and tracked in 2D only
    objects_in.append(tmp)
zed.ingest_custom_box_objects(objects_in)
List<sl::CustomBoxObjectData> objects_in = new List<sl::CustomBoxObjectData>();
// The "detections" variable contains your custom 2D detections
for (auto &it : detections) {
    sl::CustomBoxObjectData tmp;
    // Fill the detections into the correct SDK format
    tmp.uniqueObjectId = sl.Camera.GenerateUniqueID();
    tmp.probability = it.conf;
    tmp.label = (int) it.class_id;
    tmp.boundingBox2D = it.bounding_box;
    tmp.is_grounded = true; // objects are moving on the floor plane and tracked in 2D only
    objects_in.push_back(tmp);
}
zed.ingestCustomBoxObjects(objects_in);
Getting Object Data #
Similar to Object Detection, the 3D positions can be in different reference frames depending on the grab parameters. You can find more information on the Object Detection documentation
sl::Objects objects; // Structure containing all the detected objects
zed.retrieveObjects(objects, detection_parameters_rt); // Retrieve the 3D tracked objects
objects = sl.Objects() # Structure containing all the detected objects
zed.retrieve_objects(objects, obj_runtime_param) # Retrieve the 3D tracked objects
sl.Objects objects = new sl.Objects(); // Structure containing all the detected objects
zed.RetrieveObjects(ref objects, ref obj_runtime_param); // Retrieve the 3D tracked objects
The sl::Objects class stores all the information regarding the different objects present in the scene in its object_list attribute. Each individual object is stored as a sl::ObjectData with all information about it, such as bounding box, position, mask, etc. All objects from a given frame are stored in a vector within sl::Objects. sl::Objects also contains the timestamp of the detection, which can help connect the objects to the images. For more information, refer to the Object Detection page
You can iterate through the objects as follows:
for(auto object : objects.object_list)
  std::cout << object.id << " " << object.position << std::endl;
for object in objects.object_list:
  print("{} {}".format(object.id, object.position))
for (int idx = 0; idx < objects.numObject; idx++)
  Console.WriteLine(objects.objectData[idx].id + " " + objects.objectData[idx].position);
Accessing Object Information #
Once a sl::ObjectData is retrieved from the object vector, you can access information such as its ID, position, velocity, label, and tracking_state:
unsigned int object_id = object.id; // Get the object id
int object_label = object.raw_label; // Get the label
sl::float3 object_position = object.position; // Get the object position
sl::float3 object_velocity = object.velocity; // Get the object velocity
sl::OBJECT_TRACKING_STATE object_tracking_state = object.tracking_state; // Get the tracking state of the object
if (object_tracking_state == sl::OBJECT_TRACKING_STATE::OK) {
    cout << "Object " << object_id << " is tracked" << endl;
}
object_id = object.id # Get the object id
object_label = object.raw_label; # Get the label
object_position = object.position # Get the object position
object_velocity = object.velocity # Get the object velocity
object_tracking_state = object.tracking_state # Get the tracking state of the object
if object_tracking_state == sl.OBJECT_TRACKING_STATE.OK:
    print("Object {0} is tracked\n".format(object_id))
uint object_id = object.id; // Get the object id
int object_label = object.rawLabel; // Get the label
Vector3 object_position = object.position; // Get the object position
Vector3 object_velocity = object.velocity; // Get the object velocity
OBJECT_TRACKING_STATE object_tracking_state = object.objectTrackingState; // Get the tracking state of the object
if (object_tracking_state == sl.OBJECT_TRACKING_STATE.OK) {
    Console.WriteLine("Object " + object_id + " is tracked");
}
📌 Note: To access the label from your custom detector in the ZED SDK, use the raw_label field. This value forwards the value from your detector, the label field is used for the SDK’s own Object Detection classes.
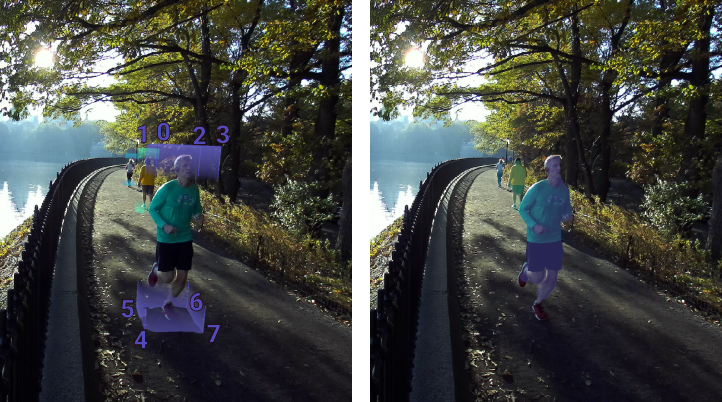
The 3D bounding boxes and the mask can also be accessed from this structure. A 3D bounding box is represented by eight 3D points starting from the top left front corner, as follows:
Code Example #
For code examples, check out the Tutorial and Sample on GitHub.