How to Use Matlab with ZED
Introduction
This tutorial is intended for those who want to use the ZED with Matlab. It is divided into two sections:
-
The first part shows how to capture video with the camera in Matlab.
-
The second part explains how to get depth, point cloud and positional tracking data.
Capturing Video
This section shows how to open the camera in Matlab and display the raw (unrectified) video feed. To get the rectified video and depth, see the second part of this tutorial.
Prerequisites
You must have a MathWorks account (free) and Matlab installed on your system. Even if you’re new to Matlab, this tutorial should be easy to follow.
Getting started
Open Matlab and in the Command Window, enter this command:
You should encounter this error if you’ve never used Matlab with a webcam before:
If you encounter the error, click on the link in the error log. A dialog window should appear that prompts you to install a package to support video acquisition with USB cameras:
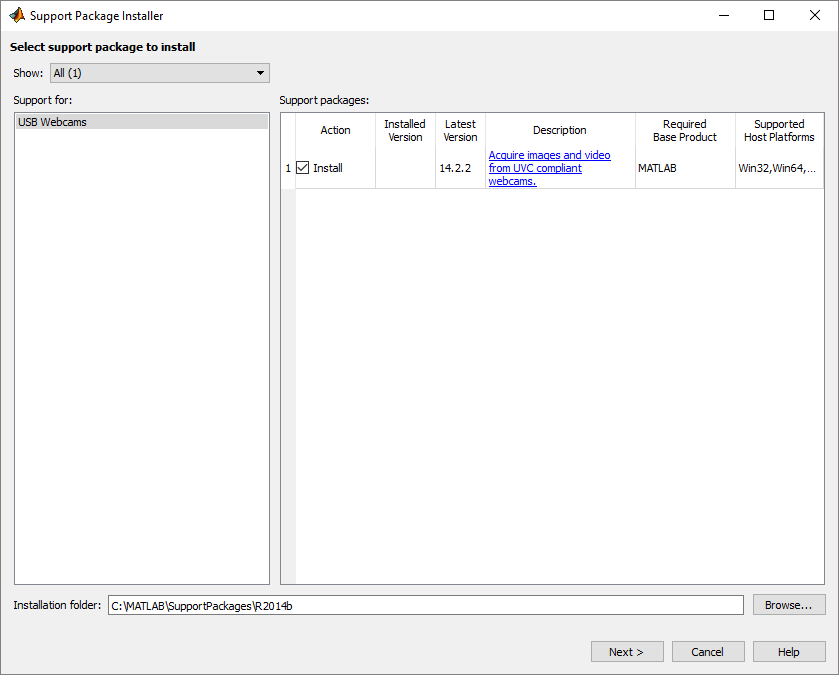
Click Next and Log In. Matlab will ask for your MathWorks account credentials. Go through the MathWorks auxiliary software license agreement. Click Next and Install. Package installation can take around 10-15 seconds.
When the setup process is finished, uncheck the “Show support package examples” check box and click on Finish. Now, in the Matlab Command Window, enter:
You should get this return:
Perfect! The ZED camera is now properly detected. Open the ZED camera with the following command line:
and the cam variable will return the current parameters of the camera:
You can also check if the ZED camera is running properly with this command:
Now start grabbing images with this command:
You’ve just grabbed your first ZED frame in Matlab. If you need real-time video capture, set a loop. The ZED camera will stay active as long as you keep the cam variable in Matlab’s environment. To turn off the camera, use this command:
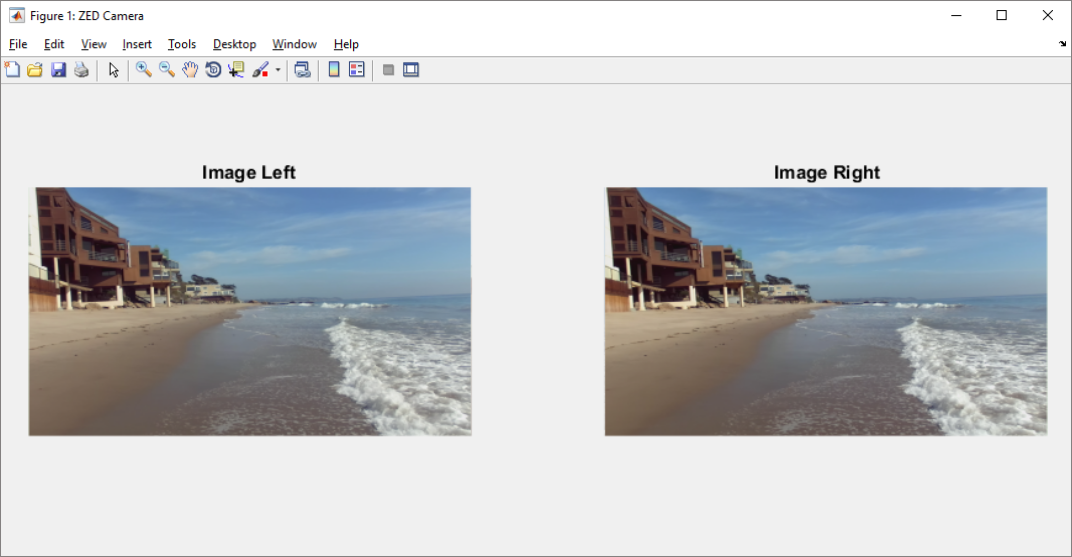
Here is a code snippet that demonstrates how to open the ZED, grab side-by-side images and split them into left and right images:
As a result, you should see the left and right images in the same window.
Using the ZED SDK
The purpose of this section is to explain how to use the ZED and its SDK to capture depth and motion tracking in Matlab. Here we use the ability of Matlab to execute C++ code through an intermediate file called MEX file.
Prerequisites
- Matlab (tested with R2016b version).
- ZED SDK
- ZED Matlab interface available on GitHub
Package
The Matlab interface contains the following directories:
- matlab: Contains Matlab examples ZED_Camera.m, ZED_Tracking.m and ZED_PointCloud.m that demonstrate the use of the ZED SDK features in Matlab.
- src: Contains all the files needed to build the Mex file wrapping the SDK functions.
In this directory, you will find a mex subfolder with a ‘mexZED.cpp’ file which contains the ZED SDK functions and the interface with Matlab. This file is referred to as a MEX file; it re-implements the majority of the ZED SDK functions in Matlab. It is provided as a basic container and can be complemented with your own functions.
- Since Matlab does not handle image representations the same way the ZED SDK does, additional conversion functions are required. They are located in the different ‘.hpp’ files in the include directory.
In the ‘ZED_Camera.m’ file, the ZED SDK functions can be called using mexZED(’..’). Check the ‘mexZED.cpp’ to see the list of available functions.
Build procedure
We need to compile the mexZED.cpp file in a MEX file format which can be used by Matlab. Usually, MEX files can be directly compiled by Matlab but since several libraries need to be linked (ZED, OpenCV, CUDA), it is easier to use CMake.
Windows
In CMake GUI:
- Set ‘where is the source code’ as ‘zed-matlab\src’
- Set ‘Where to build the binaries’ as ‘zed-matlab\build’
- Make sure to specify an x64 version of Visual Studio
- Click ‘Configure’
- You may encounter an error saying ‘MATLAB not found…nothing will be built.’
It means that the ‘MATLAB_ROOT’ variable isn’t containing a valid path to your Matlab installation. To solve it, you can create a MATLAB_ROOT environment variable, reboot, and click on ‘Configure’, or edit the MATLAB_ROOT variable if it is already displayed in the CMake GUI i.e.‘MATLAB_ROOT=C:/Program Files/MATLAB/R2016b’
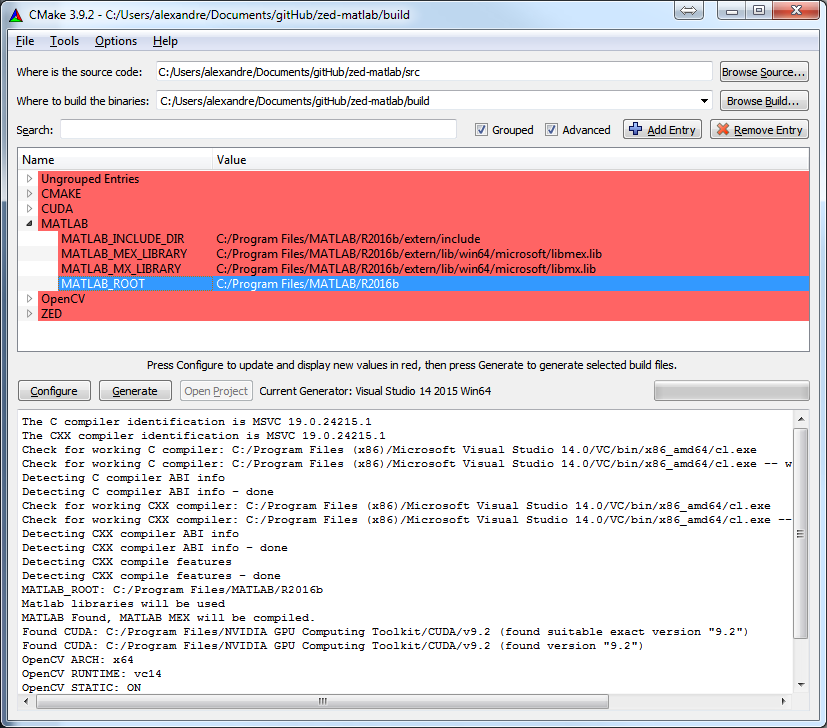
- Click on ‘Generate’
- Click on ‘Open Project’
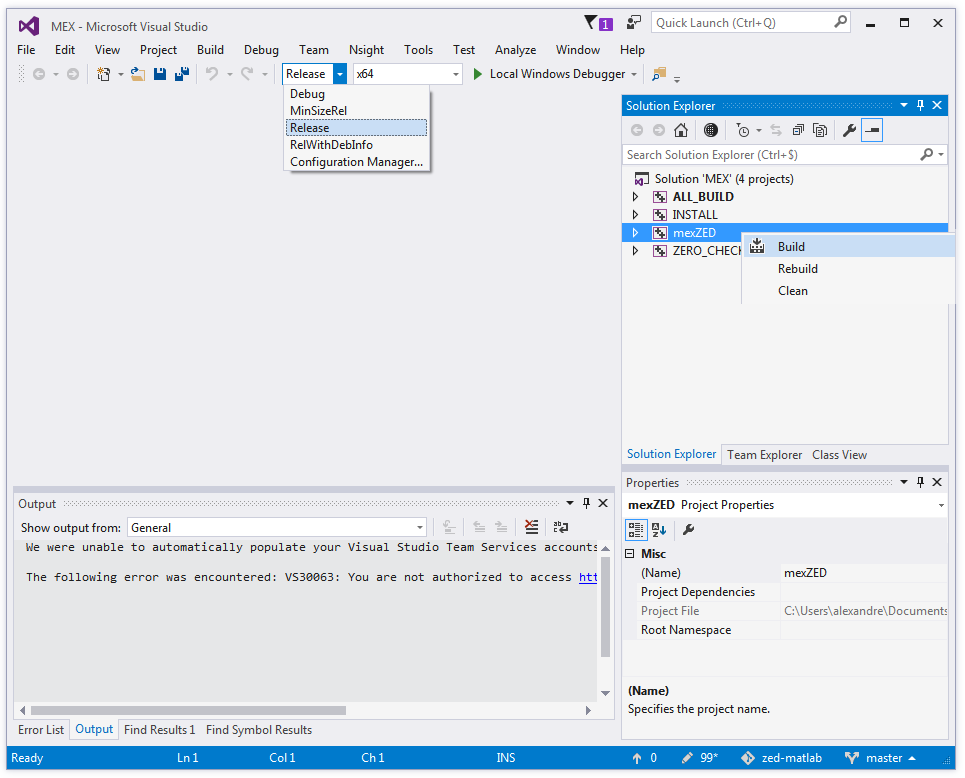
- Set the Solution Configuration to Release
- Build mexZED
- Build INSTALL
Linux
Open a terminal in the ‘zed-matlab’ directory and execute the following command:
The created Mex file will be copied into zed-matlab\matlab. Now you should be able to run the ZED examples!
Run the Examples
Open Matlab, move to the zed-matlab\matlab directory and launch the samples.
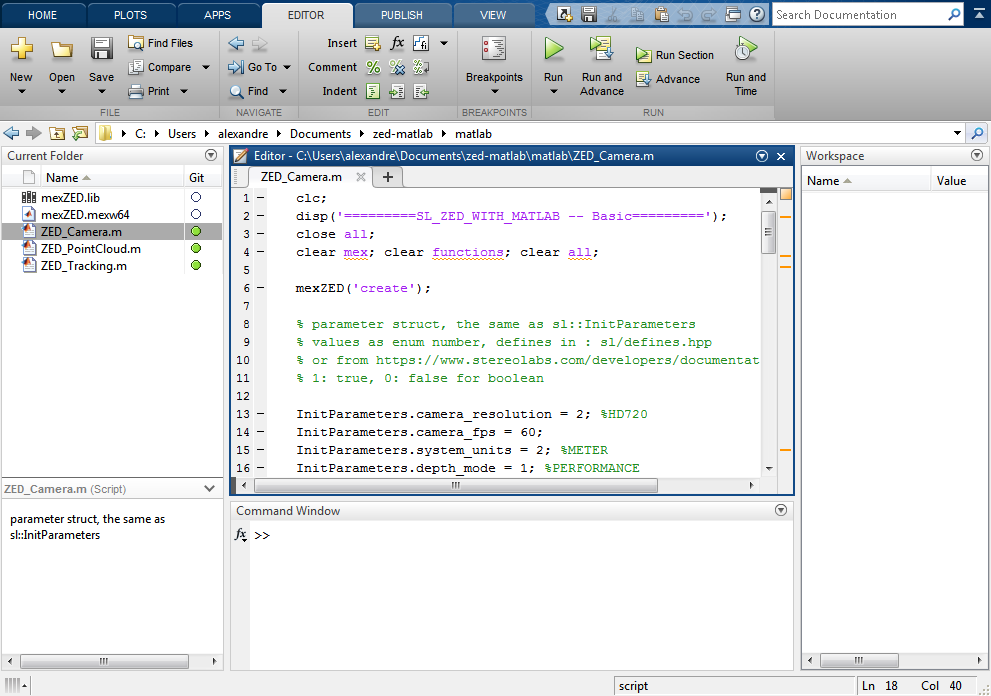
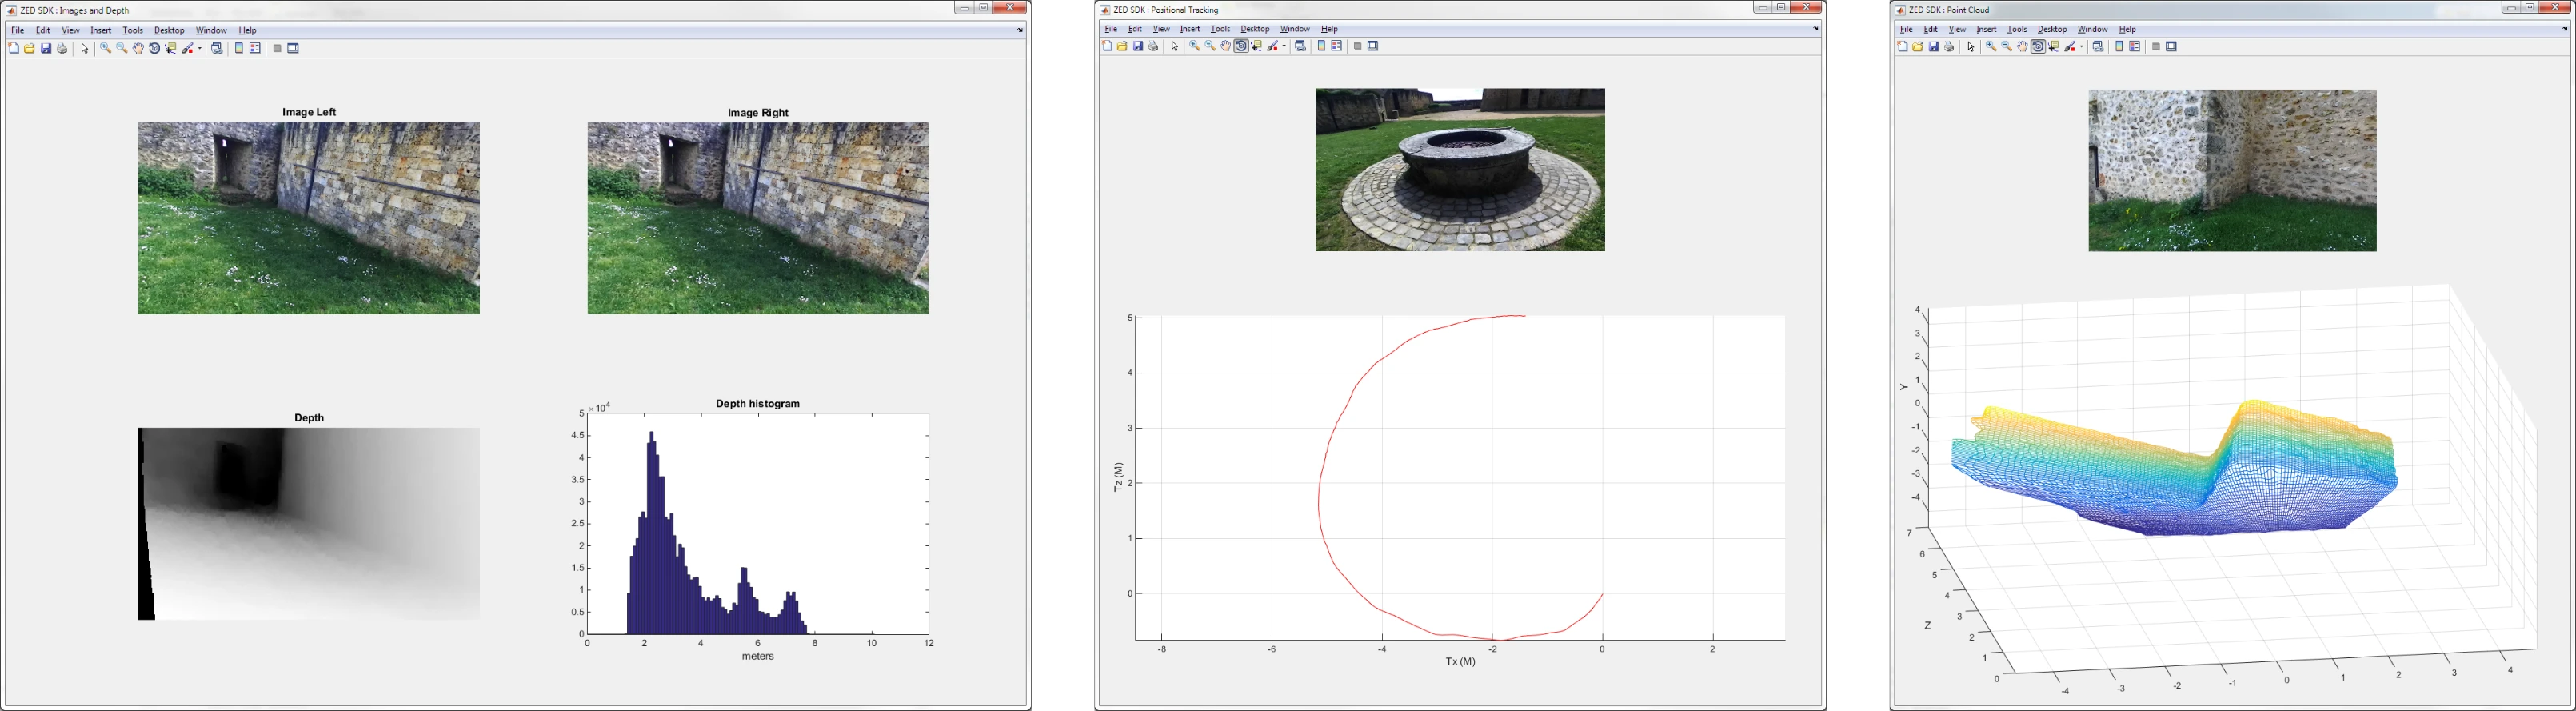
ZED_Camera.m shows how to open the ZED, capture video and depth and display a depth histogram.
ZED_Tracking.m shows how to open the ZED, capture images and positional tracking data and draw the 3D position of the camera over time.
ZED_PointCloud.m shows how to open the ZED, capture images and 3D point cloud. The point cloud is displayed as a mesh.