Live Link for UE5
The ZED Live Link plugin allows developers to send camera tracking information as well as skeleton data into Unreal Engine 5 using a plugin integrated into UE5. You can control a Skeletal Mesh in real time using the Skeleton tracking module of the ZED SDK, without the need to install the UE5 plugin.
You can have an overview of the solution on the diagram below:
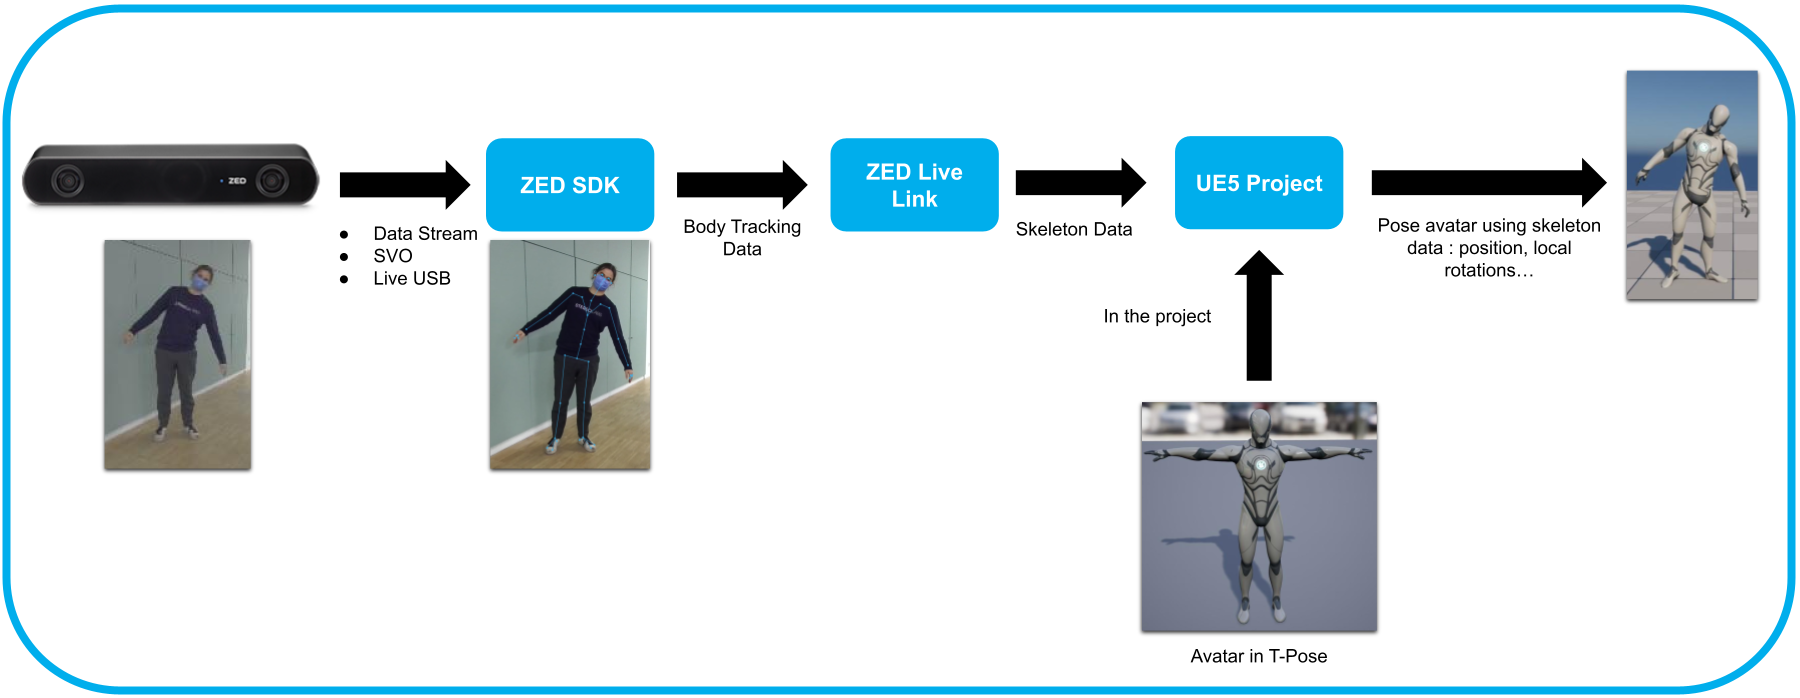
The machine running ZED Live Link will use the ZED SDK, so it should be installed, download it here. The Unreal Project can run on a separate machine (Windows or Linux).
What is Live Link? #
Live Link is a plugin designed to stream animation data coming from external sources to UE. You can get more information about this plugin in the UE5 Live Link doc. Our plugin uses its pipeline to stream skeleton data into UE5.
In this tutorial, you’ll learn how to use our ZED Live Link sample, connect it to your Unreal Project and animate a default avatar with the Live Link skeleton data. You must follow these steps:
1. Import the plugin to your project #
- Go into the root folder of your Unreal Project (where the “Content” folder is located).
- Create a “Plugins” folder if it does not already exist.
- Copy the ZEDLiveLink folder in the “Plugins” Directory of your project.
- Open the project
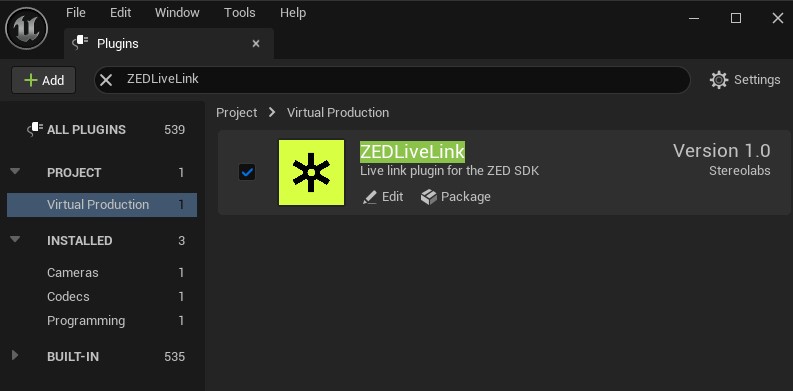
- Navigate to Edit -> Plugins.
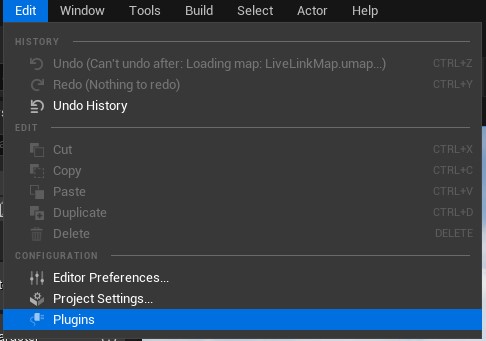
- Under the Virtual Production section, click Enabled for Live Link, and Yes on the confirmation window, then restart the Editor.
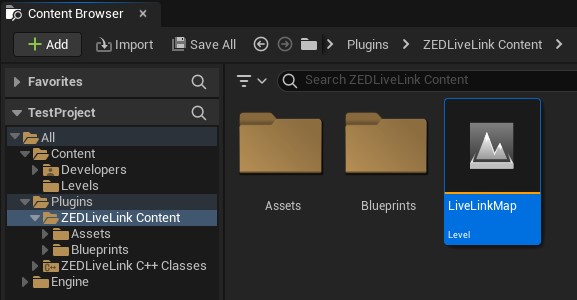
2. Get familiar with the samples from the plugin #
The plugin comes with a pre-set sample map, prepared with the necessary resources. You can use it as it is, or copy it to your project to build upon it.
It’s located at Plugins -> ZEDLiveLink Content -> LiveLinkMap.
BP_ZEDLivelink_Manager #
The scene contains a BP_ZEDLivelink_Manager blueprint with some useful settings.
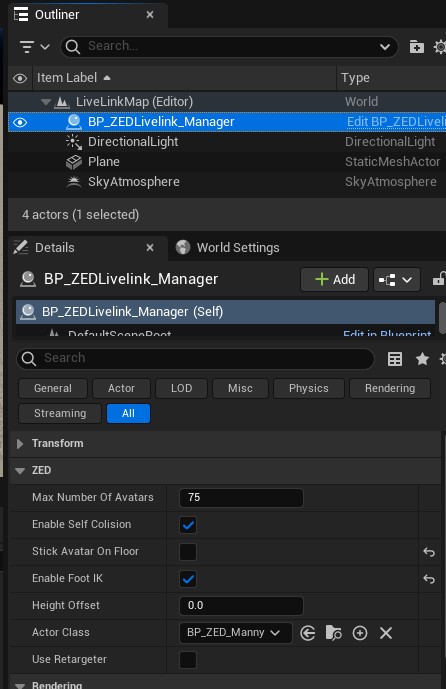
- Max Number of Avatars: Maximum number of body tracking detections.
- Enable Self Collision: If true, the avatar will collide with itself, preventing limbs from disappearing into the avatar.
- Enable Foot IK: Enable foot adjustments to prevent jitter and stick them to the ground when they should not be moving.
- Height Offset: Manual Z-axis offset for the avatars.
- Actor Class: The blueprint to use for the avatars.
- Use Retargeter: Tick this if your avatar’s blueprint uses the UE5 retargeter to animate another model than the default one.
📌 Note: The Use Retargeter checkbox should be ticked only if you’ve put in place a Animation Retargeting system with the actor class passed to Actor Class (see Animate New Avatar). Else, there could be animation problems like avatar not showing or not moving.
3. Run ZED Live Link #
Deprecated instructions (before 4.1)
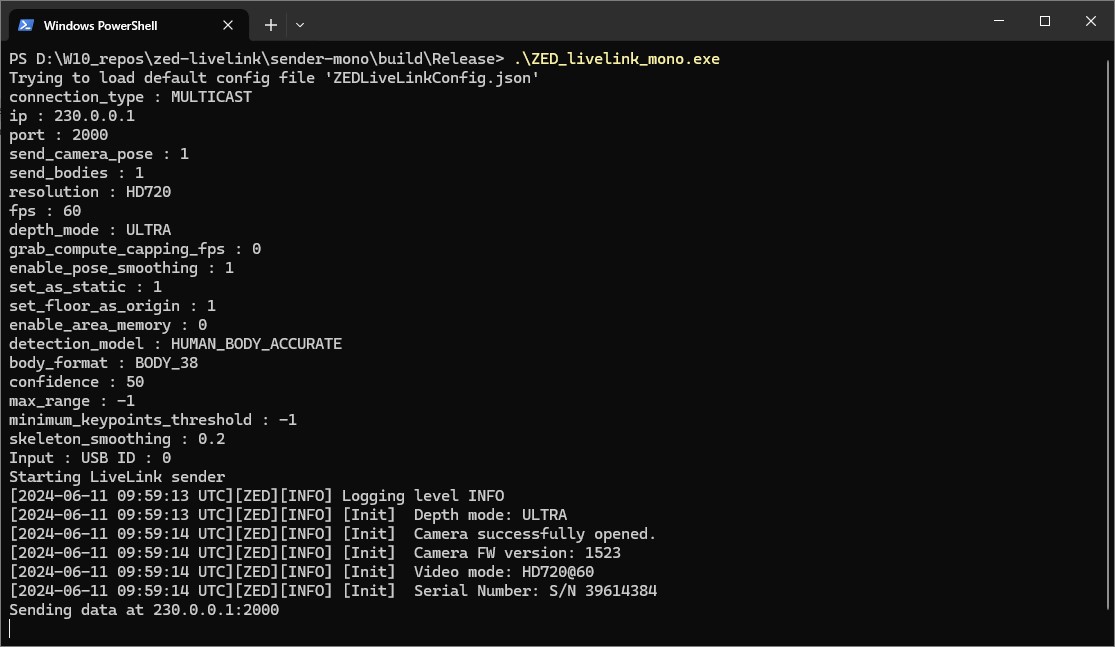
At this point, you must run the ZED Live Link executable. It will call the ZED SDK in order to compute skeleton data and stream it to the Unreal project. So you must make sure to have the ZED SDK installed on the machine that will run the ZED Live Link sample.
- First, download the latest version of the ZED SDK on stereolabs.com
- For more information, read the ZED Documentation and API documentation
A pre-built ZEDLiveLink sender for the current SDK version is located in zed-livelink repo/zed-livelink-fusion (or mono)/Releases/your system/.
To learn how to build the ZED Live link sample yourself, take a look at our Build ZED Live Link documentation page.
The release 4.0 of the ZED SDK introduced the Fusion API which allows you to fuse skeleton data from multiple cameras. This feature is also supported in the project. This project is now split into two different programs:
- zed-livelink-mono: the “classic” live link sample that sends camera tracking and skeleton tracking data from one single camera.
- zed-livelink-fusion: the new live link sample that sends fused skeleton data from one or multiple cameras.
You can now build and run the ZED Live Link senders like any other ZED SDK sample. It will call the ZED SDK to compute skeleton data and stream it to the Unreal project. You must make sure to have the ZED SDK installed on the machine that will run the ZED Live Link sender.
- Download the latest version of the ZED SDK on stereolabs.com
The release 4.0 of the ZED SDK introduced the Fusion API which allows you to fuse skeleton data from multiple cameras. This feature is also supported in the project. This project is now split into two different programs:
- zed-livelink-mono: the “classic” live link sample that sends camera tracking and skeleton tracking data from one single camera.
- zed-livelink-fusion: the new live link sample that sends fused skeleton data from one or multiple cameras.
Using the Live link sample with one camera #
- Open a terminal in the folder containing the ZED Live Link executable, and run
./ZED_livelink_mono
You can see the connection status and the parameters given in the config file in the terminal.
Adjust ZED SDK Parameters #
The ZED SDK parameters are now available in a JSON file next to the executable of the Live link sample. It allows you to change the parameters without rebuilding the sample.
The configuration file looks like this :
{
 "StreamingParameters":
 {
   "connection_type": "MULTICAST",
   "ip": "230.0.0.1",
   "port": 2000,
   "send_bodies": true,
   "send_camera_pose": true
 },
 "InitParameters":
 {
   "input": "USB_ID",
   "input_path": 0,
   "resolution": "HD720",
   "fps": 60,
   "depth_mode": "ULTRA",
     "grab_compute_capping_fps": 0
 },
 "PositionalTrackingParameters":
 {
   "set_as_static": true,
   "set_floor_as_origin": true,
   "enable_pose_smoothing" : true,
   "enable_area_memory": false
 },
 "BodyTrackingParameters":
 {
   "detection_model": "HUMAN_BODY_ACCURATE",
   "body_format": "BODY_38",
   "confidence": 50,
   "max_range": -1,
   "minimum_keypoints_threshold" : -1,
     "skeleton_smoothing": 0.2
 }
}
You can get more information about the role of most of the different parameters by taking a look at the API documentation. The StreamingParameters in this file are however specific to Live Link.
- connection_type: can be “UNICAST” or “MULTICAST”, depending on if you want to limit the streaming access. We recommend setting this to “MULTICAST” by default.
- ip and port: IP and port to stream on. These will need to be reported in Unreal when setting up the Live Link source.
- send_bodies: if the detected bodies should be sent through Live Link. You will likely want to leave this to true.
- send_camera_pose: if the camera pose should be sent through Live Link. This allows tracking the camera in your Unreal scene. You will likely want to leave this to true.
📌 Note: By default, the Live Link sample will try to open a JSON file called ZEDLiveLinkConfig.json next to the executable.
But you can also give the path to your config file as an argument when running the Live Link sample :
./ZED_livelink_mono path/to/config/file.json
Using the Live link sample with the Fusion API #
- Open a terminal in the folder containing the ZED Live Link executable, and run
./ZED_livelink_fusion
Adjust ZED SDK Parameters #
The ZED Live link sample requires a configuration file (JSON format) to run. This file contains all the parameters from the ZED SDK that can be modified in this sample. By default, the sample will try to open a JSON called “ZEDFusionLiveLinkConfig.json” located next to this executable.
The Fusion API requires a calibration file to be able to fuse the data from multiple cameras. This file can be generated using the ZED360 tool available with the ZED SDK. Once your calibration file is ready, in the ZEDFusionLivelink.json file, set the value of json_config_filename to the path to this calibration file.
The configuration file looks like this :
{
 "StreamingParameters":
 {
   "connection_type": "MULTICAST",
   "ip": "230.0.0.1",
   "port": 2000,
   "send_bodies": true,
   "send_camera_pose": true
 },
 "InitParameters":
 {
   "resolution": "HD720",
   "fps": 30,
   "depth_mode": "ULTRA",
     "grab_compute_capping_fps": 0
 },
 "BodyTrackingParameters":
 {
   "detection_model": "HUMAN_BODY_MEDIUM",
   "body_format": "BODY_38",
   "confidence": 50,
   "max_range": -1,
   "minimum_keypoints_threshold" : -1
 },
 "InitFusionParameters":
 {
   "json_config_filename": "/path/to/your/zed360/calib.json",
   "verbose": false
 },
 "BodyTrackingFusionParameters":
 {
   "skeleton_minimm_allowed_keypoints": 8,
   "skeleton_minimum_allowed_camera": -1,
   "skeleton_smoothing": 0.2
 }
}
You can get more information about the role of most of the different parameters by taking a look at the API documentation. The StreamingParameters in this file are however specific to Live Link.
- connection_type: can be “UNICAST” or “MULTICAST”, depending on if you want to limit the streaming access. We recommend setting this to “MULTICAST” by default.
- ip and port: IP and port to stream on. These will need to be reported in Unreal when setting up the Live Link source.
- send_bodies: if the detected bodies should be sent through Live Link. You will likely want to leave this to true.
- send_camera_pose: if the camera pose should be sent through Live Link. This allows tracking the camera in your Unreal scene. You will likely want to leave this to true.
📌 Note: By default, the Live Link sample will try to open a JSON file called ZEDFusionLiveLinkConfig.json next to the executable.
But you can also give the path to your config file as an argument when running the Live Link sample :
./ZED_livelink_fusion path/to/config/file.json
4. Connecting Live Link source to UE #
The “LivelinkMap” level no longer automatically connects to a source at Start. Now, you need to do it manually by selecting a Source in the Live link window.
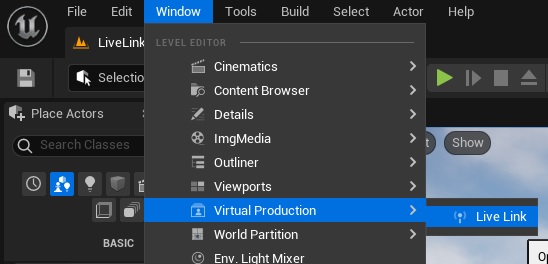
- Inside the UE5 Editor, from the Menu Bar under Window, select Live Link.
- In the Live Link window, click the Source button, then under Stereolabs Source, select your ZED source.

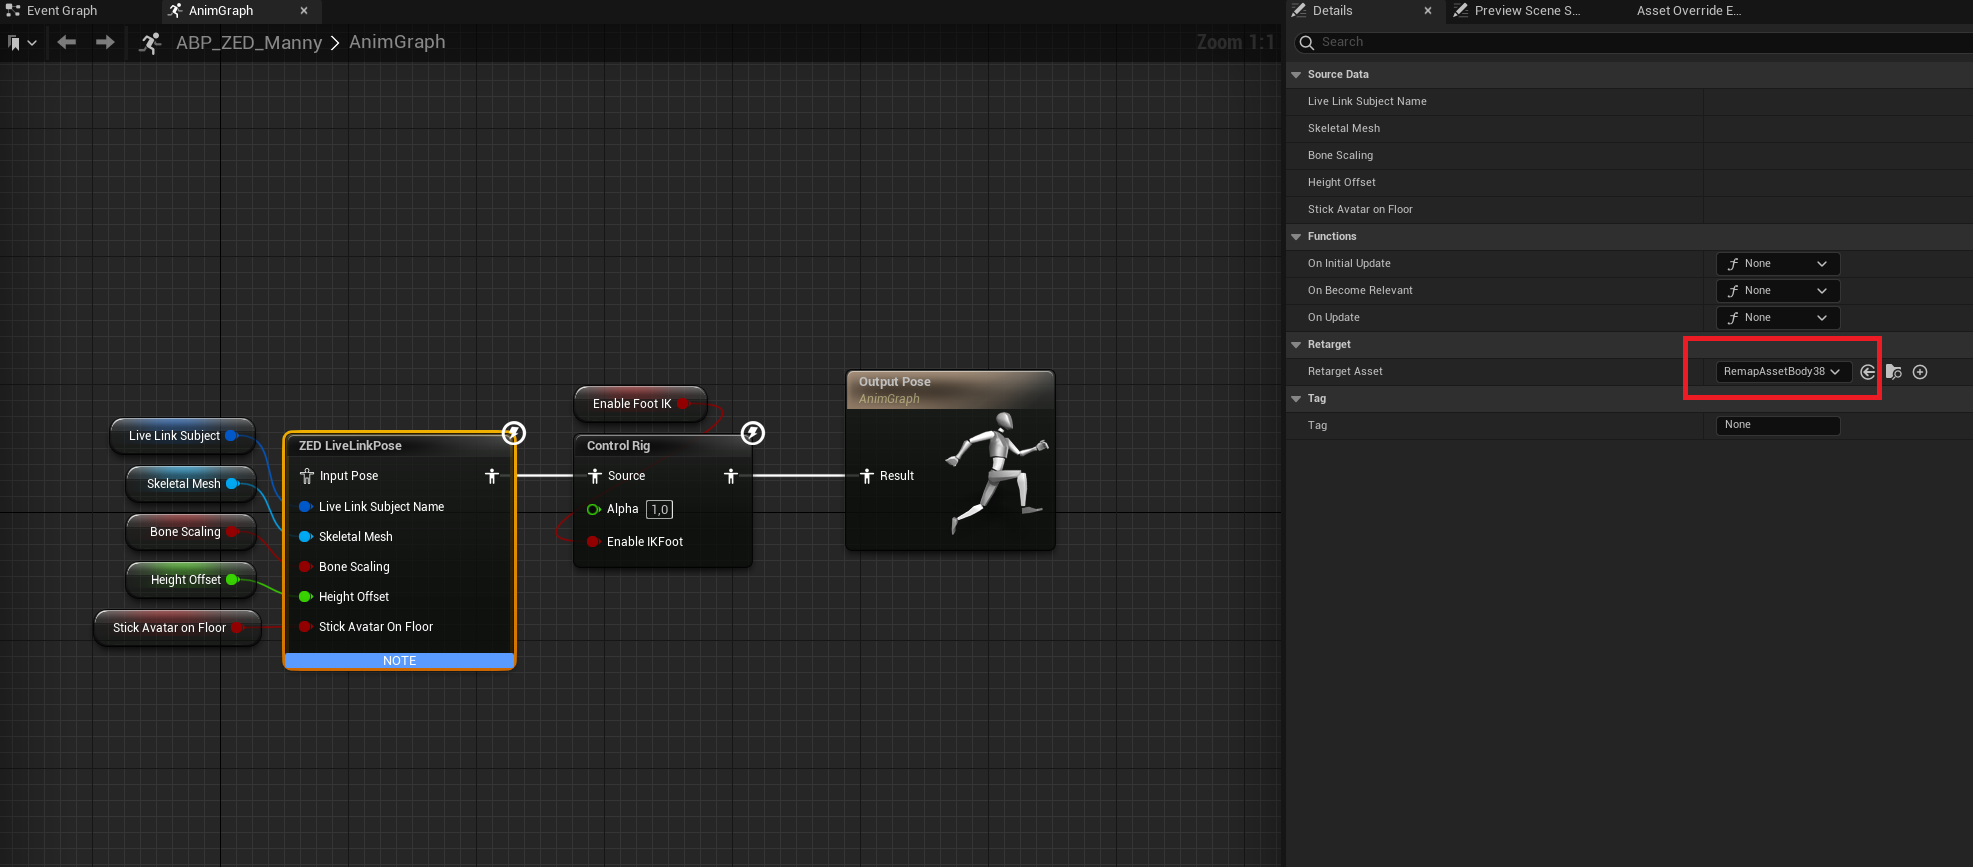
5. Select the remap asset #
The remap asset is now selected automatically. If you’re using a version before the 4.1, you may need to update it manually depending on if you’re using the Body 34 or Body 38 model.
Instructions for previous versions
The ZED SDK now has multiple skeleton formats (Body 34 and 38) available for animating a 3D model. You can find more information about the body formats available in the ZED SDK on the Body tracking page. You need to make sure the correct remap asset is selected in the Anim Blueprint of the Actor you are using in your level. Indeed, each body format has its own remap asset (as the name and number of joints are different). The remap asset must be set in the Anim blueprint, in the ZED Livelink pose component.
For example, if you are using the Body format Body_38, open the ABP_ZED_Manny anim blueprint, select the ZED LivelinkPose component, and, in the Detail panel, set the Remap Asset field to RemapAssetBody38
6. Hit Play in Unreal #
With the project you’re provided with, once the ZED Live Link sample is running, you can animate a default avatar by directly hitting Play in Unreal. To use other models, learn how to Animate New Avatar on the dedicated page. You will see avatars animated with skeleton data coming from the connected Live Link source:
Troubleshooting #
Your firewall might block the data stream. If you do not see the ZED Source in the Live Link window, try to disable it.
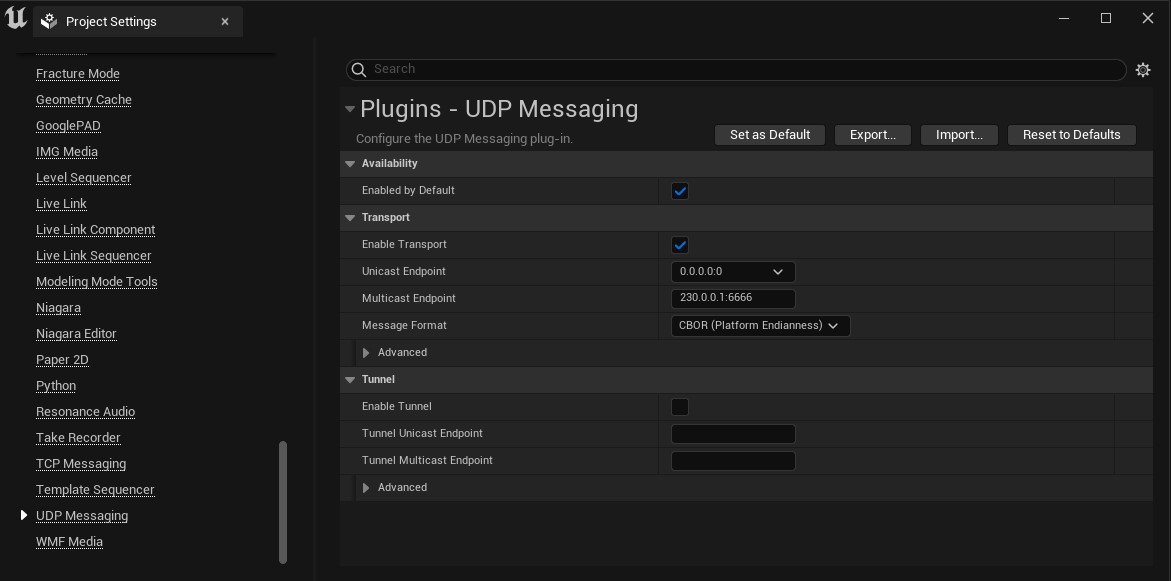
If the ZED Source is not yet detected in UnrealEngine, enable Enable by default in Edit -> Project Settings -> UDP Messaging -> Enable by default