
Animating New Avatars
The Unreal project we provide already contains avatars you can animate. This section will explain how to import a new avatar to make it work with our ZED Live Link sample. You can find various avatars on the Mixamo website for instance.
Quick and easy way: IK Retargeter #
Use the Unreal Engine Retargeting System to retarget our 3D avatar onto yours. The process is described in the Body Tracking section of the UE5 plugin.
This process will be sufficient in most cases. If you encounter errors or issues, you can try the “Advanced way” below.
Advanced way: Custom RemapAsset #
This method was necessary until the Unreal Engine team released advanced versions of their retargeting system. We recommend following the “Quick and easy way” described above, which makes use of it, but the following instructions are still valid if you want a specific remapping.
Unwrap instructions
ZED Live Link Skeleton Format #
Before explaining in detail how to animate a new avatar, it’s important to understand the format of the skeleton data sent by ZED Live Link.
Live Link works with the notion of Subject, which is an individual stream of data, typically describing a given individual character. For a given Live Link subject, at a given frame, we output a certain number of joints, depending on the body format selected.
You can find all the information about the different body formats available in the ZED SDK on the Body Tracking page.
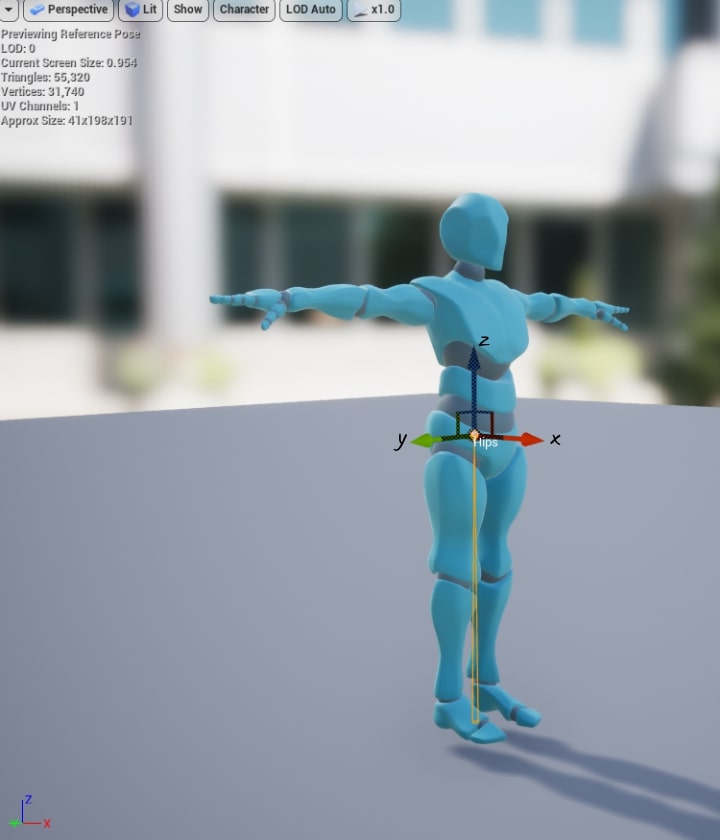
All these joint data are expressed in the Unreal Engine coordinate frame, which is LEFT_HANDED_Z_UP. Each joint orientation will be expressed in the same coordinate frame you can see here for the avatar’s hips:
- To animate a new avatar in the provided Unreal project, follow these steps:
1. Importing a New Avatar #
For now, our plugin allows animating correctly an avatar if it is imported in the right format. We need the avatar to respect two conditions:
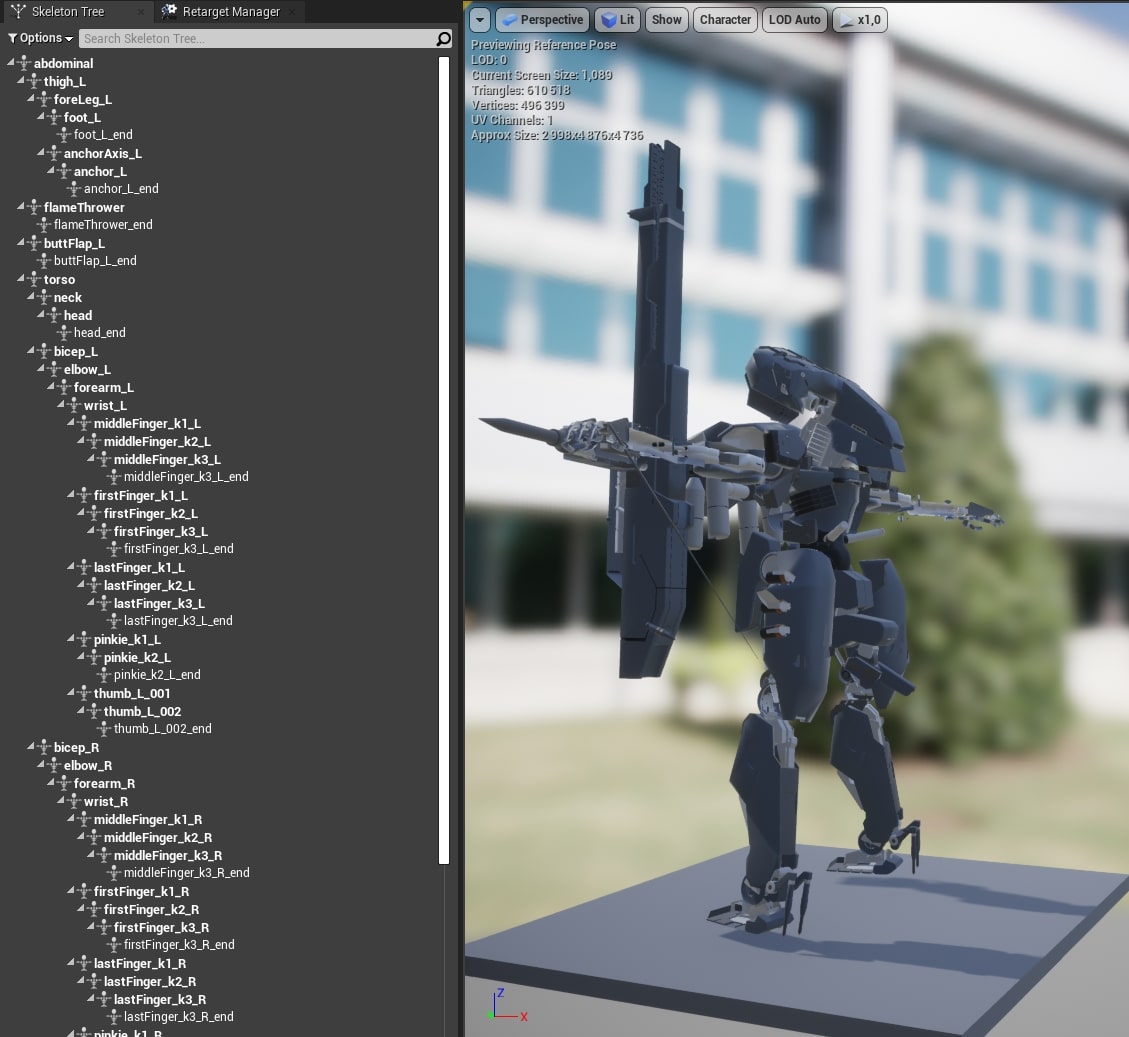
The first condition is on the avatar’s reference pose. The reference pose is the default pose of the avatar you can see when you open the skeleton asset window. We need this reference pose to be in T-Pose, which corresponds to the pose where the avatar is standing up with its arms held horizontally.
The second condition is on the avatar’s global orientation when imported. We want to start from a known orientation, so we need the avatar to be facing the +X direction in its reference pose.
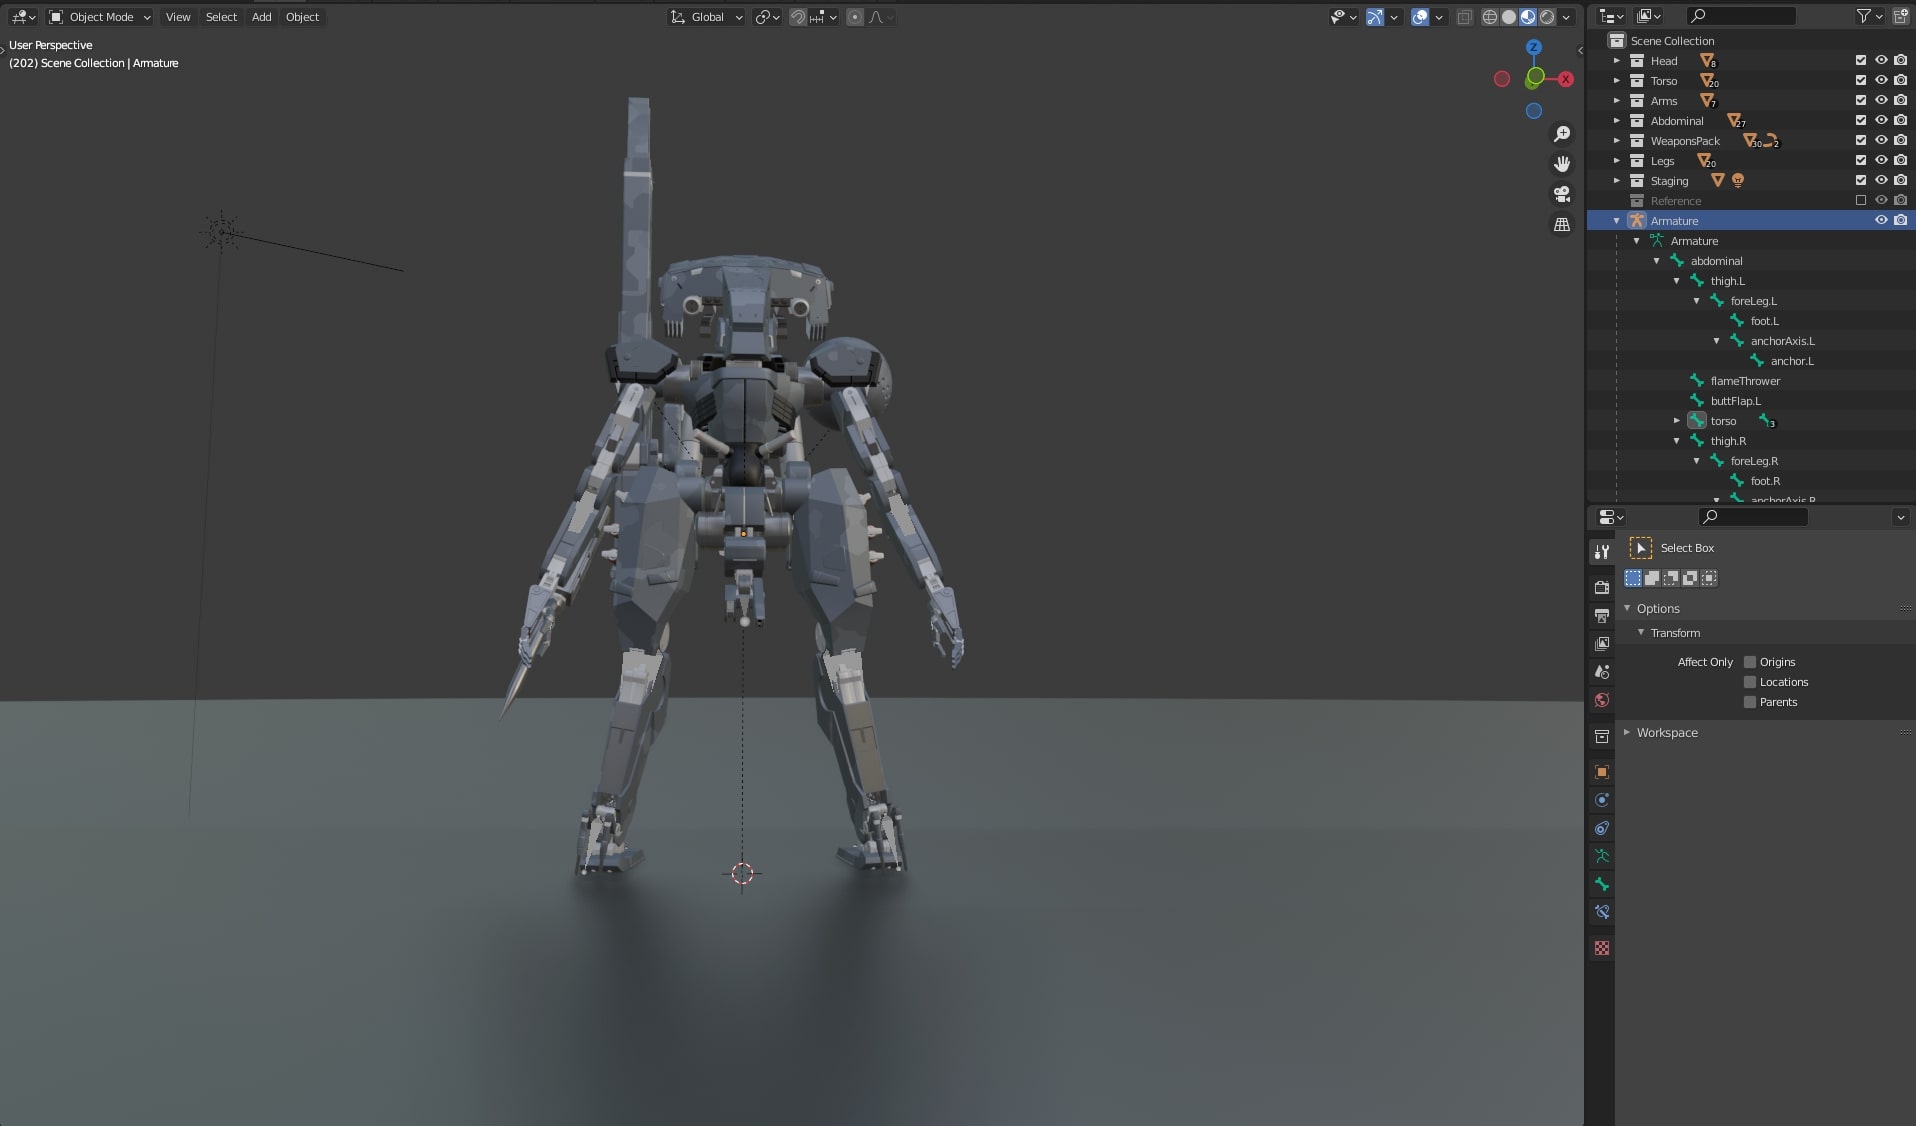
To respect the first condition, you might need to change your avatar’s reference pose if it isn’t already a T-Pose. You can change its reference pose using Blender, for instance. Let’s take the example of this robot avatar, that initially has an “A-Pose”:
You can change its reference pose this way:
- Select the Armature of your avatar in the Scene Collection and select the Pose Mode this way:
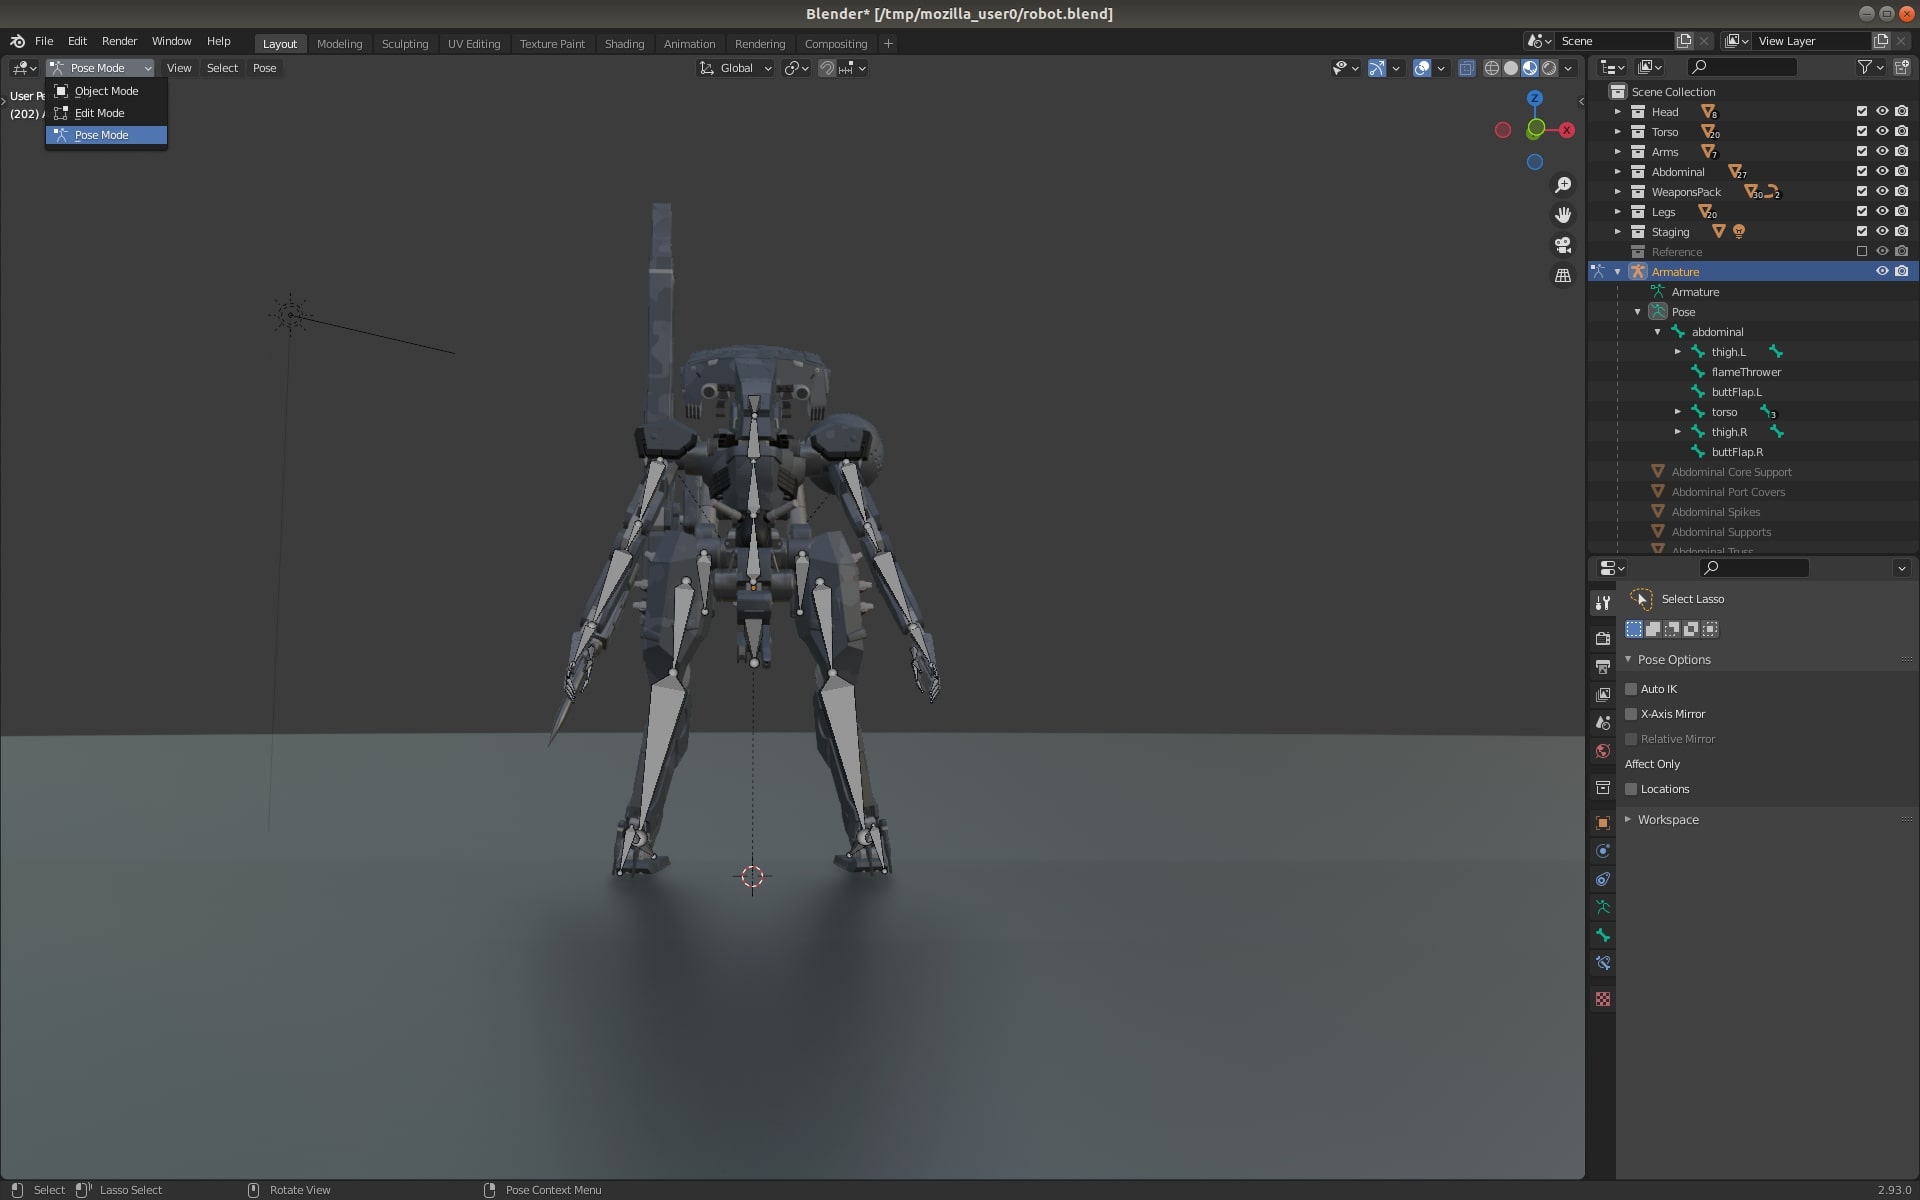
- For each bone that needs to be rotated, click on it and go to Pose/Transform/Rotate:

Once you did all the necessary rotations and your avatar appears in T-Pose, you can define it as the new reference pose (which is called Rest Pose in Blender). Go to Pose/Apply and select Apply Pose as Rest Pose:

You can then export your avatar as an FBX object and its reference pose will be the T-Pose you defined.
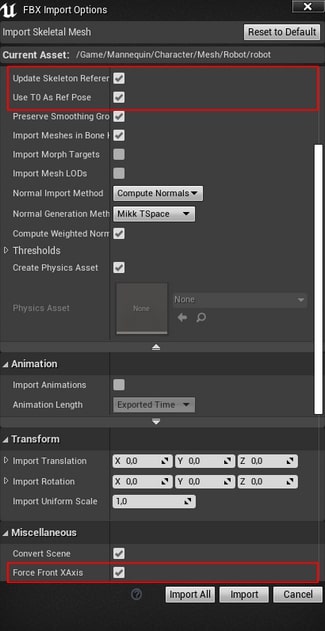
When you import your avatar in Unreal, you’ll have to tick the checkboxes Update Skeleton Reference Pose and Use T0 As Ref Pose to make sure the avatar’s reference pose in Unreal is the one you just defined in Blender.
Moreover, in order to meet the second condition, you’ll have to tick the checkbox Force Front XAxis to force the avatar to look in the +X direction. This way we make sure the avatar starts with a known orientation.
Make sure, by checking the avatar skeleton asset, that its reference pose is in T-Pose, and is looking in the +X direction. This should look like this:
2. Creating a Remap Asset #
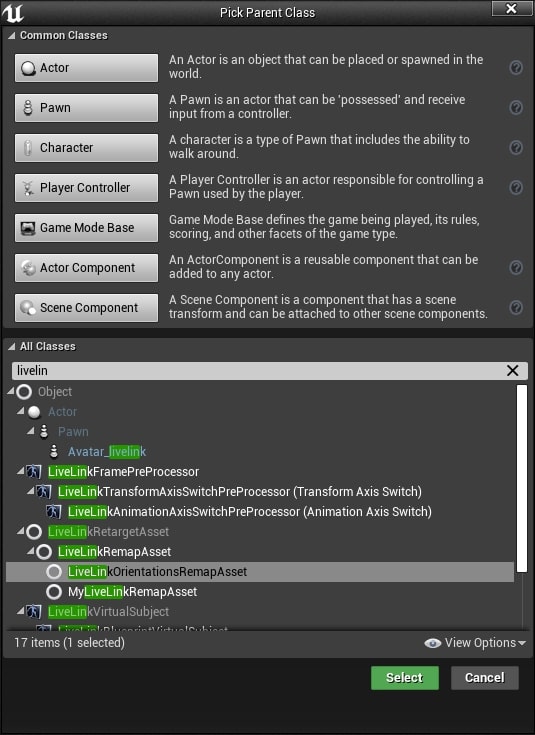
Once you have imported the avatar, the next thing to do is to create a Remap Asset. Indeed, your avatar joints probably don’t have the same name as the one given by our plugin. It’s for example the case with the Mixamo avatars we used in the Unreal project we provide. Live Link gives the possibility to remap these bone names. Create a new Blueprint class, whose parent class must be LiveLinkOrientationsRemapAsset.
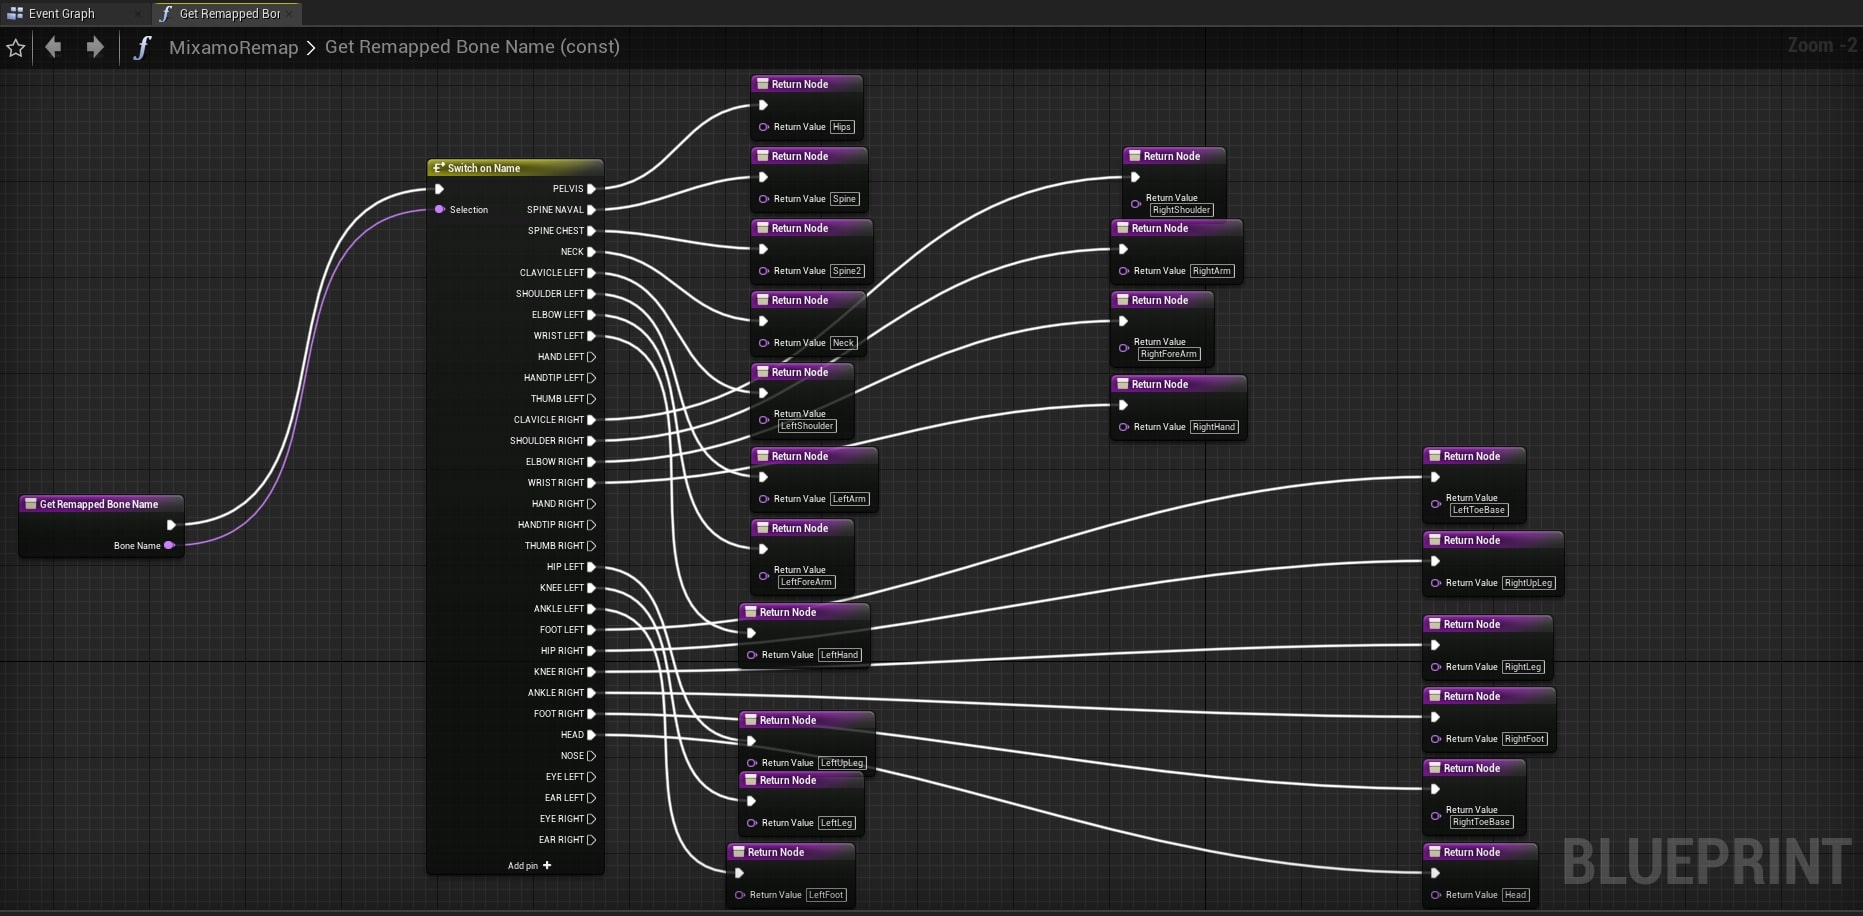
Open this blueprint class and override the function “GetRemappedBoneNames”. There you must do a similar remapping to the picture below, where bones explained in the first section must be mapped to their name in your imported avatar. The bone names in the “Switch on Name” node correspond to the bone names given by our Live Link plugin, and the bone names in the “Return Node” nodes correspond to your imported avatar bone names. The Unreal project we provided you has an example of such a Remap Asset useable for Mixamo avatars, called MixamoRemap.
3. Creating an Animation Blueprint #
Data from Live Link can be applied directly inside Animation Blueprints.
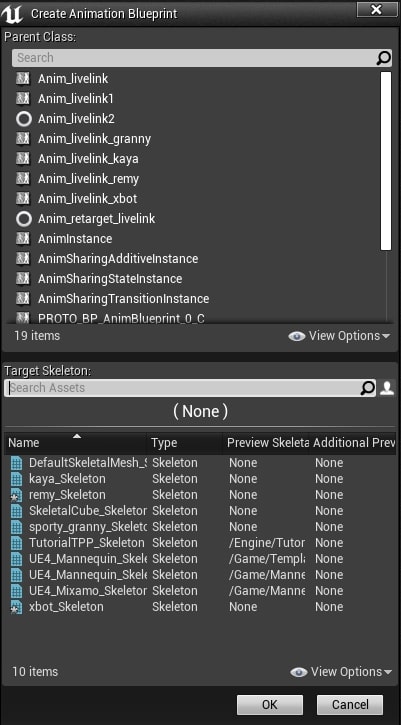
When creating an Animation Blueprint, a dialog box will allow you to select its “Target Skeleton”. Choose the skeleton created when you imported your avatar.
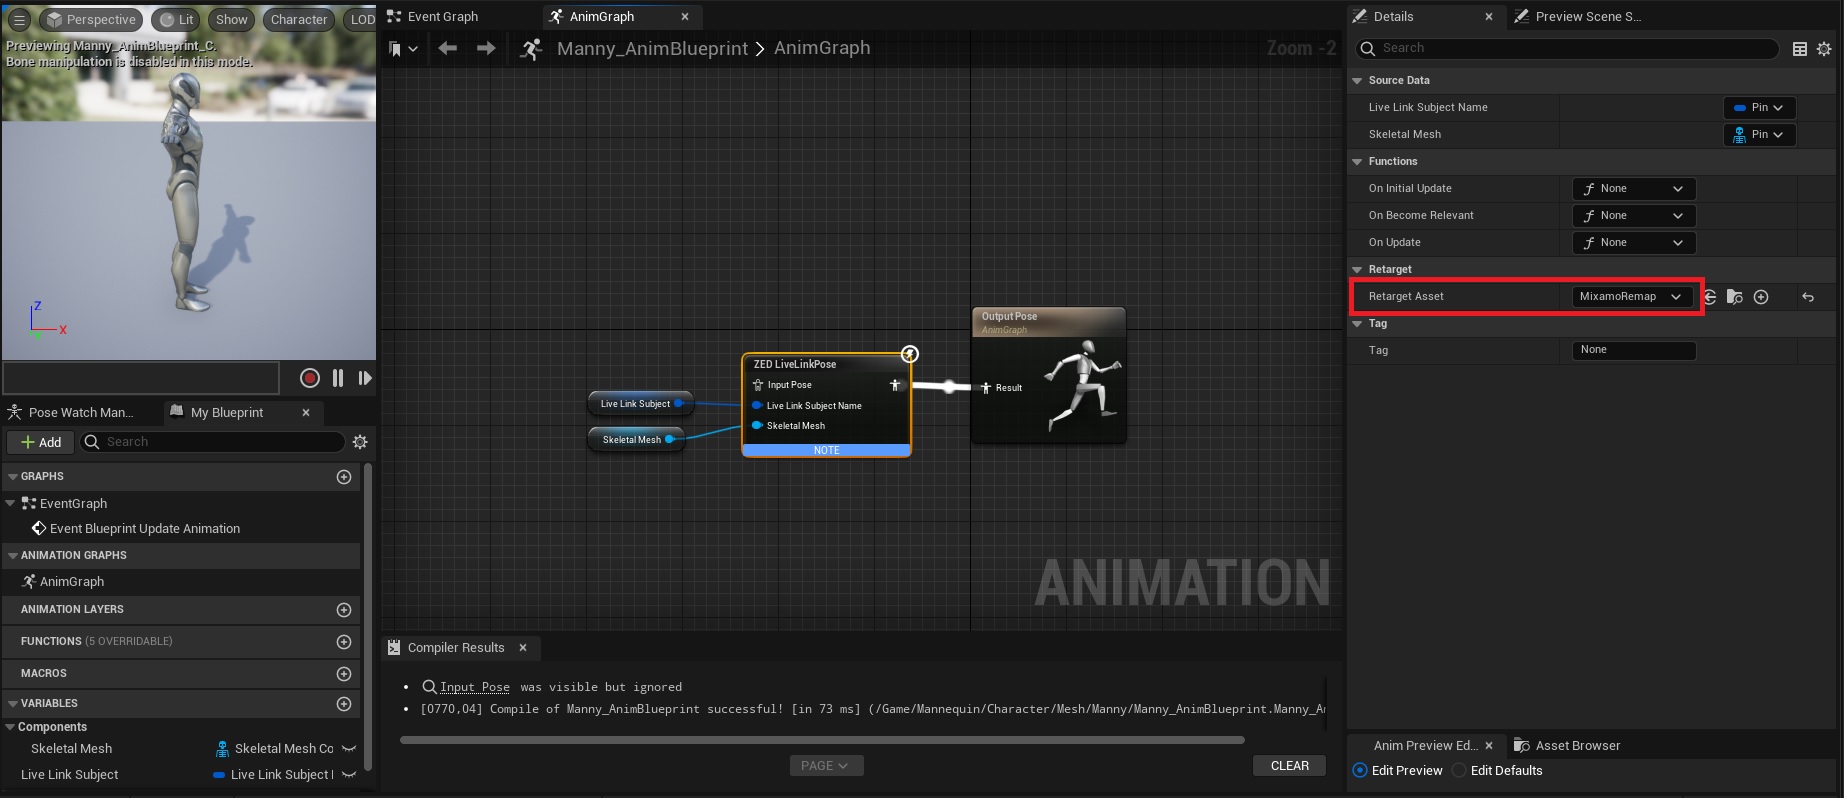
This is achieved by creating a Live Link Pose node inside the AnimGraph of an Animation Blueprint:
- Create a variable Live Link Subject and a variable Skeletal Mesh and put them in the AnimGraph. It refers to the name of the subject in Live Link to stream data from. In case several persons are detected, this variable will feed the right skeleton data to the right avatar. The Skeletal Mesh variable will be used to apply an offset to the avatar to make it stick on the ground as much as possible.
- Link it to a Live Link Pose node, which will get the actual skeleton data from our Live Link Subject.
- Link this node to the Output Pose, this way the Live Link skeleton data will directly animate our avatar.
In the “Details” menu of the Live Link Pose node, you can select a retarget asset. This is where you must select the Remap Asset you created in the previous step, to remap correctly the Live Link skeleton data to your avatar bone names.
The AnimGraph should look like this:
You can refer to the existing Animation Blueprints in the Unreal project to configure yours the same way.
4. Configuring “Avatar_livelink” asset #
Next, you must select the “Avatar_livelink” asset already provided in the Unreal Project. The role of this asset is to define which avatar will be animated in the Unreal scene. In the “Skeletal Mesh” details menu, you must select the Skeletal Mesh you imported and want to use, and the Anim Class linked to this mesh that you previously created.
The Live Link Skeletal Animation component has been added to this Actor to drive its parameters with Live Link from a connected external source.
![]()
5. Configuring project level blueprint #
Once the “Avatar_livelink” is set, the last step is to open the Level Blueprint of the project. This Level Blueprint automatically connects the project to the Live Link Source at Play, and an Avatar_livelink Actor is instantiated for each skeleton sent by the Live Link plugin, to be rendered on the Unreal scene.
At the right side of the EventGraph, you will notice two nodes “Cast To Anim_livelink” and “SET Live Link Subject”.
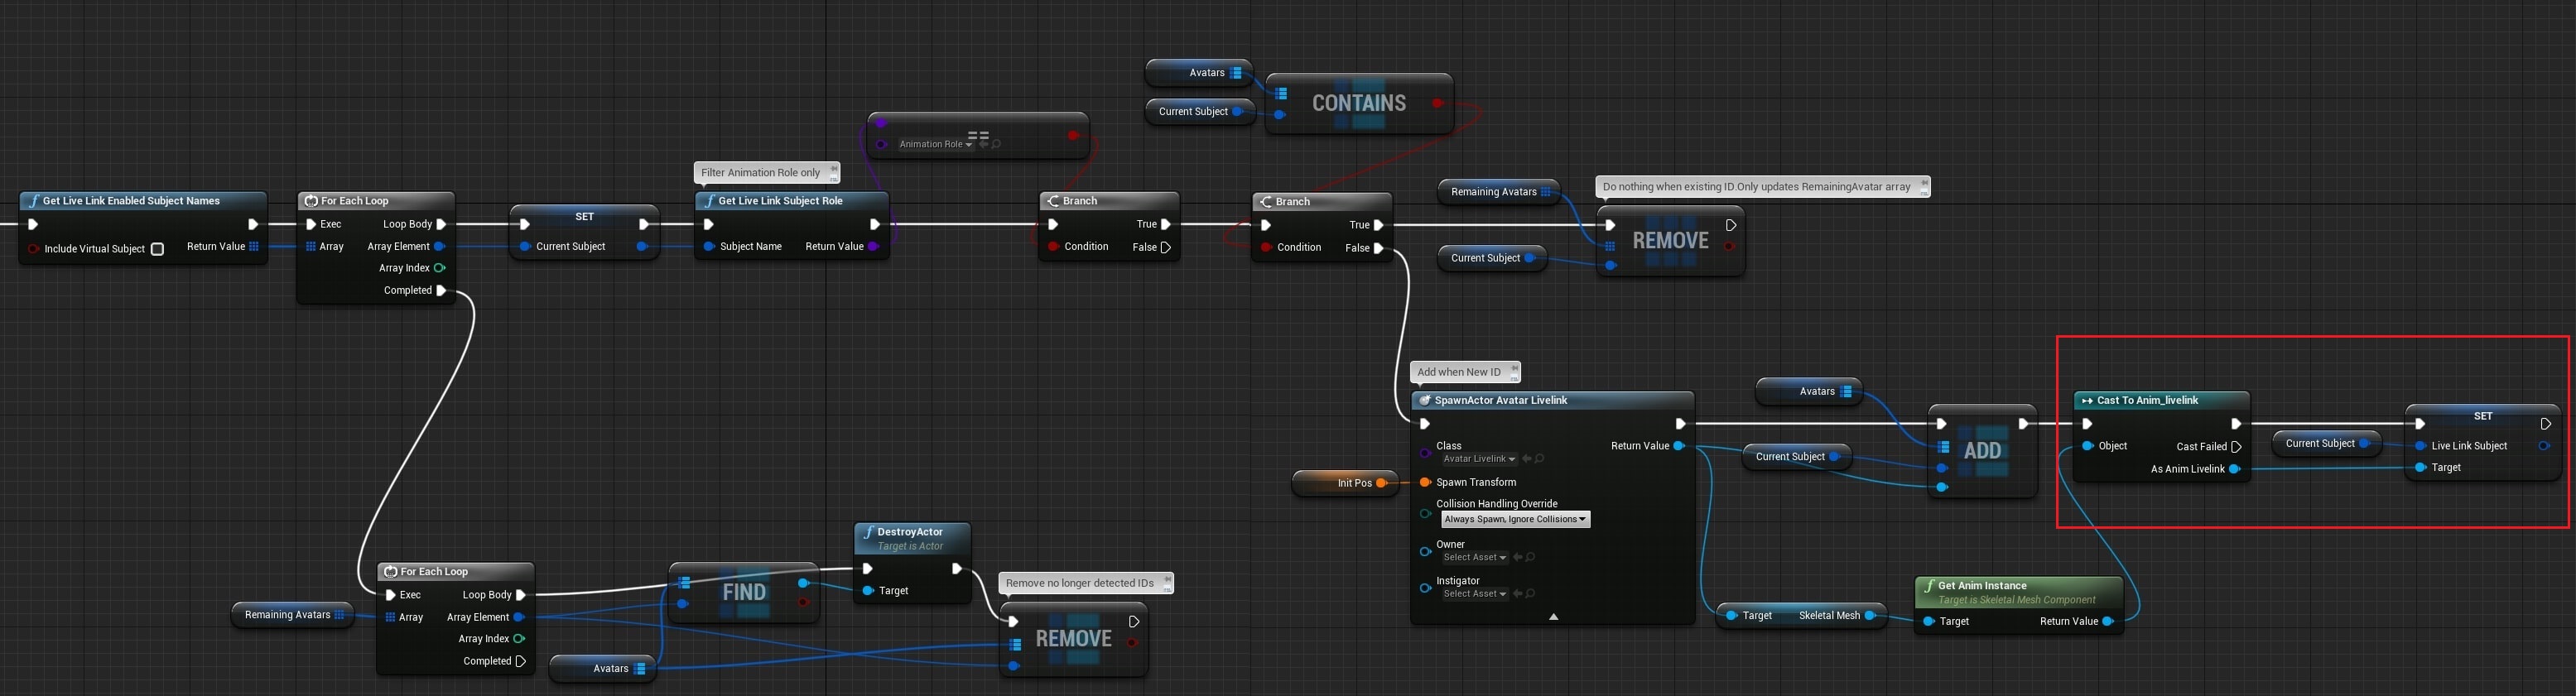
The idea is to replace these nodes with a cast to the Animation Blueprint you created for your avatar. Remove the two current nodes (or suppress their links to the rest of the graph), and create a cast to your Animation Blueprint, as well as a set to its “Live Link Subject” variable. Reproduce the same connections set before with your Animation Blueprint.
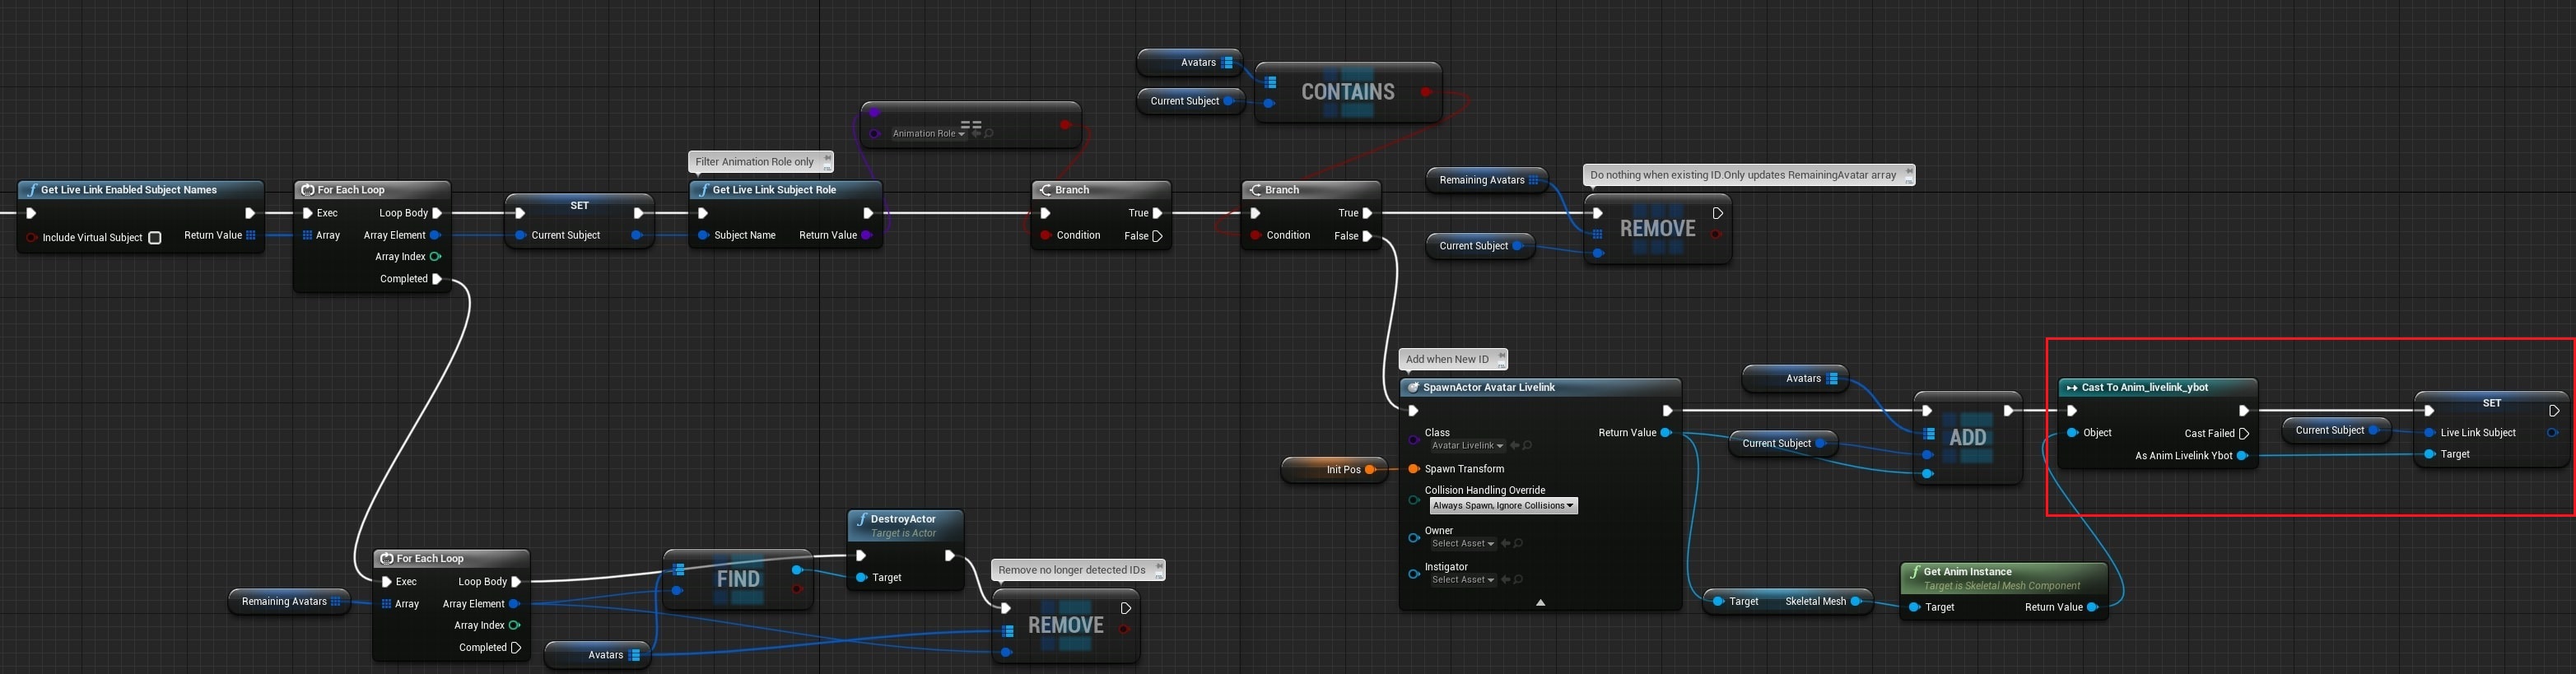
Once done, you’re ready to press play and see your avatar animated with Live Link data.